Typically, the ideal time to observe the Milky Way is during the Milky Way season, which spans from February to October. This timeframe is usually between midnight and 5:00 AM, particularly on nights when there is a new moon. However, the specific timing can vary depending on various factors such as the hemisphere, your latitude, and the moon’s phase.
Where can you find the Milky Way in the night sky?
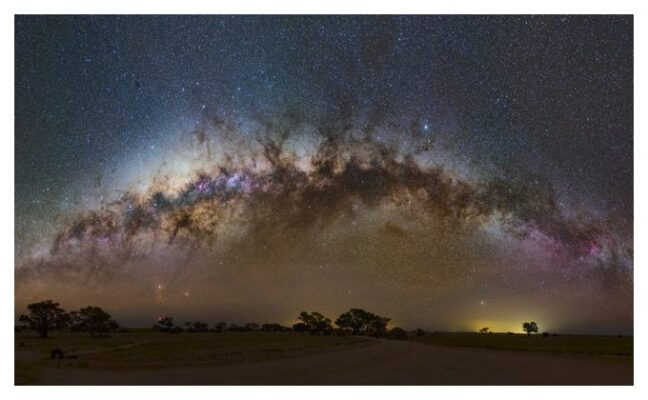
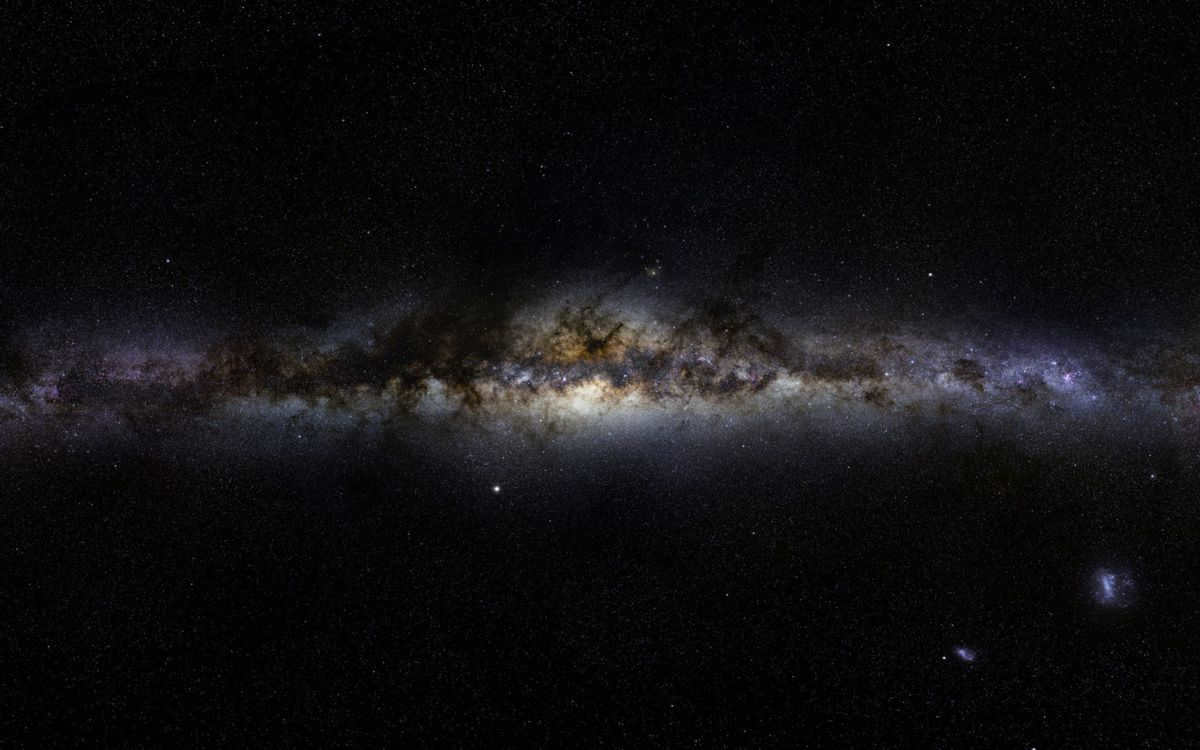
When observed from Earth, the visible portion of the Milky Way’s galactic plane occupies a region of the sky that encompasses 30 constellations. The brightest section of the Milky Way can be found in the direction of Sagittarius, which is also where the galactic center is located.
What is the ideal time to witness the beauty of the Milky Way?
Big Sur is a magnificent and mountainous region on the Central Coast of California, located between Carmel Highlands and San Simeon. This area is known for its stunning landscapes and is frequently admired for its awe-inspiring natural beauty.
Can we see the Milky Way every night?
Once upon a time, the Milky Way could be observed on any clear, moonless night regardless of location. However, modern-day living has led to a situation where the majority of individuals reside in areas where the Milky Way is no longer visible due to extensive light pollution resulting from the constant illumination of lights throughout the night.
For further information, check out:

This guide will discuss my personal approach to capturing photos of the night sky and provide some valuable tips that I believe are crucial. We are all captivated by the mesmerizing beauty of the starry sky, especially when the Milky Way is clearly visible, and we all strive to capture this beauty in our photographs. So, how can we achieve this?
You can easily learn the technique I employ for photographing the starry sky. If you’re interested in post-processing methods, I recommend checking out Michael Shainbloom’s tutorials and reading this article.
Initially, capturing photos of stars may seem extremely challenging, but in reality, it is easier than you may think. When I first attempted astrophotography, the starlight appeared faint and almost unrecognizable in my pictures. However, after several months of practice and countless shots, I have successfully captured the magnificent radiance of the stars in my images. Now, I am eager to share my knowledge and experience with you. However, there is one caveat: many of you may reside in areas where the starry sky is obscured by cloud cover, light pollution, or smog. In such cases, it is advisable to find a location with more favorable shooting conditions. To capture stunning starry images, you will need a stable tripod, a wide-angle lens, a camera capable of manual mode, and, of course, a dash of creativity.
Capturing the Beauty of the Milky Way
Let’s begin this tutorial by addressing a commonly asked question: How can one locate the Milky Way in the vast expanse of the night sky? Unfortunately, the answer may not meet everyone’s expectations, as attempting to photograph the Milky Way without being able to spot it directly with the naked eye is often futile.
What you’ll need:
- A moonless night. It’s important to check the moon phase before planning a shoot. If the moonlight is too bright, it will hinder capturing the full beauty of the Milky Way.
- A location with minimal light pollution. I recommend using Google and NASA Blue Marble Navigator’s Dark Skies Map to find a suitable spot.
- A sturdy and tall tripod. I personally use a 72″ tripod from Really Right Stuff, which is perfect for this kind of photography.
- A camera with manual mode capability.
Here are some additional things that can greatly enhance the quality of your astrophotography:
- A timer or intervalometer. This is especially useful for exposures longer than 30 seconds.
- An extremely speedy, or in simpler terms, fast, wide-angle lens (allowing for a low f value). This type of lens enables you to capture as much light as possible in the shortest duration.
- When shooting, I prefer to use either the Nikkor 14-24mm f/2.8G or the Nikkor 16mm f/2.8 Fisheye. Both of these lenses have a wide aperture of f/2.8, making them exceptionally “fast”. However, there are other lenses that can also work well.
Now, let me share a few phone programs and apps that I personally find extremely useful and frequently use when planning star photography.
- PhotoPills (only available for iPhone). I have been using this app for approximately two months now, and it has become an essential tool for me. It offers a wide range of features, which you can explore by following the link provided.
- The Star Walk Astronomy Guide app is an unparalleled tool for exploring the night sky. By simply pointing your phone towards the sky, you can instantly see the planets, constellations, and other celestial objects that are currently above you. Additionally, this app can help you find the perfect spot for observing the majestic Milky Way.
- When it comes to capturing breathtaking sunset or sunrise photographs, The Photographers Ephemeris app (available for both Android and iPhone) is my go-to tool. It provides essential information such as moon phase, rise and set times, and brightness, which are crucial for photographing the night sky.
- Stellarium is a fantastic program that offers a wealth of knowledge about space, stars, and planets. Whether you choose to download it onto your computer or install the Android app, Stellarium is a must-have resource for any astronomy enthusiast.
Stargazing and the Rule of 500
What is the ideal shutter speed for capturing the night sky?
Many photographers swear by the 600 rule, but in my opinion, the 500 rule offers better results and serves as a solid starting point for capturing stunning starry photos. To determine the maximum shutter speed that will maintain sharp stars without any trailing blur, simply divide 500 by the focal length of your chosen lens.
If you set your shutter speed faster than the calculated maximum, you may encounter unwanted blurring. However, it’s important to remember that the calculated value is just a starting point – don’t be afraid to experiment and adjust accordingly.
If your starry photos show trails instead of sharp points of light, try reducing the shutter speed by a few seconds. On the other hand, if the stars appear dim, consider increasing the shutter speed.
Mastering the art of photography requires practice and a deep understanding of how your camera operates within the given guidelines.
To simplify the process, I have compiled a table below with pre-calculated shutter speeds that will assist you in your preparations.
If you are using a partial-frame camera, it is important to take note. The table includes the most common sensor sizes and their respective maximum shutter speeds.
Focal Length – Focal length; Sensor Size, Full Frame (35 mm) – Sensor Size, Full Frame (35 mm); Crop Sensor 11.5X, 1.6X (mm) – Crop Sensor 11.5X, 1.6X (mm); Max Exp. Length (seconds) – Max Exp. Length (seconds)
My Gear: What I Utilize
Below, I will enumerate the methods and configurations that I personally employ. However, it is important to note that utilizing a distinct camera or lens will not necessarily result in inferior image quality.
- Camera:
Nikon D800 - Lenses:
Nikkor14-24mm f/2.8G
Nikkor 16mm f/2.8 Fisheye - Tripods:
BH-55 LR Ballhead
TVC-34L Versa Series 3 Tripod
BD800-L: L-Plate for Nikon D800/800E
Some useful tips for capturing stunning images of the night sky
- If you find that the stars are not appearing bright enough in your test shot, try using the 500 rule mentioned above to determine the optimal shutter speed. If increasing the shutter speed doesn’t make the stars brighter, you can then consider raising the ISO setting. However, be cautious not to sacrifice image quality by relying too heavily on higher ISO values. You can also experiment with the Rule of 500 instead of the Rule of 600 mentioned earlier.
- If your camera has a built-in level, make sure to activate it and utilize it for better alignment.
- While capturing photos, it’s important to occasionally step back from the viewfinder and search for truly captivating scenes.
- Keep in mind the concept of the Golden Ratio and apply it when composing your shot for more visually appealing results.
Camera configurations
Mode: Manual
Format: RAW
Exposure Metering Mode: Personally, I prefer to use Matrix Metering (Exposure Metering) on my 800. The brand’s cameras also offer this mode, but it is referred to as Evaluative Metering. To conduct an experiment, I tested all the exposure metering modes while capturing starry skies, and Matrix Metering proved to be the most successful.
White Balance: I manually set the white balance to achieve the most natural-looking sky possible. It usually requires some trial and error to obtain good results.
Focal length: I typically shoot with a focal length ranging from 14-31mm, with a preference for 14mm or a fisheye lens with a focal length of 16mm.
Focusing: When it comes to focusing, I usually set my focus to infinity. It’s a good idea to take a few test shots first and adjust the focus based on the results. If you want to capture an object in the foreground, I recommend taking two photos: one with the object in focus and another with the stars in focus. These photos can then be combined to create a sharp shot.
Aperture: For aperture settings, I typically choose f/2.8 or the smallest available aperture number on my camera. I find that shooting in the f/2.8 to f/4 range works best for me.
Shutter speed: My standard shutter speed is 30 seconds. However, there are times when I extend it to 50 seconds to capture more distant and less bright stars. The longer the shutter speed, the more light the camera absorbs, allowing us to see objects that are farther away from our planet more clearly.
Final recommendations
Experiment with the three main elements: aperture, shutter speed, and ISO, until you achieve the desired results. Even the slightest adjustment in each component can have a significant impact on the outcome.
A guide to capturing star trails
When capturing star trail images, you may not need to focus as much on the precise calculations required for shooting the Milky Way. However, a few useful tips and an understanding of the Rule of 500, which was mentioned earlier, would still be beneficial.
Keep in mind that some of the tips mentioned below have already been discussed in the previous guide, as they are relevant to both types of photography.
What you will require:
- It is possible to take photos on any night, but the most crucial factor is having a clear sky. Personally, I prefer capturing star tracks when the moon provides ample illumination, as this allows me to keep the ISO below 1000 and avoid noise in my images.
- A stable and tall tripod is essential for this type of photography. I rely on a 72″ Really Right Stuff tripod, which offers the perfect height for me to monitor the camera screen while shooting.
- A camera with manual mode capability is a must-have for this kind of photography.
- A timer or intervalometer is also crucial, especially when shooting at shutter speeds longer than 30 seconds.
- While not necessary, the PhotoPills app can be quite helpful. It can assist in calculating the appropriate shutter speed for capturing star tracks and provide information about moon phases.
- When it comes to capturing star track photos, it is ideal to use fast lenses. For this particular genre of night photography, I suggest adjusting the aperture to approximately f/4, although personally, I tend to shoot within the f/1.4 – f/2.8 range.
- Ensure that your battery is fully charged before embarking on a night photography session. Since you will be shooting continuously for several hours, it is wise to bring along a few spare batteries as well.
Guidelines for capturing shooting star trails
Make sure to acquaint yourself with the Rule of 500 I mentioned earlier. Without understanding and mastering this simple guideline, capturing stunning star trail images will be more challenging.
My Choice of Equipment
I won’t go into detail about all the equipment I use since I already covered that in the previous lesson. Feel free to revisit it if needed.
It’s worth noting that you don’t necessarily need a wide-angle lens for star trail photography. I captured the trails using various lenses, and I must say, all the photos turned out great, despite the differences caused by the crop factor.
Settings for the camera
When it comes to capturing star tracks, my preferred method is using multiple exposures. Each exposure captures a small section of the star’s trail. The camera settings remain constant, and the only change is the position of the stars in the sky. Afterward, I combine all the photos in Photoshop to create a single, long trail for each star. I prefer this method because it allows me to keep the ISO value and exposure time (approximately 15-45 seconds) low.
Note: It is possible to capture star tracks by using a single, long shutter speed. However, in my opinion, this method significantly reduces the photo quality, although in favorable conditions, you can still achieve acceptable results. By learning the technique described below, you will be able to calculate your own exposure time.
Focus: In general, I typically set the focus to infinity. If you want to capture an object in the foreground, I recommend taking two separate photos: one with the object in focus and another one capturing the stars. Afterwards, you can combine these photos in Photoshop to achieve a sharp shot.
Aperture: When it comes to star track photography, I usually set the aperture to f/2.8 (or somewhere in the f/2.8 to f/4 range).
Shutter speed: My standard shutter speed is 30 seconds. Occasionally, I also take photos at 50 seconds to capture more distant and less bright stars. The longer the shutter speed, the more light the camera captures, allowing us to see objects that are further away from our planet.
Tip: I often add a few extra seconds to the shutter speed calculated using the Rule of 500.
ISO: Because I often take photos in low light conditions, I may not be able to use high ISO settings. Begin shooting with an ISO of 300 and adjust the value as necessary. Remember, you don’t need long exposures since the photos will be combined later in Photoshop, as mentioned earlier.
Tip: Only increase the ISO as a last resort; if the photos are not bright enough, you can always increase the shutter speed.
Duration of Shooting/Number of Shots
The PhotoPills application can assist you in determining the necessary shooting time for capturing star trails of various lengths. Keep in mind that the larger the portion of the sky in the overall composition of the photograph, the more time will be required to capture the image. However, if you have a few hours to spare, you can relax, enjoy a cup of coffee and a meal, and calmly set the desired number of frames, delay, and patiently wait.
Configuring the timer
It is strongly advised to utilize a timer to automate the process, otherwise you will need to manually press the shutter button for extended periods of time. Certain cameras come equipped with a built-in timer.
After determining the duration needed to capture star tracks of the desired length, it becomes essential to set up the timer. I suggest shooting at intervals of 1 second or less, if feasible on your camera. This frequency is crucial to prevent any gaps between star tracks during the post-processing stage in Photoshop.
I will now provide a brief overview of the post-processing procedure in Photoshop.
- Import all of your captured photographs into a RAW converter program such as Lightroom or Adobe Camera RAW.
- Select one photo from the entire series and make adjustments to your liking using features like White Balance, Light, Shadow, etc. Edit the picture to reflect how you want it to appear after the post-processing is complete. Next, synchronize these adjustments with all the photos you have taken. This can be easily done using the Sync option in Lightroom.
- Export all the photos in your desired format. I recommend using the JPEG format since you will have around 100 photos, and working with formats like TIFF requires a fast computer with a large amount of RAM.
- Open all the images in Photoshop as layers within a single file. I accomplish this by using Adobe Bridge and selecting the “Load Files into Photoshop as Layers” feature.
- Choose all layers except the bottom layer and modify the blending mode to Lighten.
- Finished. You should now have a photo in front of you with connected star tracks forming beautiful traces of the stars’ trajectory.
A few last thoughts
Perhaps the most challenging aspect of creating a star track photograph is achieving the right exposure length. If you don’t take enough shots, the star trails may not appear long enough in the final image. Thus, it’s better to take more shots and not worry about overdoing it. It’s also crucial to strike a balance between aperture and shutter speed.
Space, in comparison to humans, operates on an entirely different temporal scale. This is why numerous individuals hold the belief that our Milky Way galaxy remains unchanged during the limited time we have on Earth, deeming it impossible to observe any of its alterations. It is important to bear in mind that the constellations we currently perceive were documented and depicted by our distant ancestors, and have remained unchanged for thousands of years. However, the Milky Way is highly dynamic, constantly undergoing transformations. Even within the span of a human lifetime – let’s say, for instance, a century – it will have experienced changes that many individuals will find unexpected.
Expansion
Initially, there will be a growth, and it will be quite significant. Recently, a research team released a study asserting that spiral galaxies, including our own Milky Way, are expanding at a rate of approximately 500 meters per second. This is twice as fast as the speed of a jet plane! If this applies to our galaxy, it means that it will enlarge by around one and a half billion kilometers over the course of a century. This information is not just a random statistical fact, but rather a valuable insight into the evolution of galaxies. The concept of galaxies growing in size is not entirely unexpected. Astronomers have long known that smaller galaxies are sometimes absorbed by larger ones. However, the aforementioned study revealed that this is not the sole method by which these already immense cosmic entities are increasing in size.
The emergence of new stars
Expansion can also occur through the birth of new stars, even in unexpected locations. In the same research, scientists observed two spiral galaxies that resemble our own. By calculating the movement of stars at the edges of these galaxies, they discovered that the growth is also attributed to the emergence of new stars in the “backyard”. Although computer simulations predicted these processes, it was nearly impossible to confirm these modeling conclusions by studying the Milky Way itself, as we are located within it. However, examining other galaxies made this task much easier. Regardless, this study has challenged the existing belief that star formation primarily occurs in the central regions of galaxies.
During its current phase, the Milky Way galaxy experiences a low rate of star production, with only one or two stars being formed annually. However, this means that over the course of your lifetime, you will witness the birth of at least a hundred stars! In comparison to the hundreds of billions of stars already in existence, this may seem insignificant, but as the saying goes, our time on Earth is but a fleeting moment. Approximately nine billion years ago, when the Milky Way was undergoing its initial formation, it was capable of generating around twelve stars per year. However, as the central disk began to take shape, this process began to slow down. Although astronomers have yet to establish a clear connection between these two phenomena, some speculate that the appearance of the disk caused the gas within the galaxy to heat up, making it more difficult for it to condense into stars.
The Demise of Celestial Bodies
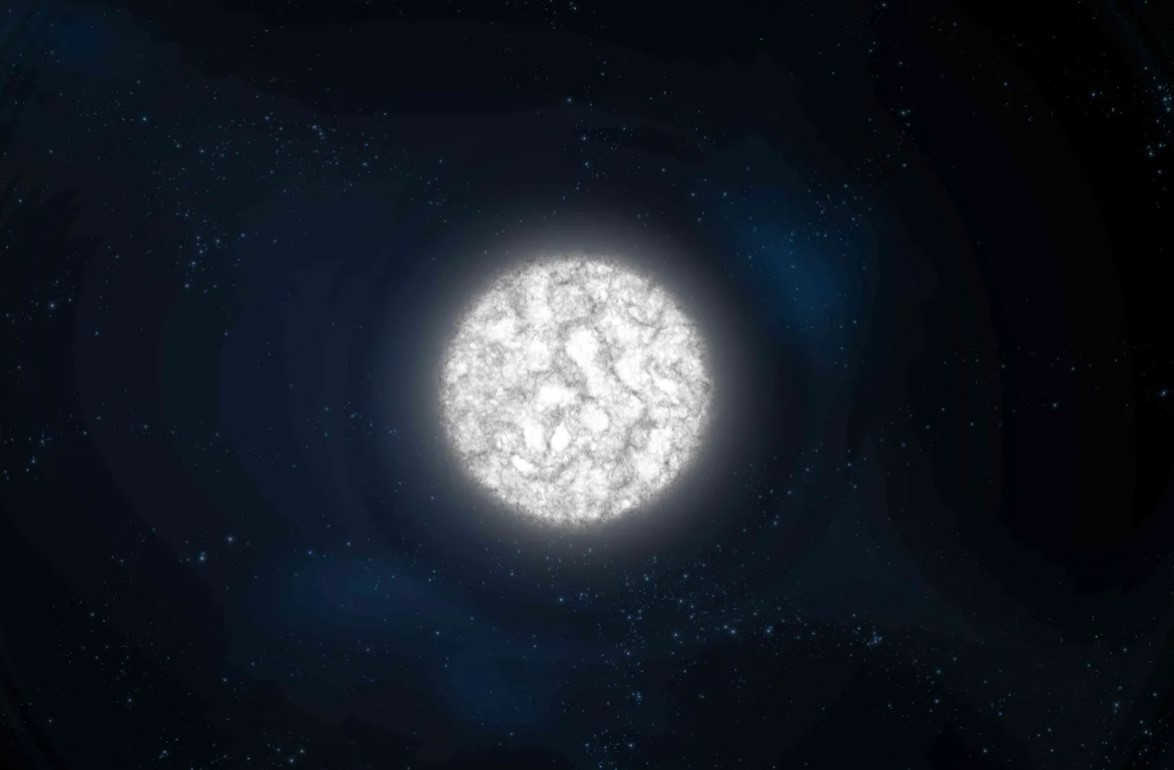
The vast expanse of the Milky Way does not solely witness the expansion and accumulation of fresh stars. It is an undeniable truth that certain stars meet their end. It is crucial to comprehend that the birth of new galactic stars does not occur out of nothingness; rather, they are the recycled remnants of their predecessors. In the forthcoming century, it is highly probable that the number of stars that perish here will be on par with the number of stars that come into existence. Among these, a couple or even three might undergo a cataclysmic event known as a supernova. This phenomenon can only befall exceedingly massive stars, causing them to emit their matter into the vastness of space. Consequently, this ejected matter will serve as the building blocks for future stars.
If scientists are correct, it has been approximately 140 years since the last supernova explosion in our galaxy. However, based on a 2006 estimation, these catastrophic events happen on average every 50 years. This suggests that the anticipated spectacular display is slightly overdue. Fortunately, astronomers have identified a potential candidate for the next supernova. They are closely monitoring a triple star system known as Apop (do not attempt to read it backwards, as it may cause fear), which is situated eight thousand light-years away from our location.
There is a high possibility that an explosion may occur in this area very soon. One of the celestial bodies is emitting streams of charged particles at a rate that indicates this object is on the brink of collapse. Fortunately, due to its position in space, it can be confidently stated that the Earth is not at risk. However, even in this situation, it is highly likely that the precise timing of the fireworks is not entirely clear. It could happen in a month or even in a thousand years. Regardless of whether or not we witness this explosion, it is crucial to acknowledge that the Milky Way is not a frozen, static river that coldly illuminates the night sky. During our time on Earth, numerous stars will be born and die within it, and it will continue to expand its boundaries by over a billion kilometers. We will have the opportunity to witness numerous astounding events. The key is to observe and appreciate them.
When planning a night sky photoshoot, it is important to consider the lights of the city at night and the brightness of the full moon. These factors can obscure the glow of the stars, so it is recommended to consult the lunar calendar beforehand. For optimal results in capturing the Milky Way, it is advisable to schedule the shoot between March and September in the northern hemisphere. During this period, the Milky Way is positioned high in the sky, offering a great opportunity for stunning photographs.
Unique Content
- When is the optimal time to observe the Milky Way?
- What is the duration of the Milky Way’s visibility?
- Is it possible to see the Milky Way without the aid of a telescope?
- Where can you find the clearest skies on Earth?
- Can the Milky Way be seen from Russia?
- How long is one galactic day?
- Prepare your equipment. Taking a high-quality photo of the night sky will require a long exposure or low shutter speed.
- Utilize manual mode.
- Adjust the shutter speed.
- Tweak the white balance.
- Modify the ISO settings.
- Select a location devoid of any street lights.
- Launch the Google Camera app.
- Tap on the Night Shot option.
- Securely position your phone on a tripod, flat rock, or any other stable surface.
- Wait for a few seconds.
- Tap on the Take photo icon.
- Avoid touching the phone while the photo is being taken.
What is the optimal time to observe the Milky Way?
The Milky Way forms a wide circle in the sky known as the Galactic Plane. For the best visibility, it is recommended to view the Milky Way away from the bright lights of a city. In the Northern Hemisphere, the ideal time to observe the Milky Way is around midnight during the month of July, at 10 p.m. in August, or at 8 p.m. in September. During these times, the Northern Cross constellation, also known as Cygnus, will be positioned near the zenith, making it easier to locate the Milky Way.
When is the prime time for star photography?
When it comes to capturing stunning images of stars, it is important to consider the lighting conditions. Even the light from the moon can act as a source of backlighting, which may impact the quality of your photographs. To ensure optimal results, it is recommended to plan your star photography sessions during the new moon or after moonset. Additionally, using a tripod is crucial to stabilize your camera and achieve sharp images, especially when using a slow shutter speed.
Where is the best location to observe the Milky Way?
The constellation of Sagittarius is where the Milky Way shines particularly brightly, as it is at the very center of our Galaxy.
Where is the best location to capture a photograph of the Milky Way?
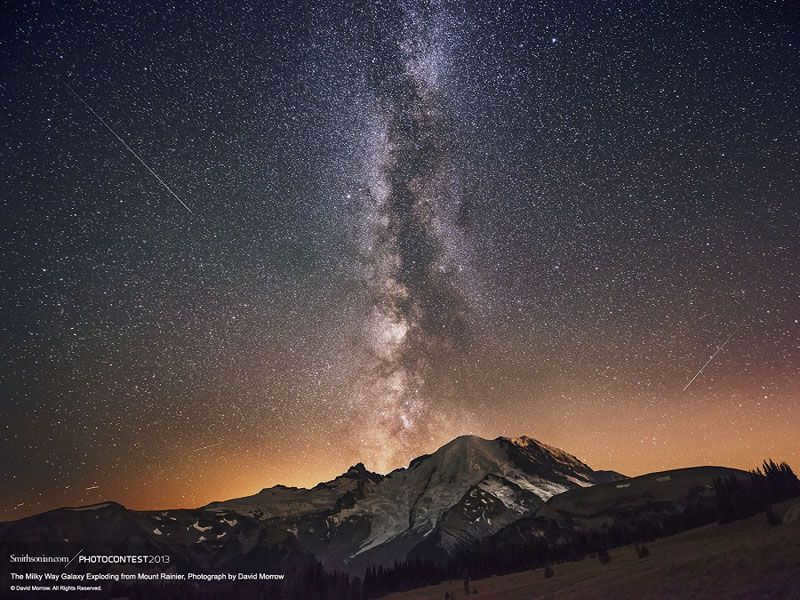
The most ideal location would be high up in the mountains, away from any cities or sources of stray light. However, a forest can also work. Additionally, you will need clear weather and preferably no moon. The moon can cause surrounding areas to be illuminated, making the sky too bright even if it is not in the frame, and clouds will obscure the stars.
Why is the Milky Way not currently visible?
Based on a study, it is estimated that 60% of Europeans and nearly 80% of North Americans are unable to see the glowing disk of our galaxy due to the effects of artificial lighting.
How long does the Milky Way last?
The duration of the Milky Way is estimated to be between 225 and 250 million Earth years.
What is the optimal time for a photo session?
For a more balanced lighting effect, it is recommended to wait for about an hour or two after noon when the sun has shifted slightly. Many models tend to look their best when the light is coming from the side. That is why the period shortly after sunrise and before sunset, commonly referred to as the “golden hour,” is considered the ideal time for photography.
When is the best time to capture photos?
The most favorable time of day for portrait photography is a few hours after sunrise and a few hours before sunset. During this period, it is advisable to shoot after the early morning golden hour or before the start of the evening hour.
When is the optimal time for moon photography?
Wait until the moon rises or sets (shortly after sunset or just before sunrise). However, if you want to capture the moon against a dark background, the optimal time to take photos is during the late night hours when the sky is clear and the moon is high above the horizon.
Is it possible to observe the Milky Way without any aids?
Is it possible to see a galaxy without any aids? Yes, certain galaxies can be observed with the naked eye, including the Milky Way, the two Magellanic clouds, and the Andromeda galaxy. There are a few other galaxies, but they require specific equipment, such as a telescope, to be visible.
As a result, researchers have discovered that Dome A plateau in Antarctica is the optimal location for astronomers. Surprisingly, this location is even drier than the famous Mauna Kea volcano in Hawaii, which is renowned for hosting numerous observatories. Mauna Kea is widely regarded as one of the most ideal places on Earth for astronomers.
How can we observe the Milky Way?
Given that the Milky Way appears as a long streak in the sky, we can infer that it has a disk-like shape and that we are viewing it from an angle.
What is the proper method for capturing sky photographs?
Can we see the Milky Way from urban areas?
Even if you’re not an astronomer, it’s common knowledge that spotting a clear night sky in a city with the naked eye, let alone capturing a photo of the Milky Way, is highly unlikely. The presence of “light pollution” caused by artificial light sources such as streetlights, car headlights, and neon signs is to blame.
How can I capture photos in the dark using my phone?
When is the Milky Way expected to vanish?
Scientists have discovered that the Milky Way and the massive Andromeda galaxy are currently in the process of merging. In approximately 4 billion years, they will combine to form a single galaxy, causing our galaxy to undergo a transformation and cease to exist as we currently know it.
Can the Milky Way be observed in Russia?
The Milky Way is a spiral galaxy that houses our Solar System. From Earth, we can only see a small portion of it as a streak of stars across the sky. Russia is situated in the northern hemisphere, which is not the most ideal location for observing the Milky Way. For optimal views, one would need to travel to the southern region of the country between the months of July and September.
Which arm of the Milky Way does our solar system reside in?
Our solar system is located within the Orion Arm, a small galactic arm of the Milky Way. This particular arm is approximately 3,500 light-years thick and spans about 11,000 light-years in length.
What is the top location in Russia for stargazing?
When it comes to astrotourism in Russia, the Astrophysical Observatory of the Russian Academy of Sciences in Karachay-Cherkessia is the ultimate destination. Situated at the base of Mount Pastukhov, this observatory is home to the world’s largest radio telescope, RATAN-600.
What is the equivalent of 1 galactic day?
In the Galaxy, it takes 60 seconds to make 1 minute, 60 minutes to make 1 hour, and 24 hours to make 1 day.
Video: What is the optimal time to capture the Milky Way on camera?
Did our responses assist you?
Trending in the past 24 hours

Which article prohibits taking pictures?
Article 152.1 of the Civil Code states that it is not allowed to publicize or use a person’s image without their consent.

The presence of a glass in the bathroom may seem puzzling to some. However, this seemingly unusual item actually serves a practical purpose. A bathroom glass is a convenient accessory that can be used for storing various hygiene products. Whether it’s toothbrushes, toothpaste, or even small toiletries, having a glass in the bathroom allows for easy organization and accessibility. So, next time you see a glass in the bathroom, know that it’s not just for drinking water, but rather a useful addition to keep your bathroom essentials within reach.
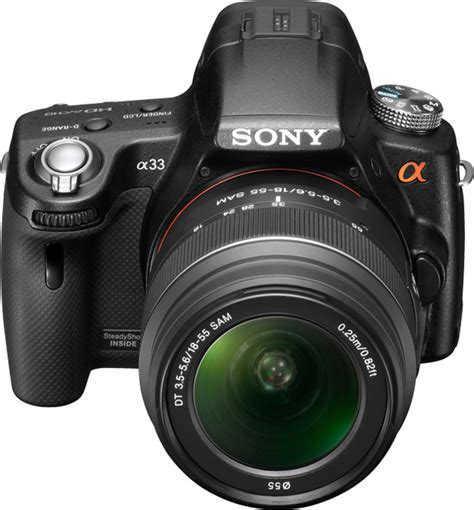
What makes a DSLR camera superior?
The presence of a mirror mechanism in DSLR cameras enables the utilization of additional features for capturing intricate details in images.

What is the best way to store soap in a soap dish?
It is recommended to store unused soap in its original packaging, within the soap dish.

Which option is preferable – purchasing a DSLR or a mirrorless camera?
Mirrorless cameras are generally more compact compared to DSLRs. The reason behind this lies in the camera’s design, utilizing s.

A mirror camera, also known as a DSLR (Digital Single-Lens Reflex) camera, is a type of camera that uses a mirror and a prism to direct light from the lens to the viewfinder.

What is the reason behind the practice of placing money in the coffin?
At funerals, it is a common tradition to place money in the coffin as a way to honor the deceased or to ensure that the deceased has enough money to pay for their final resting place in the cemetery.

Which option is superior, a DSLR or a mobile phone?
There is a notable discrepancy in quality. The image quality of a DSLR camera surpasses that of a cell phone camera due to its larger image sensor.
What sets apart a DSLR from a system camera?
System cameras offer a more compact and lightweight alternative, thanks to the elimination of a mirror and an optical viewfinder.

Who is prohibited from being captured on camera?
According to the Law of the Russian Federation № N 5485-1 (dated 21.06.1993), it is strictly prohibited to film individuals in any location.

The country of Russia

Sign in
Sign up
Forgot password
Provide the email address used during registration and we will send you instructions
If the majority of St. Petersburg residents turn off their lights, you will be able to see the Milky Way in the sky today!

As per Nikolai Zheleznov, a scientist at the Institute of Applied Astronomy of the Russian Academy of Sciences, the mesmerizing sight of the Milky Way will grace the sky today! In a recent interview with “Radio Baltica”, he mentioned that the residents of St. Petersburg will have the chance to marvel at the breathtaking Milky Way, provided they switch off the lights in their homes. Today, the city will dim the lights of 40 prominent architectural landmarks, and all St. Petersburg residents can actively participate in the Earth Hour initiative by turning off their household lights from 8:30 pm to 9:30 pm. If a significant number of residents cooperate and refrain from using lights, the sky will be illuminated even more – revealing the magnificent spectacle of the Milky Way above St. Petersburg.