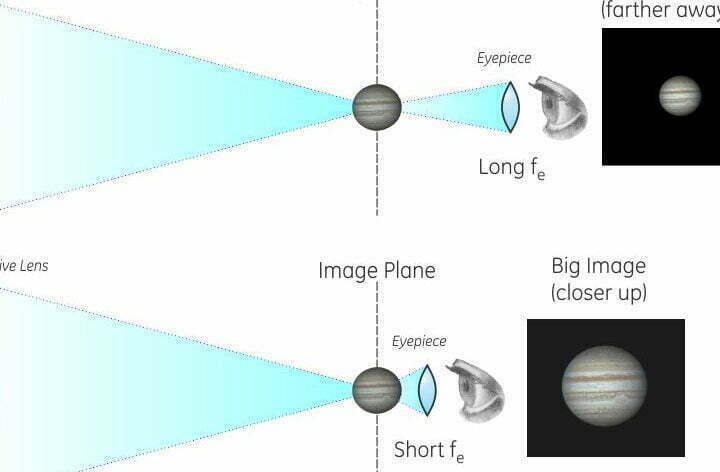
When it comes to telescopes, there are two important concepts to consider: the maximum useful magnification and the magnification achieved with a specific eyepiece. The maximum useful magnification refers to the optimal level at which the telescope’s optics perform. Going beyond this limit will result in a decrease in image quality. To calculate the maximum useful magnification, simply multiply the diameter of the telescope’s lens by two. For example, a telescope with a 70 mm aperture will have a maximum useful magnification of 140x.
On the other hand, the magnification achieved with a selected eyepiece is determined by the accessory itself. To calculate this magnification, you can use an astronomical calculator. This value will vary depending on the specific eyepiece used.
Astronomy Calculator
Utilize the online calculator to determine the magnification of your telescope and choose the suitable eyepieces. Simply input the necessary data in the “Initial parameters” section and tap on the “Calculate” button.
Input data
The magnification of a telescope can be calculated by multiplying the telescope’s objective diameter (in millimeters) by its focal length (in millimeters) and dividing the result by the focal length of the eyepiece (in millimeters). If a 2x Barlow lens is used, the magnification can be doubled.
Calculation of Magnification
Magnification = (Telescope objective diameter * Telescope focal length) / Eyepiece focal length
Recommended Magnifications
The maximum magnification of a telescope is determined by its objective diameter. To calculate the maximum magnification, simply multiply the diameter of the telescope by 2. This maximum magnification is ideal for observing close double stars and aligning the telescope. It also allows for viewing small details on the surface of planets and the Moon, but only under ideal atmospheric conditions. Using a magnification greater than the telescope’s maximum magnification can result in a fuzzy and distorted image, rendering it ineffective.
The resolving power of a telescope, which refers to its ability to distinguish fine details of the objects being observed, can be maximized using the resolving magnification. This magnification is particularly useful when studying planets, satellites, and the Sun. While increasing the magnification beyond the resolving magnification typically does not reveal more details, in optimal atmospheric conditions it may be possible to slightly exceed the calculated value.
When observing the surface of the Moon and Sun or large details on planetary disks, high magnification is recommended. For observing extended nebulae and bright galaxies, medium magnification is suggested.
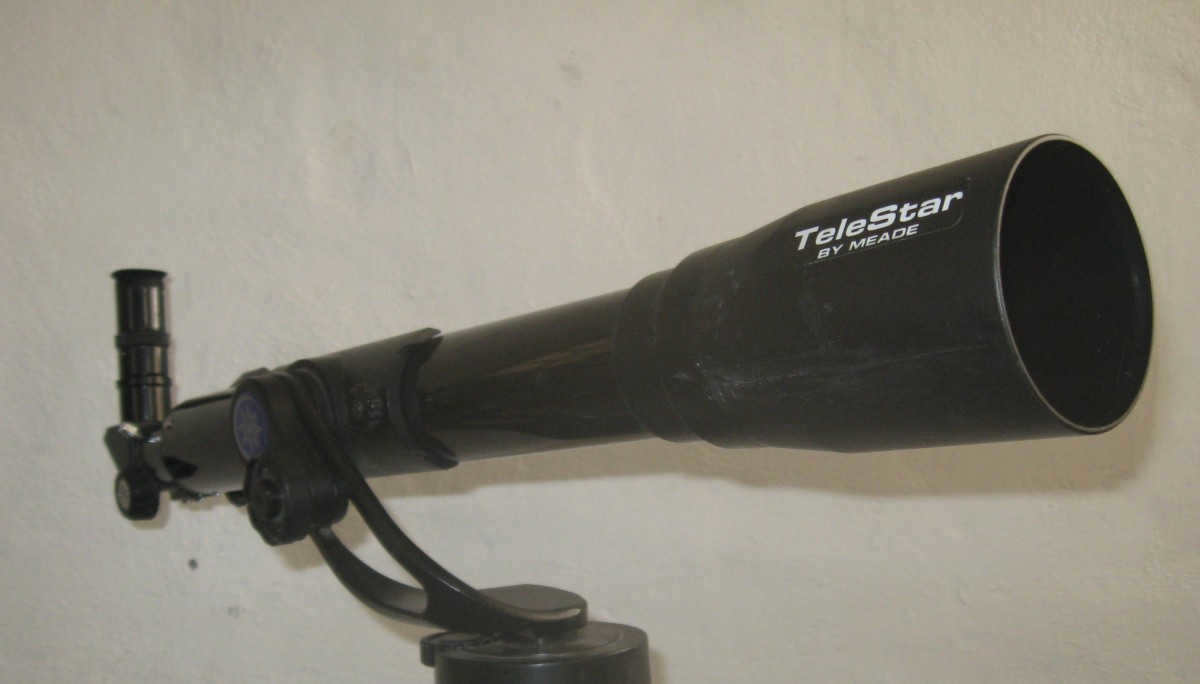
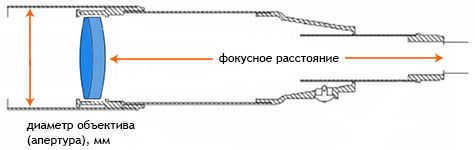
The measure of a telescope’s magnification can be obtained by dividing the diameter of its objective lens by the focal length of the telescope. In this particular article, I will demonstrate techniques for enhancing the magnification of a telescope, specifically the one depicted above. This telescope possesses a focal length of 70 mm and an objective lens with a diameter of 60 mm. However, the optical instruments and methods I will be discussing can also be applied to other variations of telescopes in order to amplify their magnification capabilities.
To enhance the magnification of a telescope, astronomers employ eyepieces, typically bundled with the telescope. An eyepiece functions as a lens that attaches to the end of the telescope tube where the incoming light converges, also known as the telescope’s focal plane. While the eyepiece serves as the main amplifying component in a telescope, there exist additional devices that, when combined with the eyepiece, can further augment the telescope’s amplification.
How can I determine the magnification of a telescope?
To measure the magnification of a telescope, you need to divide the focal length of the main objective lens by the focal length of the eyepiece. In this instance, I will demonstrate how to increase the focal length of a 700mm telescope using 9mm and 25mm eyepieces.
When utilizing a 25mm eyepiece with the telescope, simply divide the focal length of the telescope. In this case, the 700mm focal length is divided by the 25mm eyepiece, resulting in a magnification of 28x. This implies that you will be able to view objects at a size that is 28 times larger than their actual dimensions.
If you opt for a 9mm eyepiece on a 700mm telescope in a different scenario, the resulting magnification would be 77x, the same as that of a 9mm eyepiece. It’s worth noting that a shorter eyepiece offers greater magnification compared to a longer one. This is primarily due to the shorter focal length of the eyepiece, which results in enhanced magnification.
Eyecup and Barlow lens
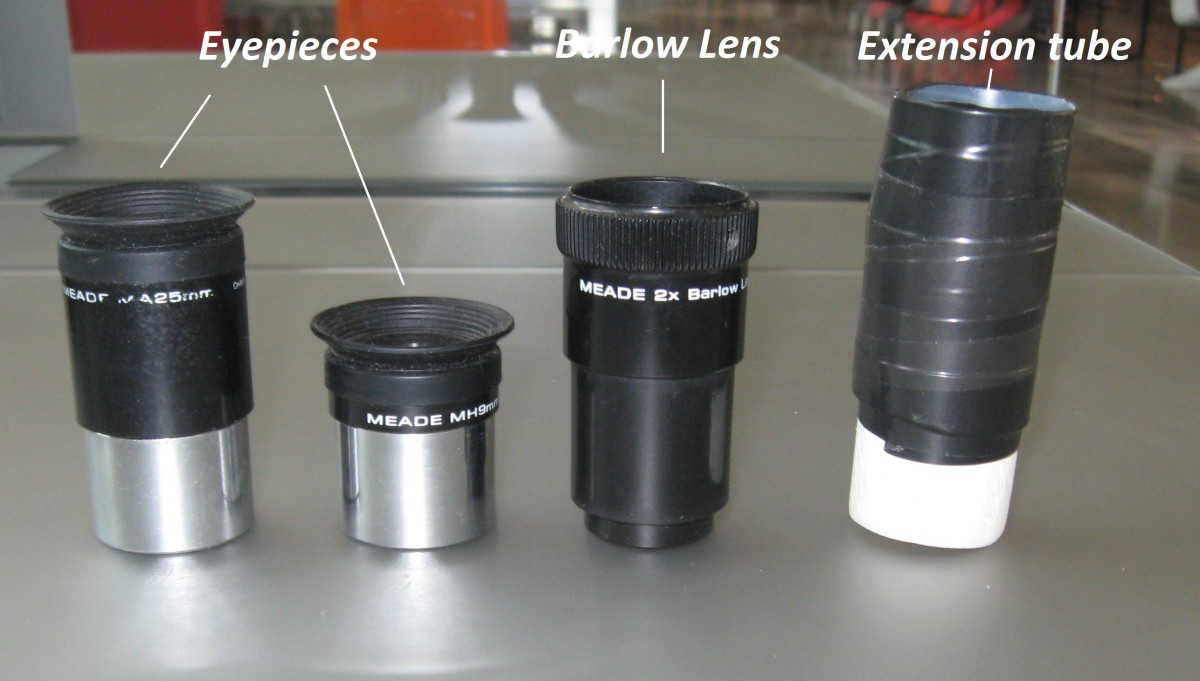
Enhancing the magnification of a telescope using a Barlow lens
Another method to further enhance the magnification of your telescope is by incorporating a Barlow lens in front of the eyepiece. A Barlow lens is a type of lens that scatters light rays, causing them to disperse. When utilized with a telescope, a Barlow lens elongates the focal length, resulting in increased magnification of the image.
Typically placed in front of the eyepiece, Barlow lenses can double or triple the telescope’s magnification. These lenses are often classified as 2x and 3x, indicating that they multiply the original magnification of the telescope by two or three, although other magnifications are also available.
By placing a Barlow lens in front of the 25mm eyepiece of a 70mm telescope, the magnification of the eyepiece can be doubled. If the magnification without the Barlow lens was 28x, it will increase to 56x with the Barlow lens. Similarly, when the Barlow lens is used with the 9mm eyepiece, the magnification increases to 155x. Thus, in both cases, the magnification is doubled. It is worth noting that there are other Barlow lenses available with even higher magnification.
The same principle applies to a Barlow lens with a 3x grating. In this case, the magnification of the telescope will be tripled, depending on the eyepiece used. With a 25mm eyepiece, the magnification will triple to 84x, and with a 9mm eyepiece, the magnification will triple to 233x.
What is the method for increasing the magnification of my telescope using an extension tube?
To further increase the magnification of your telescope, you can incorporate an extension tube into the setup. One way to do this is by inserting a 1-inch diameter PVC tube between the Barlow lens and the eyepiece. Simply sand down one end of the tube so that it fits snugly into the Barlow barrel. Then, on the other end, cut and attach a portion of the same tube to act as an eyepiece holder. In the accompanying image, you can see the extension tube that I created using this method.
Adding an extension tube between the Barlow lens and the eyepiece allows for a magnification boost in the telescope. The magnification factor can be doubled, tripled, or even more depending on the size of the extension tube. The concept is simple: by increasing the distance between the Barlow lens and the eyepiece, the focal length of the eyepiece decreases, resulting in an increased magnification power for the telescope.
Enhanced Image with a Barlow Lens and Extension Tube
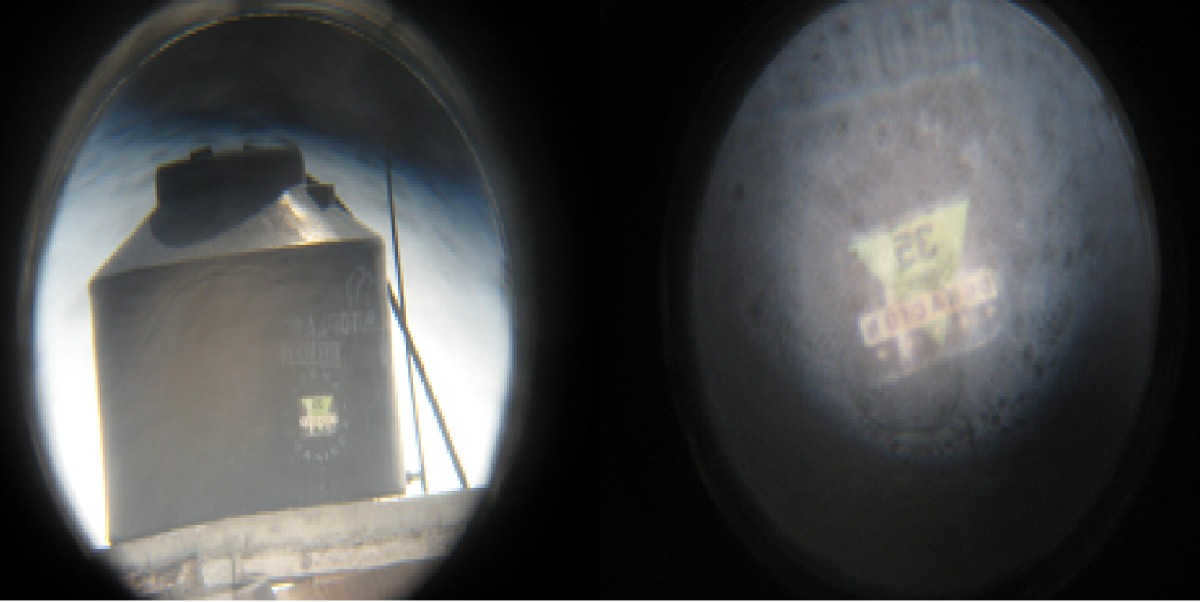
On the left side of the picture, you can see a telescope with a Barlow lens and a 25mm eyepiece. On the right side, the same telescope is shown with the same optical devices mentioned before, but this time it also includes an extension tube that increases the distance provided by the Barlow lens fourfold.
This photograph captures a water tank on top of a house located approximately two miles away. Without the assistance of a telescope, it would be incredibly challenging to discern the letters on the surface of the water.
Percentage of visitors interested in astronomy
Summary
As depicted in the data provided, the utilization of the three optical apparatuses outlined within this section will enhance the level of magnification attainable through your telescope. This amplified magnification enables the observation of intricate lunar details, albeit with a slight decrease in brightness. This decrease in sharpness is a consequence of the reciprocal relationship between magnification and object clarity.
Utilizing a 700mm telescope, my observations of planets are restricted to a 25mm eyepiece in the absence of a Barlow lens. However, upon incorporating a Barlow lens, I am still able to perceive the planetary bodies, albeit with a narrower field of view.
Initially, you may employ a low magnification eyepiece, such as a 25mm eyepiece, to easily locate celestial objects. Subsequently, you can substitute this eyepiece with a higher magnification option, such as a 9mm eyepiece or Barlow lens. It is even possible to insert an extension tube, although this may result in a decline in image quality.
The magnifications mentioned in this article can be used to observe birds or other distant objects while traveling outside of town or from the seashore. The higher the magnification, the better the quality of the image you will see.
© 2012 Jose Juan Gutierrez
Telescope Calculator. Calculate magnification online.
Explore the menu for weather forecast, technical articles, Delphi on Android, converter converter, auto harnesses, calculators, trucking, piston stroke, dino bench, frequency wavelength, Morse code, VHF UHF radio, Ohm’s Law, relays and fuses, and the essence of OBD.
+ Weather + Track + Auto + Radio + Satellites + Computers & Technology + Car & Truck Diagnostics + Tech Blog + Monitoring Innovations for Work & Entertainment + News + Advertising + Shopping + Music + Videos + Reviews + Recommendations + Articles + +
Calculate the magnification and choose the eyepiece online for your telescope.
Guidelines for utilizing the telescope calculator.
The practical intricacy of calculating telescope parameters is significantly higher than the intended goal of developing this straightforward yet fairly intricate calculator. As a result, some averages and errors are permissible in the output. However, the overall representation of the telescope parameters appears quite lucid and satisfactory, much more coherent than the descriptions found on telescope vendors’ websites.
– The calculator has very simple and minimalist requirements: just enter the telescope’s diameter and focus, then click the calculate button.
– Before starting a new calculation, make sure to reset/clear the form to avoid any remnants of previous calculations or incorrect information.
– Values that are not recommended for use are highlighted in red. Keep in mind that there may be some margin of error in the calculations.
– Acceptable telescope magnification is highlighted in blue, with a note indicating the range of magnification based on recognized standards and a brief description of its application.
– A table is provided for reference, showing the appropriate magnification limits when using different combinations of eyepieces and Barlow lens.
– There are no limitations on the numbers you can input, but for extremely large values, the accuracy of the calculations may be affected. However, the formulas used will automatically handle the calculations for you.
What is the purpose of knowing the telescope parameters? The calculator assists in pre-calculating the magnification of the image that the human eye perceives while observing celestial bodies such as planets, nebulae, and stars. These objects emit dim light, which sometimes only just reaches the field of view. The telescope calculator takes various factors into consideration, including useful dimensions, lens diameter, telescope focal length, and eyepiece focal length, in order to clearly display allowable configurations and set minimum/maximum values. This allows for the selection of an appropriate optical device. The construction principle of a telescope, which relies on the principles of optics, is similar to that of a telescope, monocular, and to some extent, even binoculars.
An illustration of the computation and evaluation of a telescope.
Here is an example of how to calculate the optics of the Levenhuk 50 x 600 AZ telescope.
Equipment: 20 mm, 12.5 mm, SR4 mm eyepieces, 1.5x lens corrector, and 3x Barlow lens.
Input the data into the telescope calculator to see the results.
The telescope has a relatively long focal length.
The relative focus of 12 indicates a normal, closer to slow, dark, and magnifying design.
The maximum achievable magnification is 7x with an 86mm eyepiece, which is technically impossible. The highest magnification achievable is 12x with a 50mm eyepiece.
The recommended resolving magnification is 70x with an 8.6mm eyepiece, which is not included in the kit and must be purchased separately. Close alternatives are a 2x Barlow lens with an 18mm eyepiece, or a 2.5x Barlow lens with a 20mm eyepiece.
For the lower limit, a penetrating magnification of 30x – 40x can be achieved with a 20mm eyepiece.
The telescope’s magnification with different eyepieces is as follows: 30x with a 20mm eyepiece, 50x with a 12mm eyepiece, and 125x with a 4mm eyepiece.
The 4mm eyepiece should not be used as it exceeds the telescope’s maximum allowable magnification of 100x. It is unclear why it is included in the kit, as it provides extremely poor and dark observation conditions. The minimum suitable eyepiece is 6mm.
In general, for this children’s telescope, there is no need to purchase additional equipment. The minimum suitable telescope for beginners, the 70 x 700 model, provides a recommended magnification of 98x and a penetrating magnification of 47x. It is very close to the aperture and relative aperture norms. Therefore, it performs approximately 30% better.
I won’t provide any further information, as you can easily make future comparisons yourself. Take, for instance, 500 x 3500.
15:03 02.03.2022. This page is optimized for mobile viewing.
Here is a complete list of all pages in the sky-stars section: watch them online for free, they’re interesting – a must-see.
Car Diagnostics.
Autodiagnost is a business card for computer diagnostics of car engines, both domestic and imported trucks. It offers quick reading of DTC error codes using tools like K-Line, ELM 327, OBD, EOBD, MOBD, USA OBD, and JOBD. Additionally, it provides recommendations. Learn more.
Welcome to the official RU page website.
Visitors to this site have the power to determine the order in which they explore our diverse range of materials. By expressing interest in specific topics, they not only prioritize their own selection but also influence the preferences of future visitors and guests. The individual interests of each user become shared knowledge, benefitting a larger community.

Regarding business. The marketplaces in 2023 will function as ozone seller documents.
Pertaining to. Promotions in September 2023. Receive a grant in 2023. Be the first to participate. Cloud for files and new technologies that enhance people’s lives. Learn how to obtain a grant in 2023.
Automobile transportation. Engine diagnostics in Ekaterinburg. Rolls-Royce, Rolls-Royce. Porsche, Porsche. Kia, Kia. Other cars and services.
Popular Links.
Redmond SteamGlide Pro iron not working, how to fix it. Troubleshooting the iron on our own. Required tools, including screwdrivers. Common causes of malfunction.
Unlocking radio vehicle codes with a calculator. Software for auto radios. Using a calculator to unlock radio vehicle codes. Unlocking rad.
Calculating wavelength from frequency. Hz translator. Converting oscillations from frequencies in Hz, kHz, mHz, gHz to wavelengths in meters using lambda.
Installing a second Linux OS on a VHD with W. Can Linux be installed on a VHD disk? Choosing a second Linux OS for a computer.
Understanding the principles of OBD self-diagnosis. Components, systems, and codes involved. Monitoring and diagnosing malfunctions. Component CID, PID, TID. OBD mode.
SW reception conversion, chapter 10. Mini Wh antenna. Radio frequency band. Voltage. Current. Amplifier circuit with field-effect and bipolar transistors.
Summer 2023 mushroom season. Urals, forest. Abundance. Biological and weather factors leading to an unexpectedly bountiful mushroom crop in the Ural region.
News Media Summaries in Russia
2023-01-22. Breaking news. News updates.
#club.dns-shop.ru. The European Union has proposed a new regulation that would require all smartphones to have removable batteries.
Recently, the EU passed a law mandating USB-C (Taipsi) connectors for all smartphones, including Apple devices. Now, they are turning their attention to batteries. This initiative is motivated by a desire to make power sources more practical, environmentally friendly, and easily recyclable. However, there is another perspective on this issue. Some argue that having a removable battery allows for greater freedom and privacy. By removing the battery, individuals can avoid being tracked or monitored. This may be why some are hesitant to support this regulation, as it could potentially infringe on personal privacy. Nonetheless, with the increasing use of electronic passports, facial recognition technology, and neural networks for iris identification, the need for removable batteries may become less relevant in the future.
2023-02-17 . Concise and clear . No updates available .
# . tass.ru, Sberbank is launching a project aimed at recovering funds that have been transferred to scammers.
. The refund process is expected to be expedited to just a few days. The system operates through simplified court procedures, taking into account the high reliability of bank data. The obligation to compensate customers will motivate banks to take more active measures against fraudsters.
2023-07-06 . News flash . News twist.
# . kommersant.ru, Equipment manufacturers and suppliers are increasing prices in Russia by 10 to 15 percent due to the growing exchange rates.
The increase in production costs caused by the fluctuating exchange rate will impact all household appliances and electronics. The greatest price increase will be seen in products that are not manufactured in Russia, specifically smartphones, laptops, and tablets.
Discover all the most intriguing news from the past day, week, and month.
New content on the website.
Quick and helpful information.
Apple CarPlay: Enhancing your driving experience with iOS integration.
Apple CarPlay is an innovative software developed by Apple that seamlessly integrates your iPhone with your car’s Infotainment system. By utilizing Apple CarPlay, you can effortlessly access a wide range of iPhone features such as navigation, music, phone calls, messaging, and more, all while safely controlling these functionalities through your vehicle’s dashboard or by utilizing Siri voice commands. This groundbreaking technology allows you to stay connected and informed on the go, without compromising your attention on the road ahead.
Apple CarPlay is compatible with iPhones that have iOS 7.1 or newer and is available in various car models that offer similar technology. Moreover, several car manufacturers have started incorporating wireless capabilities for Apple CarPlay, simplifying the usage for drivers. To enable Apple CarPlay on your iPhone, simply connect your device to your car’s USB port or wireless network (if supported). Afterward, you can customize the desired features through the CarPlay settings on your iPhone.
In general, Apple CarPlay offers a convenient and secure solution for utilizing various iPhone features while on the go, making it a vital tool for countless drivers who desire to remain connected during their journeys. By connecting your navigation system within your vehicle, you can enjoy a safe and cost-effective interface for accessing your car’s multimedia device directly from your iOS iPhone smartphone. Apple’s cutting-edge operating system provides a modern approach to integrating an automotive device with a display that offers valuable information and reliable navigation. Apple CarPlay relies on compatible technologies to effectively operate the functions of your iPhone. Notable car manufacturers that have highlighted their compatibility with Apple CarPlay include Volvo, Porsche, Kia, BMW, Toyota, and Skoda.
Social Networks, access my page.
Connect with others through social networks, explore my personal page, search for friends and contacts, and log in without the need for registration. Discover new connections and start dating without the hassle of remembering passwords. Enjoy the convenience of free login.
Visit my page on vk.com, the popular social networking site VKontakte.
Join my classmates page on ok.ru.
Connect with me on t.me, my page on the messaging app Telegram.
Subscribe to my YouTube channel at youtube.com.
Follow me on Twitter at twitter.com.
Like my Facebook page at fb.me.
Check out my Instagram page at instagram.com.
Connect with me on LinkedIn at linkedin.com.
Discover and download the latest music without any hassle.
Are you wondering where the girls are hiding? Find out and listen to the song “Daisies are hiding, buttercups are drooping – Shafferan, Ptichkin.”
Looking for a specific song? Listen to music for free and discover new tracks.
Enjoy the romantic tune “The Lady In Red” by Chris De Burgh.
Dance along to “Girls Just Want To Have Fun” by Cyndi Lauper.
Get the best music downloads and enjoy cool tunes.
Experience the catchy beats of “Stole The Show” by Kygo, featuring Parson James.
Think About The Way – Ice MC.
From Earth To Sky – Caribasa.
techstop-ekb.ru © TechStop, Ekaterinburg, Russia. 2023.
Magnification is often misunderstood when it comes to telescopes, and this misconception is not limited to beginners. Many new users believe that higher magnification will always result in better images, but they soon discover that this is rarely true. In fact, lower magnification often produces superior images.
Observations of celestial bodies, taken in Sochi at an altitude of 600 meters above sea level, were captured by K. Radchenko.
What are the drawbacks of using high magnification?
There are multiple reasons why high magnification may not be the preferred choice. Many new amateur astronomers assume that since we are trying to observe objects that are extremely distant, we need to magnify them in order to bring them closer. However, most objects in the night sky, despite their great distance, actually appear quite large. For instance, the Orion Nebula appears more than double the size of the full Moon, and the Andromeda Galaxy appears six times larger. Despite being 70 trillion times farther away than the Moon, Andromeda is also 420 trillion times larger than our satellite! The problem with high magnification is that it limits the field of view, so a larger object may not fit within the telescope’s range.
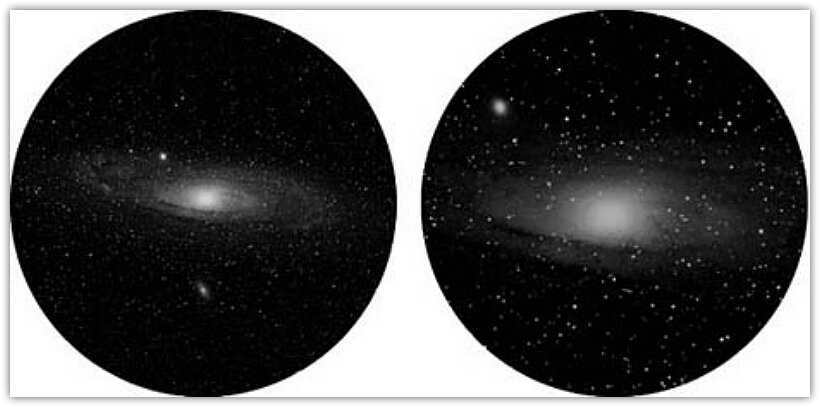
A closer look at the galaxy in Andromeda: on the right with higher magnification, but the entire Andromeda galaxy can only be observed in low magnification mode – on the left
There is another factor to consider when it comes to increasing magnification, and that is the brightness of the image. According to a regrettable law of physics, doubling the magnification results in the image becoming four times less bright. Since most celestial objects are already quite faint, it is not advisable to make them even dimmer than necessary. This is why the aperture (the diameter of the lens) is the most crucial aspect of a telescope, rather than the magnification. Brightness is key in astronomical observations.
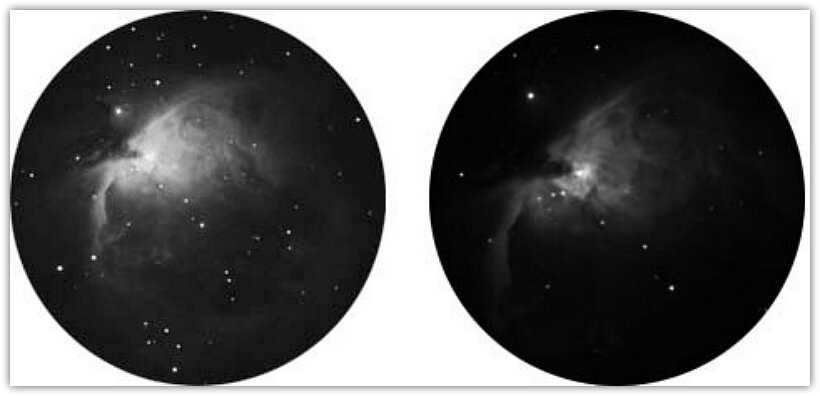
Image of the Orion Nebula: shown at a higher magnification on the right, but with a lower brightness compared to the lower magnification on the left
Certain objects, on the other hand, are small yet luminous, making them suitable for high levels of magnification. Planets fall precisely into this category. Despite being the largest planet in our solar system, Jupiter appears relatively small due to its distance of 644 million km, and is only 1/36 the size of the full Moon. However, it is still brighter than any star in the sky. High magnifications are particularly effective for observing Jupiter, Saturn, Mars, and other bright objects such as the Moon.
What is the limit?
Why not simply zoom in on Jupiter as much as we desire? If it appears better at 200x than at 50x, shouldn’t it appear even better at 600x or 1000x? Unfortunately, there are two reasons why this is not the case.
The first reason relates to the telescope itself. The brightness of an object relies on the size of the telescope and the magnification. The larger the area of the lens (determined by its diameter), the more light can be gathered. This allows for increased magnification before the image becomes too dim. Furthermore, the resolution, or the ability to see fine details, also depends on the lens diameter. Consequently, there is a theoretical upper limit to how much a telescope can magnify before the image becomes faded and excessively blurry. This limit is determined by a simple equation:
The maximum possible magnification of a telescope is equal to twice the diameter of its objective lens (D).
For instance, a telescope with a 75mm objective lens has a maximum theoretical magnification of 150x. Similarly, a telescope with a 150mm objective lens can achieve a magnification of 300x, while a telescope with a 200mm objective lens can reach a magnification of 400x. However, it is important to note that these values represent the theoretical limits and are not always achievable in practice, as there are other factors that can limit the actual magnification of a telescope.
The Earth’s atmosphere is typically the limiting factor when it comes to maximum magnification. When observing celestial objects in space, we must look through the dense atmosphere, which increases the negative impact of atmospheric conditions as we increase magnification. Turbulence in the atmosphere can further blur the image. The stability of the atmosphere is referred to as viewing conditions, with good visibility indicating a stable atmosphere and a clear image. On the other hand, poor visibility corresponds to a highly turbulent atmosphere and a blurry image. Even with a high-quality telescope, nights with poor visibility will not yield more detailed images.
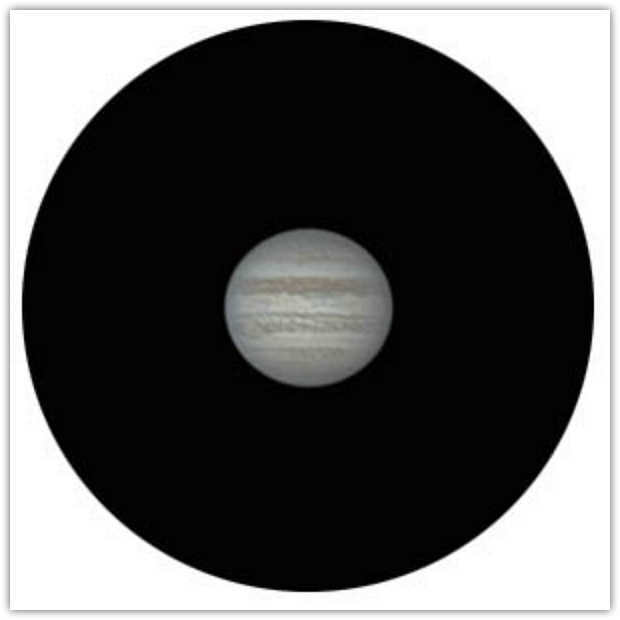
Jupiter under optimal viewing conditions
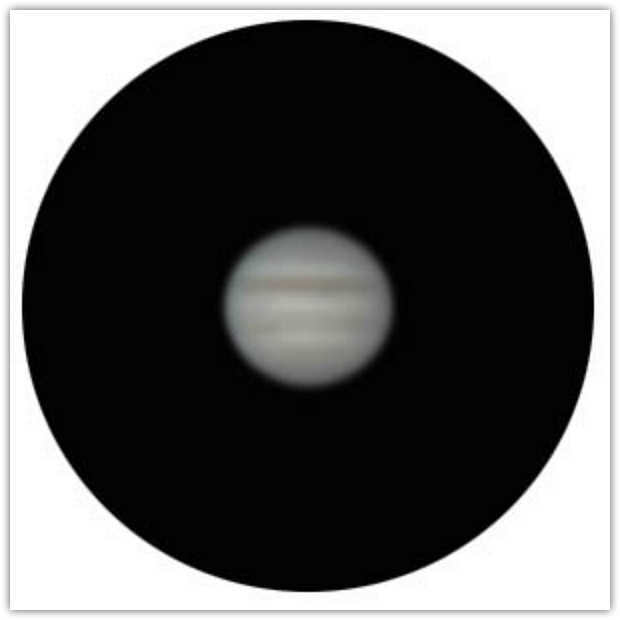
Observing Jupiter in unfavorable seeing conditions
The actual maximum level of magnification, regardless of the size of the telescope, on an average evening will be approximately 250x to 300x. On a poor evening, you will not be able to surpass 100-150x. Please note that the conditions for observing and the transparency of the atmosphere are not the same. Often, very dark and clear evenings will have unfavorable seeing conditions, while foggy evenings with low transparency often provide excellent visibility. This is because disturbances in the upper atmosphere subside and disrupt the view.
Alright, so too much magnification is not ideal, but what about low magnification?
Increasing the magnification of a telescope provides a narrower field of view and a dimmer image. However, it is important to find the right balance, as too much magnification can be detrimental. On the other hand, there is also a minimum magnification that is determined by the exit pupil of the telescope system. The exit pupil is essentially the diameter of the beam of light that comes out of the eyepiece. The larger this beam, the brighter the resulting image. This holds true until the diameter of the telescope’s exit pupil matches or exceeds the size of the observer’s eye pupil.
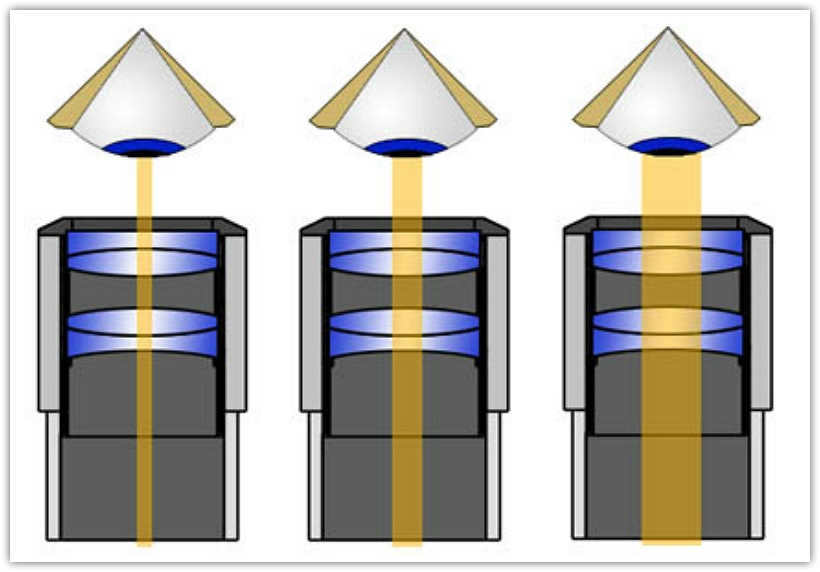
Exit pupils come in various sizes. The exit pupil on the right is wider compared to the observer’s eye pupil.
If the exit pupil exceeds the size of the observer’s eye pupil, the brightness of the image diminishes. This effect is similar to restricting the aperture of a telescope (diaphragmization). The size of the observer’s pupil is influenced by factors such as dark adaptation and age (the maximum pupil size decreases with age). A typical dark-adapted pupil measures 7 mm in diameter. The pupils of older observers may only open up to 5 or 6 mm. Assuming the standard dark-adapted pupil size is 7 mm, there is a simple equation to calculate the minimum magnification:
Minimum Useful Magnification = D / 7
D represents the lens diameter in mm
Optimal magnification
One issue that arises when reducing magnification is the decrease in image scale and detail. The human eye achieves its best resolution with a smaller instrument exit pupil diameter. Experimental observations consistently show that, for observing objects in deep space, the optimal picture is obtained with an exit pupil of 2mm to 3mm. This translates to a magnification of 35-50x on a 100mm telescope, 70-100x on a 200mm telescope, and 120-175x on a 350mm telescope. Lower magnification may be necessary to capture an entire large object within one field of view. However, when attempting to observe fine details in a galaxy, nebula, or globular cluster of stars, medium magnifications may be more suitable.
Planets can be viewed using higher levels of magnification. It’s important to note that each object, telescope, and observer is unique, so certain combinations may require specific magnifications. Most astronomers possess three eyepieces – one for high magnification, one for medium, and one for low – to accommodate different observing conditions. Typically, these eyepieces range from 50x to 250x, covering a wide range from wide field to high magnification. While the high magnification eyepiece can be useful on exceptional nights, it is likely to be infrequently used. Lower magnification can be advantageous for obtaining wider fields of view.
For determining the magnification of any eyepiece and telescope combination, consult a magnification calculator.
I hope this article proves helpful to someone!
Wishing you clear skies and successful observations!
Konstantin Radchenko, Editor-in-Chief of the Open Astronomy Group.
When individuals are looking to purchase a telescope, they may become overwhelmed by the various characteristics and parameters associated with this optical device. These characteristics not only impact the cost of the telescope but also the quality of the images produced. In this article, we aim to address the most common questions posed by prospective buyers.
So, what are the primary optical properties of a telescope?
The ability of a telescope to gather light is directly influenced by the type of optics employed in its design. Investing in a telescope with subpar optics can lead to disappointment. Therefore, it is essential to consider the following parameters when contemplating a telescope purchase:
1. What does the telescope’s aperture refer to?
The aperture of a telescope refers to the diameter of its objective lens or main mirror. The amount of light collected by the telescope is directly related to this measurement. Generally, a larger lens or mirror allows the telescope to gather more light and produce a brighter image. When purchasing a telescope, it is important to consider the aperture, but it should not be the sole focus. Other factors such as size, weight, storage, transportability, and additional parameters should also be taken into account. It is worth noting that the largest telescope may not always be the best option.
2. What is the telescope’s magnification?
Beginners who are considering purchasing a telescope are often misled by this parameter. Manufacturers of “cheap and versatile” telescopes often advertise “200x and above” in their catalogs and on their product packaging. However, the magnification or power of the telescope is not directly related to its optical properties and should not be the primary factor in choosing a telescope.
The magnification power of a telescope is determined by the combination of lenses it uses. Typically, a telescope will have a large focal length objective lens or main mirror, combined with shorter focal length eyepieces. It’s important to note that increasing the magnification will result in a dimmer image and a narrower field of view. Calculating the magnification of a telescope with a specific eyepiece is quite simple, using the following formula:
TELESCOPE MAGNIFICATION = FOCAL LENGTH OF TELESCOPE / FOCAL LENGTH OF EYEPIECE USED
There is also a commonly accepted guideline regarding magnification: the maximum useful magnification of a telescope is equal to twice the diameter of its objective lens, measured in millimeters. Because nearly all telescopes can achieve any desired magnification with the use of different eyepieces, aperture becomes a more significant factor than magnification. Furthermore, it is worth noting that most astronomical objects are better observed at lower magnifications due to the increased brightness of the image.
3 What does the term “focal length” refer to in relation to a telescope?
The term “focal length” in relation to a telescope refers to the distance that a lens or main mirror needs to place the collected light at a single point, known as the focal point. This measurement is typically provided in the telescope’s labeling, on the optical tube, on the box, or in the manual.
Understanding the focal length of a telescope is crucial. As mentioned earlier, the magnification of a telescope is dependent on its focal length. Generally, telescopes with longer focal lengths offer greater magnification compared to those with shorter focal lengths. However, it’s important to note that the length of the telescope’s optical tube should not be confused with its focal length, as advanced telescope designs can have long focal lengths while maintaining a compact tube size.
4. What is the definition of relative aperture in a telescope?
The relative aperture, also known as luminosity, is a measurement that relates to the brightness of an image and the width of the field of view in a telescope. It is calculated by dividing the focal length of the telescope by the aperture size. The concept of relative aperture originated in the field of photographic engineering, where a smaller relative aperture indicates slower shutter speeds for film, commonly referred to as “fast” shutter speeds. While this concept applies to telescopes as well, when comparing “fast” and “slow” telescopes at the same magnification for visual observation (as opposed to photography), both types of telescopes will provide the same picture quality.
- Telescopes with a relative aperture of f/10 or higher are suitable for observing the Moon, planets, and double stars (bright objects).
- Telescopes with a relative aperture of f/8 are considered versatile.
- Telescopes with an aperture of f/6 and lower are ideal for observing objects in deep space that emit faint light.
What other non-optical features should be taken into account when selecting a telescope?
Naturally, there are numerous other factors that should be considered when purchasing a high-quality telescope:
5. What is a telescope eyepiece assembly (eyepiece holder)?
There are three potential eyepiece landing diameters:
Meanwhile, the eyepiece holder of a telescope has a fixed diameter. Inexpensive telescopes typically come with a 0.965-inch eyepiece assembly. The most popular telescopes have a 1.25-inch eyepiece assembly, while 2-inch telescopes are less common. The seating diameter of the eyepiece should match the size of the eyepiece assembly. If you plan to purchase an eyepiece, ensure it has the correct fit diameter for your telescope.
6. What is a telescope mount? And what types of mounts are there?
A telescope mount is a specialized stand that holds the tube of the telescope, providing stability and allowing the telescope to be pointed at stars and other celestial objects. It also compensates for the daily rotation of the celestial sphere.
There are two primary types of telescope mounts:
- The alt-azimuth mount consists of two axes – horizontal and vertical – that allow for easy adjustment of the telescope’s position. To align the telescope with a specific object, simply rotate it along the horizontal axis (also known as the azimuthal axis) to align with the object’s horizontal coordinate, and then tilt it along the vertical axis to match the object’s vertical coordinate. This type of mount is commonly found in affordable telescope models due to its user-friendly design. However, it lacks the ability to track the movement of celestial objects, making it unsuitable for astrophotography.
- The equatorial mount is equipped with two perpendicular axes of rotation, namely the ascension axis and the declination axis. By utilizing the coordinate circles of the equatorial mount, one can effortlessly align with a celestial object based on its coordinates. Additionally, equatorial mounts can be equipped with motors on either one or both of the axes. If the intention is to purchase a telescope and pursue astrophotography, it is advisable to opt for a telescope equipped with an equatorial mount.
- Apart from the aforementioned types of mounts, there are also other options available such as fork mounts, Dobson mounts, and more.
Of course, there are numerous other factors and components to consider when purchasing a telescope, but we will delve into those in our next discussion.