As beginner stargazers embark on their journey to acquire their first telescope, a magnificent instrument for voyaging through the cosmos, they possess diverse aspirations. Certain individuals strive to uncover comets or dream of one day showcasing their astro-photography expertise, while others simply yearn to relish in the mesmerizing sights of the moon and planets sporadically. Regardless of these goals, there is one undeniable truth: commencing with the fundamentals by acquiring knowledge on how to properly employ a telescope is of utmost importance.
What is it?
A telescope is a device created specifically for the purpose of observing objects that are far away. While the term is commonly associated with optical instruments, there are telescopes available for various parts of the electromagnetic spectrum as well as other types of signals. In the case of an optical telescope, it operates by magnifying the apparent size of distant objects.
The functionality of telescopes is based on the utilization of one or more curved optical elements, such as lenses or mirrors. These elements are responsible for gathering light or other forms of electromagnetic radiation and directing it to a point where the resulting image can be properly observed, captured through photography, or studied in detail.
Useful Tips for Assembly
When assembling the telescope, it is important to follow the instructions provided by the manufacturer. However, there are some additional tips that can make the process easier:
Understanding the Components
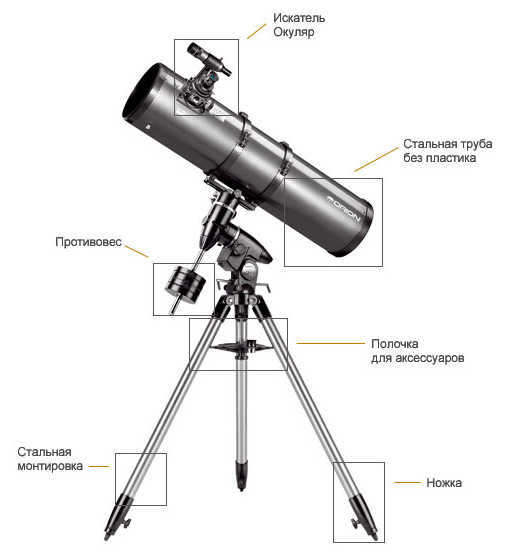
It is essential to familiarize yourself with the different parts that make up the telescope:
You can improve your telescope skills by practicing at home, where you have a well-lit environment. No matter what type of mount you have, you can make positional adjustments in the same way.
If you have a non-computerized telescope mount:
This technique is ideal for making large, sweeping movements across the sky. However, if you need to make smaller, incremental adjustments, manual mounts should have one or two cables or “slow control” knobs.

When it comes to a computerized telescope mount, the Go To feature is essential:
Aligning and using the finder
Now, it’s important to have a clear understanding of how to properly set up the telescope and the viewfinder.
Viewfinders are crucial accessories because without them, users will end up spending most of their time trying to locate objects rather than actually observing them.
Usually, telescopes come with one of two types of finders: a red dot finder or an optical finder:
Both types of telescope finders work effectively, but they need to be aligned with the telescope in order to be useful.

Using a Refractor Telescope
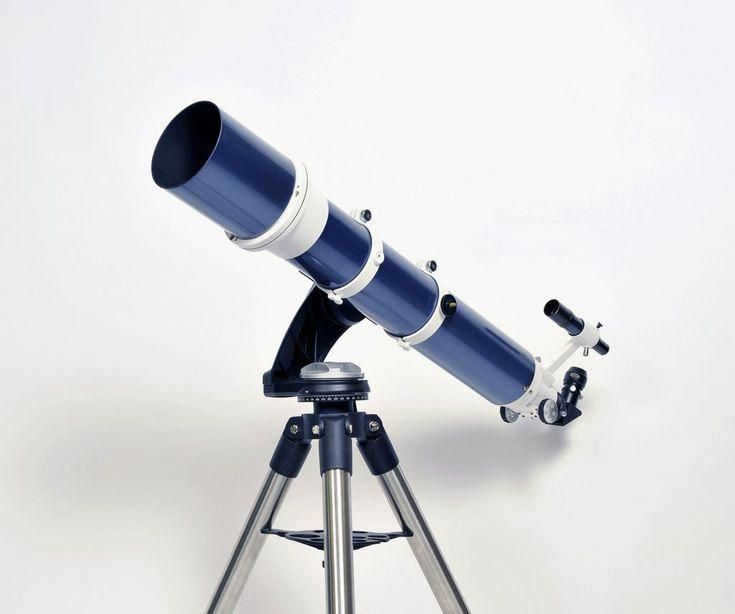
A refractor telescope utilizes glass lenses that are enclosed in a metal tube to gather light from distant celestial objects such as the moon, planets, star clusters, and nebulae. By incorporating interchangeable magnifying eyepieces, a refractor telescope enables the observation of these astronomical phenomena with remarkable precision. The Sky-Watcher BK 705AZ2 telescope serves as a prime example of this kind of instrument:
Tips for Using a Reflector Telescope
There are various techniques for observing the galaxy using this device, which allow you to examine objects ranging from simple to intricate. After becoming comfortable using the telescope for casual observation, transitioning to more detailed and complex viewing should be relatively straightforward. One example of a reflector telescope is the Celestron AstroMaster 76 EQ telescope:
Now, you have the opportunity to explore the universe by referring to star charts as needed.
The first question that arises for a happy owner of an optical instrument is how to assemble the telescope. Even if the salesperson in the store demonstrated the process, you may not have had a chance to remember everything due to your excitement. That’s alright: if the telescope is truly your long-awaited dream, understanding the basics of assembly and pointing will not be a major issue.
How about we try our hand at assembling the telescope?
Each device is equipped with a manual that provides detailed instructions on how to assemble it. It contains a step-by-step algorithm that guides you through the process. Start by practicing assembling the telescope at home. This will help you familiarize yourself with its basic structure and perform a few common operations. Once you have had some practice, you will be able to perform these operations in the dark of night.
The main component of your instrument is the mirror or lens. It is where the rays of light converge, forming an image in the focal plane. Always make sure that the telescope lens is pointed towards the object you are observing or searching for. The astronomer views the image through the eyepiece.
When assembling the telescope, make sure to use the included eyepieces, which have varying magnifications and focal lengths. After following the instructions to assemble the instrument, compare the eyepieces and select the one with the greater focal length. Attach this eyepiece to the tube. At this point, the primary assembly steps have been finished.
Master the art of adjusting the settings

How to calibrate the telescope? Practicing pointing the telescope at objects can also be done at home. You can try pointing the tube of the instrument at any object outside the window. Without proper calibration, the image will appear blurry, so it is important to focus it correctly:
- Adjust the focuser, which is located on the tube. Gently twist it in different directions, aligning it with the mechanism. The key is to align the focal plane of the eyepiece with the lens plane. Rotate the knob until you achieve a clear and sharp image;
- Avoid pointing the telescope at close objects. The primary purpose of a telescope is to observe distant objects, so it cannot be focused at close range;
- When placing the eyepiece in its designated position, be sure to secure it properly to avoid displacing the tube from its intended alignment.
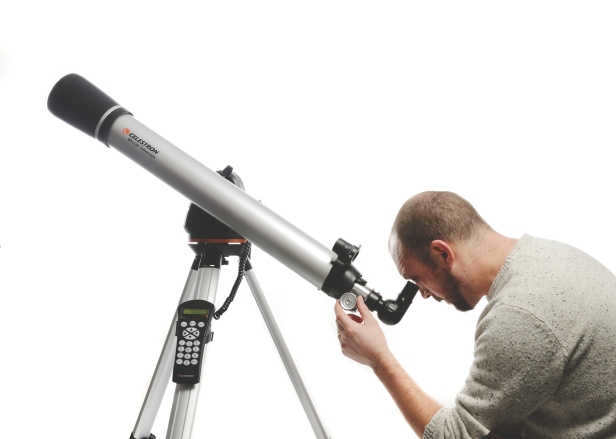
How can the telescope be directed towards a specific object?

How can I use a telescope to point it at an object in the sky? It’s easy to “point” at a large object on the ground, but when it comes to a specific star, it can be difficult without a finder.
A finder is a small telescope that is attached to a larger tube. It is parallel to the main telescope and always has a crosshair on its glass. To locate a specific astronomical object in the sky, follow these steps:
- Refer to a star map to determine the object’s approximate location.
- Try to locate the object visually without using the telescope.
- Adjust the telescope’s position to point towards the object you are searching for.
- Observe the object by moving the main tube of the instrument;
- Ensure that the crosshairs of the finder are aligned with the visible object.
If locating a star proves challenging, try aligning the finder with a general area where it may be located, such as a cluster of stars. Remember to keep your other eye open while using the finder, as this will help you quickly match the visible portion of the sky with the field of view of the finder.
Once the alignment is complete, look through the telescope’s eyepiece. If you have followed the steps correctly, there is a high probability that you will see an image of the desired object in the tube.
Calibrating the finder
Prior to using the telescope, it is important to ensure that the finder and main tube are properly aligned. Ideally, they should be parallel to each other. You can achieve this by adjusting the finder’s settings. It is recommended to practice adjusting the finder at home so that it becomes easier to do so at the observing site:
- Start by attaching the eyepiece with the highest magnification;
- Secure it onto the tube;
- Direct it towards a distant object visible through a window pane;
- Properly fix the main tube of the instrument in place;
- Look through the finder and adjust it using the adjusting screws so that its crosshairs align with the object.
- The effectiveness of finding the desired objects and the outcomes of observations rely on the proper functioning of the finder. It is worth noting that some telescopes come with collimator finders that have a “red dot” feature. These finders make it significantly easier to navigate in dark sky conditions.
Accompanying heavenly bodies
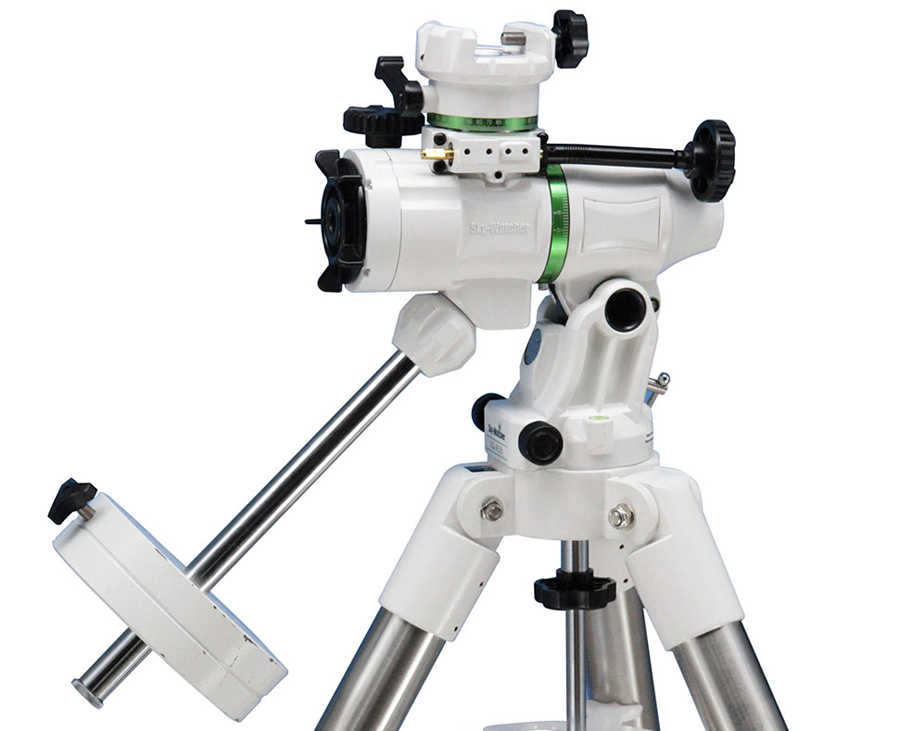
Mounting the telescope helps to accompany celestial objects and guide them as they move across the celestial sphere. There are two types of mounts: azimuthal and equatorial. For beginners, it is recommended to purchase an azimuthal mount as they are easier to control and transport. More experienced astronomers prefer equatorial mounts, which are adjusted to equatorial coordinate systems and come with more advanced control mechanisms. Once you learn how to use this type of mount, tracking celestial objects becomes much easier.
If you are a beginner astronomer, we suggest considering telescopes designed for beginners. They are user-friendly and affordable!
When buying their initial telescope, an optical time machine for exploring the cosmos, novice stargazers have various objectives. Some aim to uncover comets or someday publish astro-photography, while others simply desire to relish views of the moon and planets on occasion. Regardless of the objectives, one thing is certain: you must begin with the fundamentals by acquiring knowledge on how to operate a telescope.
A telescope is a device created for the purpose of observing objects that are far away. The term commonly refers to instruments that use optics, although there are telescopes designed for various parts of the electromagnetic spectrum and for different types of signals. An optical telescope enhances the apparent size of distant objects.
Telescopes function by utilizing one or more curved optical components – either lenses or mirrors – to gather light or other forms of electromagnetic radiation. This collected light or radiation is then focused to a point where the image can be examined, photographed, or analyzed.
Tips for Assembling
When assembling the telescope, it is important to follow the instructions provided by the user’s manual. However, there are some additional tips that can help make the assembly process easier:
- Choose a well-lit room to assemble the telescope.
- Ensure you have enough space, patience, and all the necessary tools before starting the assembly.
- After completing the assembly, take some time to familiarize yourself with the telescope’s features and how to use it before taking it outside for the first time.
What is its composition?
Let’s explore the makeup of a telescope:
- The main component of a telescope is the optical tube. This is the part that is typically associated with a telescope. It contains a lens at the front (refractor) or a mirror at the back (reflector) that is responsible for gathering light. Some optical tubes incorporate both lenses and mirrors. These types of telescopes are known as catadioptric telescopes. The most popular catadioptric telescopes are the Schmidt-Cassegrain telescope (SCT) and the Maksutov-Cassegrain telescope (MCT).
- The mount (mount) is the component that holds the optical tube. There are several different types of mounts available, including equatorial, alt-azimuth, computerized GoTo, and manual mounts. The Alt-Azimuth mount allows for movement of the telescope in straight lines, including up, down, left, and right. On the other hand, the Equatorial mount is specifically designed to track stars as they move in an arc across the sky. It can be adjusted to compensate for the observer’s latitude. Equatorial mounts can range from simple models with basic motor functionality on one or both axes, to more complex computerized systems that can control telescopes in an entire observatory.

How to Operate a Telescope
It is recommended to practice operating your telescope in a well-lit environment. Regardless of the type of mount, the adjustments can be made in the same manner.
For telescopes with non-computerized mounts:
- Start by loosening the locking knobs on the elevation and azimuth (for alt-azimuth mounts) or on the direct elevation and deflection axes (for equatorial mounts).
- Hold onto the optical tube and move it in the desired direction.
- Secure the telescope to prevent any unintended movements.
This technique is useful for making large, sweeping movements across the sky. For more precise adjustments, manual mounts may have one or two cables or “slow motion” knobs.
When it comes to a computerized telescope mount, you have the option to:
- Utilize the provided hand controller to adjust the telescope’s position.
- Choose a slew rate that suits the distance you wish to move the telescope across the sky. Higher speeds are employed for transitioning between objects, while slower speeds are used for centering or keeping the object in view through the eyepiece. It may take some time to get accustomed to these speeds, so feel free to experiment with the directional buttons on the hand controller and familiarize yourself with operating this type of telescope.
Alignment and Utilization of the Finder
Now, it is crucial to comprehend the correct alignment procedure for both the telescope and the viewfinder.
Viewfinders are essential accessories as they enable users to swiftly locate objects without wasting time.
Typically, telescopes are equipped with one of two types of finders: a red dot finder or an optical finder:
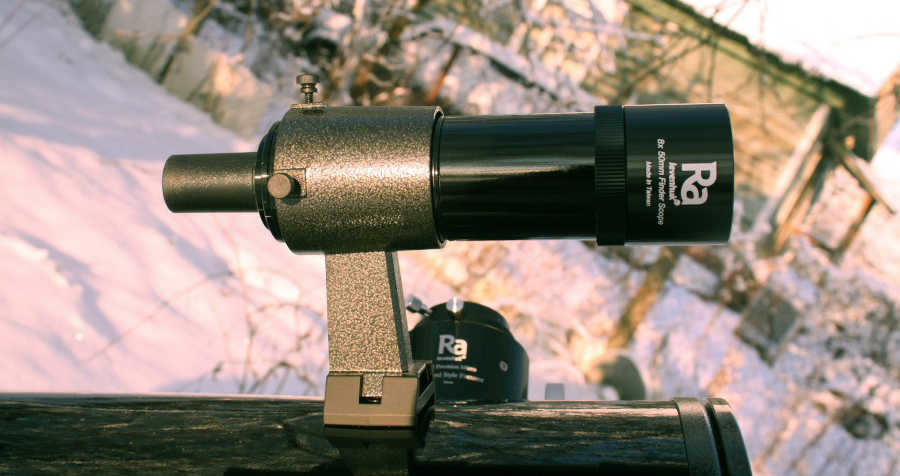
- An optical viewfinder is a compact device that is positioned on top of the main telescope using a viewfinder bracket. It provides a low-magnification view of the sky, usually ranging from 6X to 10X, and features a crosshair visible through the eyepiece, aiding in centering the object within the finder’s field of view.
- The red dot finder provides a broad view of the sky without any magnification. Rather than peering through the eyepiece, users observe a glass or plastic screen that reflects a red dot. Typically, this finder is affixed to the telescope using an elevated bracket.
Both varieties of telescope finders function effectively; however, they must be properly aligned with the telescope in order to be of any use.
- Follow the instructions in the manual to attach the finder bracket and finder to the telescope.
- Choose the eyepiece with the lowest magnification and insert it into the focuser.
- During daylight hours, take the telescope outside and position it where you have a clear view of a distant, stationary object. This could be a stop sign, lamppost, or high voltage insulator on an electric pole.
- Carefully aim the telescope at the target and look through the eyepiece. The object should be visible within the field of view, but if not, use the slow-motion control knobs or telescope mount dial to make adjustments until the target is centered in the eyepiece.
- Ensure that the telescope’s latches are securely tightened to prevent any movement.
- When observing through the finder, utilize the adjustment knobs on the viewfinder or finder arm to precisely center the target within the finder’s field of view.
- Once the telescope is locked in place, cautiously switch to the eyepiece with the next highest magnification.
- After successfully centering the target in both the viewfinder and eyepiece at the highest available magnification, the viewfinder will be properly aligned.
How to utilize a refractor telescope
Refractor telescopes make use of glass lenses housed within a metal tube to gather light from far-off objects such as the moon, planets, star clusters, and nebulae. By combining them with interchangeable magnifying eyepieces, a refractor allows for the detailed study of these celestial objects. An excellent example of this kind of equipment is the Sky-Watcher BK 705AZ2 telescope:
- Choose a location for observation that is away from sources of light.
- Set up the tripod on the ground. Extend each leg of the tripod to the same length, and then secure them in place by tightening the screws on each leg. Position the tripod in an upright position. Loosen the thumbscrews on the tripod mounting bracket. Insert the telescope into the tripod mounting bracket, and then secure it by tightening the mounting screws.
- To direct the telescope towards the desired astronomical target, aim it at a bright object like the moon or a star. Adjust the tube’s height and move it horizontally to point the telescope in the right direction.
- Check the search field and modify the telescope’s orientation to center the object in the viewfinder field.
- Place a low-power eyepiece, with a magnification of 75X or lower, into the telescope’s focuser.
- Secure the eyepiece in place by tightening the locking screw. Look through the eyepiece and ensure that the object is within the field of view. If not, re-center the object using the search area. Use the focus knob to adjust until the object appears sharp in the eyepiece.
- Insert the high-power eyepiece into the telescope’s focuser to observe the object in greater detail.
- Use the focuser to sharpen the object in the eyepiece.

Tips for using a reflector telescope
There are various ways to observe the galaxy using a reflector telescope, allowing you to explore objects ranging from simple to intricate. Once you have become proficient in operating the telescope for casual observations, transitioning to more precise and complex viewing should be straightforward. An example of a reflector telescope is the Celestron AstroMaster 76 EQ:
Take the time to familiarize yourself with the instruction manual of the telescope.
Locate the eyepiece mount and practice changing and removing different eyepieces. Each telescope brand utilizes different locking mechanisms to secure the eyepieces.
You now have the opportunity to venture into outer space, consulting star charts whenever necessary.
Studying the moon and celestial bodies is an incredibly fascinating pursuit. Unlike other astronomical observations, viewing planets is not affected by light pollution and can be done directly from urban areas. Additionally, planet observations do not require wide-angle eyepieces, as even affordable Plössl eyepieces can yield satisfying visual results.
- Magnification
- Resolution
- Brilliance
- Light scattering
- Contrast
- Sharpness
Magnification
The most indeterminate factor. Planets are small, so the greater the magnification the better!? Not really. You need to utilize the optimal magnification for your telescope. The simplest way to determine it is to calculate it from the optimal exit pupil of the telescope. The exit pupil is the size of the focused image you observe through the eyepiece in your telescope.
The exit pupil is calculated as follows: the diameter of the telescope objective in mm, divided by the magnification of the eyepiece. The magnification of the telescope is calculated by dividing the focal length of the objective lens in mm by the focal length of the eyepiece used, also in mm.
The focal ratio (F/D) of a telescope lens is determined by dividing the focal length of the lens by its diameter (aperture).
Interestingly, the human eye achieves optimal resolution for well-lit objects with a 1 mm exit pupil. To illustrate, let’s consider a 90mm refractor with a focal length of 900mm and a focal ratio of F/D-10. In this scenario, a 10mm eyepiece would provide the best views of the Moon or planets. Similarly, for F/D-5, a 5mm eyepiece would be suitable, while an 8mm eyepiece would be ideal for F/D-8. By using these specific magnifications, you can enjoy exceptional planetary observations on most nights.
- If the atmospheric conditions (transparency and stability) are excellent, and your telescope has high-quality optics, you can increase the magnification to a 0.5 mm exit pupil size to observe fine details more clearly. This requires a 5mm eyepiece or a 10mm eyepiece with a 2x Barlow lens for an F/D-10 focal ratio objective.
- If the atmospheric conditions are poor and the image of the planet appears “distorted and blurred” with a 1mm exit pupil, it is necessary to reduce the magnification and use a 1.5mm or 2mm exit pupil size to observe at least some of the key features of the object. For the F/D-10 objective, this would require using a 15mm or 20mm eyepiece, respectively.
Brilliance
Excellence
The Moon and most other planets emit a strong glow, which can often obscure fine details when looking through a telescope. One way to address this issue is by creating artificial light pollution. By turning on lights on your porch, balcony, or observation area, you can counteract the effects of nighttime eye adaptation and improve your view. Another effective technique is to observe the Moon and planets during the daytime, while the sky is still blue. I have personally had the best views of Jupiter right before sunset. If these methods are not sufficient, you can also use an aperture or filters to control the brightness. Adding an aperture in front of the lens, especially when observing the Moon without a specialized filter, can be quite effective for telescopes with focal ratios of F/D-4 to F/D-6. However, for instruments with smaller apertures and lower luminosity, such as F/D-8 or F/D-15, I would not recommend this as it may reduce resolution. In such cases, using filters would be a more appropriate solution (more information on filter selection will be provided later).
Scattering of Light
The phenomenon of light scattering takes place when intense light emitted by the moon, planets, or stars strikes the glass surface of your telescope. This scattering effect can result in glare, decreased contrast, and reduced resolution. Unfortunately, it is not possible to eliminate light scattering entirely through the use of filters. The most effective approach to mitigate this issue is to carefully select a diagonal, Barlow lens, eyepieces, and filters that offer superior control over the level of light scattering. In other words, it is advisable to opt for high-quality equipment, such as a diagonal featuring a dielectric mirror surface coating.
Enhancing Contrast
The objective of observing planets and the moon is to achieve optimal contrast. This can be accomplished by managing glare and light dispersion while selecting eyepieces that offer excellent contrast. Additionally, you can enhance the contrast of specific surface features on celestial bodies by using suitable filters (further details on this will be provided below). It is important to note that higher magnifications may result in a reduction of contrast.
There are different levels of image sharpness that can be produced by various optical telescopes. Assuming that you already own a telescope, it would be wise to focus on selecting the right eyepieces and Barlow lens. It is important to note that certain eyepiece models may result in a “washed out” image, particularly at higher magnifications. Interestingly, some of these eyepieces are even marketed as being ideal for planetary observation. However, it is widely agreed upon that Orthoscopic eyepieces are the best option for observing planets. It is also worth noting that using budget eyepieces can potentially compromise the sharpness of the image.
Here are some recommendations for choosing a telescope and its accessories:
Telescope
When it comes to observing planets, any telescope, regardless of its size or optical layout, can be used. However, if you specifically want to observe the moon and planets, it is recommended to choose a telescope with a long focal length and an F/D-8…F/D-15 ratio. Telescopes with this design will provide better results as they minimize chromatic aberrations, which can reduce resolution when using high magnifications.
For optimal performance, we recommend considering the following options:
– Achromatic refractors with a long focal length of 80-120mm.
– APO/ED refractors with a smaller size of 80-100mm.
Another option to consider is catadioptric telescopes such as Maksutov and Schmidt-Kassegren. These telescopes have a diameter of 5-11 inches. However, it is worth noting that their full potential may not be realized frequently due to atmospheric instability.
While larger APO refractors can offer excellent magnification and image quality, they come with a hefty price tag. On the other hand, larger Newtonian and catadioptric telescopes have the potential to provide unparalleled views of the planets. However, in order to fully benefit from their larger aperture (objective lens diameter), you will need to wait for nights with exceptionally stable atmospheres to achieve high resolution. Unfortunately, such nights are few and far between, making it more practical to use a telescope with a smaller lens diameter on an average night.
Filter Options
Once you have your telescope, the next important step is to consider the filters you will use. It is crucial to invest in filters of high quality, as the plastic planetary filters available from many manufacturers can actually degrade resolution and cause increased light scattering. To ensure optimal performance, I highly recommend filters from reputable brands such as Baader, Lumicon, or Refinery, which are available for purchase. Keep in mind that you can also find used filters on platforms like eBay or astropharmacies, as long as they are in good condition without any scratches.
While neutral density and polarizing filters are commonly suggested for observing the Moon and planets, I have found that color filters tend to yield better results. Therefore, I would suggest exploring color filters as an alternative to enhance your observations.
Color filters have multiple benefits, including reducing glare and enhancing the contrast of surface details. When observing celestial bodies, specific filters are recommended for optimal viewing. For the crescent Moon and Saturn, the orange #21 filter is the top choice, and it also works well for Mars. For Mars, the red #23A filter is most effective, especially for larger telescopes, the red #25 filter is recommended. Venus and Mercury can be observed best with the blue #80A filter, while the green #58 filter is ideal for full moons. Finding the right filter for Jupiter can be a challenge, as I have experimented with various filters over the years. Among the color filters, the blue #80A has proven to be the most reliable and helpful.
If you’re observing Jupiter, Saturn, or Mars, I highly recommend using specialty filters from Baader. These filters are not suitable for the Moon, Venus, or Mercury, but they work wonders for the aforementioned planets. When observing Jupiter, the Baader Moon and Sky Glow filter outperforms the blue #80A filter. For Saturn and Mars, the Baader Contrast Booster filter yields the best results. When the planets are exceptionally bright, such as during opposition, you can use both the Baader Moon and Sky Glow filter and the Baader Contrast Booster filter together. These filters effectively reduce glare and enhance contrast without significantly altering the planets’ natural surface colors.
Eyepieces
Looking for a great eyepiece for observing planets? Consider getting an Orthoscopic eyepiece! These eyepieces are known for their sharpness, high contrast, and excellent light scattering reduction. You can easily find used orthoscopes in the $40-60 price range. Most orthoscopes are manufactured in Japan, so you can expect good quality control. If you prefer to buy new, the Baader Classic Orthos (BCO) is a great option that offers excellent value for money. The BCOs also have a wider 50-degree field of view, which is larger than both conventional orthoscopic eyepieces and Plössl eyepieces.
There are two limitations associated with the orthoscopic pattern: a narrow field of view, ranging from 40 to 50 degrees, and a limited pupil outreach at shorter focal lengths. For instance, an 18-mm orthoscopic eyepiece has a comfortable pupil outreach of approximately 14 mm. When combined with a 2x Barlow lens, the effective focal length decreases to 9 mm, making it suitable for telescopes with focal ratios ranging from F/D-8 to F/D-10. Similarly, when used with a 3x Barlow lens, the effective focal length decreases further to 6 mm, making it suitable for telescopes with focal ratios ranging from F/D-5 to F/D-7.
One might argue, “My eyepieces perform admirably when observing the Moon”, and indeed they do. The Moon is an exceptionally accessible celestial body to study. Even if your eyepiece produces a slightly blurred image, you will still be able to discern a significant amount of detail. However, conducting a comparison between high-quality, precision-engineered eyepieces and those with a more modest price point will yield remarkable results. It is akin to transitioning from watching standard analog television to the crystal-clear visuals of high-definition broadcasting; the disparity is strikingly evident.
Barlow lenses
If your eyepieces fall within the appropriate focal length range, then a Barlow lens is unnecessary. Cheaper Barlow lenses can actually decrease contrast and cause more light scattering. However, high-quality Barlow lenses can still be beneficial. If you want to achieve an exit pupil of 1 mm or less in a telescope with a short focal length, you will need to use an eyepiece with a short focal length. This can sometimes be inconvenient. In these situations, it may be better to use a 2x or 3x Barlow lens along with a longer focal length eyepiece. Additionally, using a Barlow lens increases the effective focal length of the telescope, resulting in better planetary images compared to using a short focal length eyepiece. The Baader Q barlow 2.25x and the TeleVue 2x and 3x Barlow lenses are highly recommended options in the premium segment.
Diagonal
The diagonal is often ignored when considering the optical path, but it plays an important role in the quality of views through a telescope eyepiece. To ensure the best results, it is recommended to use a diagonal with a larger diameter. If your telescope has a 2-inch focuser, upgrading to a 2-inch dielectric diagonal is a wise choice. This will enhance imaging for both Deep-Sky objects (DSO) and planets. Personally, I have had a positive experience with a reasonably priced dielectric diagonal from GSO. Other reputable manufacturers include Celestron, Orion, and Explore Scientific.
If your main focus is observing the Moon and planets, a high-quality prism diagonal would be the best option. Prisms scatter less light compared to dielectric mirror diagonals, making them more suitable for moons and planets. In terms of performance and value, I would recommend the Baader T2 prism.
Observation
Lunar Observation
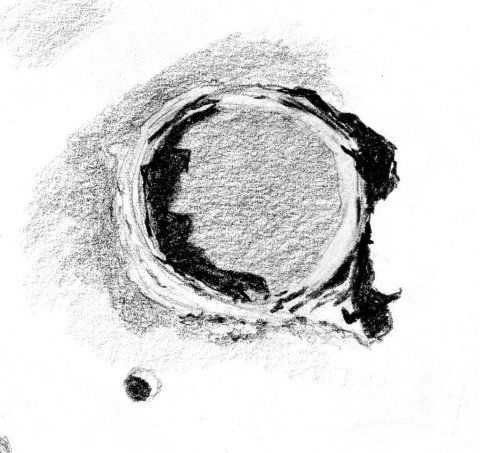
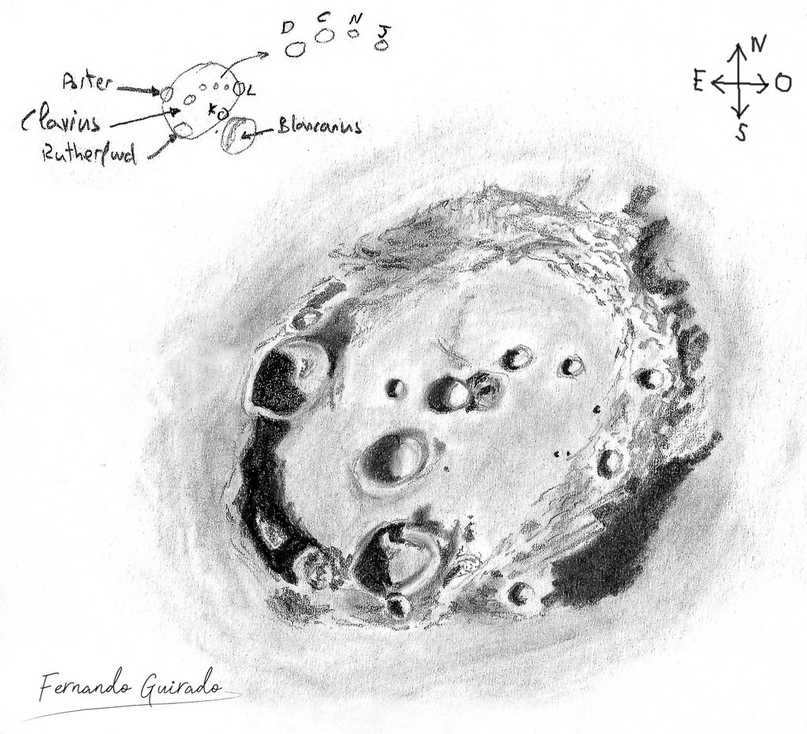
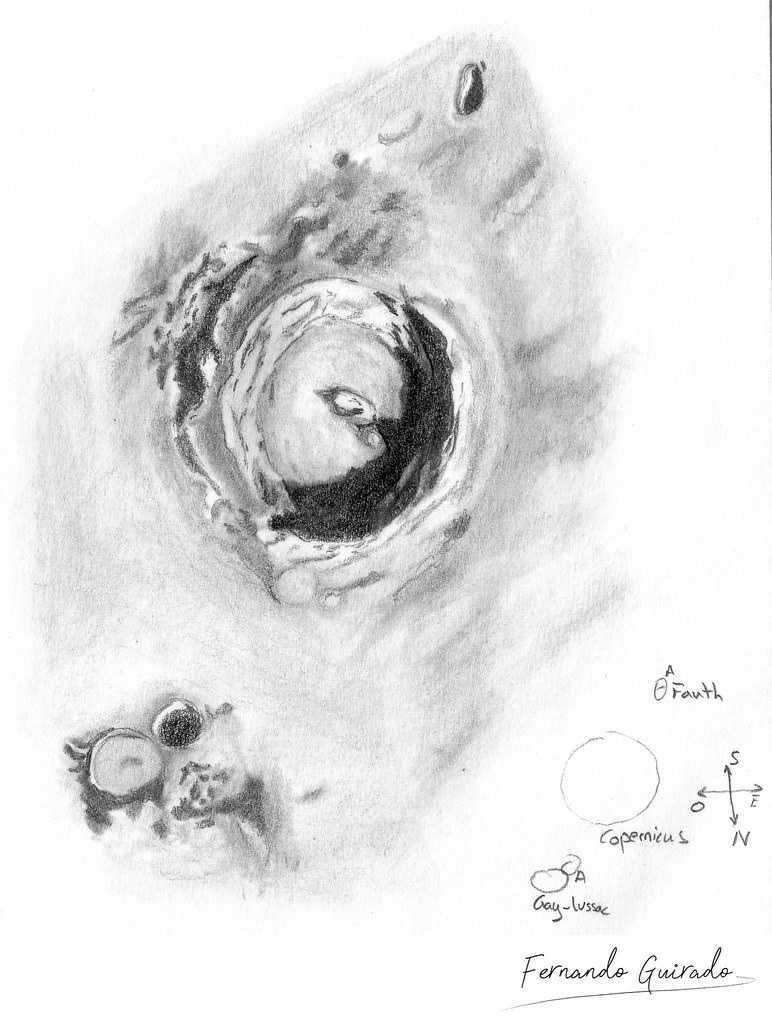
When observing the Moon, the most interesting and detailed areas can be found at the boundary between the illuminated and unilluminated parts of the lunar surface. This boundary, known as the terminator, constantly changes its location as the Moon goes through its different phases. This means that every night, you have the opportunity to discover new and exciting views of the Moon. Even with small telescopes or binoculars, you can easily see numerous craters on the Moon’s surface. However, if you want to see even finer details, it’s recommended to use a telescope with a larger aperture. For example, with my 8-inch Schmidt-Cassegrain telescope, I can observe the Moon’s surface with incredible clarity. On a typical night, I am able to zoom in and study a single crater in great detail, examining its complex walls, central slide, microcraters, and other fascinating features.
Mercury and Venus
Mercury and Venus are two fascinating planets in our solar system. They have unique characteristics and offer a wealth of information for scientists and astronomers to study.
Mercury is the closest planet to the sun and is known for its extreme temperatures and lack of atmosphere. It is a rocky planet with a cratered surface, similar to our moon. Despite its small size, Mercury has a dense core and a thin atmosphere composed of atoms blasted off its surface by the solar wind. This makes it an interesting subject of study for scientists who want to learn more about the formation and evolution of planets.
Venus, on the other hand, is often referred to as Earth’s “sister planet” due to its similar size and composition. However, Venus has a very different atmosphere, which is mostly made up of carbon dioxide and clouds of sulfuric acid. These clouds create a greenhouse effect, trapping heat and making Venus the hottest planet in our solar system. Venus also has a thick layer of clouds that completely obscures its surface from view. Despite these challenges, scientists have been able to gather valuable information about Venus through the use of radar imaging and other techniques.
Studying Mercury and Venus provides valuable insights into the formation and evolution of rocky planets, as well as the dynamics of different atmospheres. By understanding these neighboring planets, scientists can better understand our own planet and its place in the universe.
These planets are not visible throughout the year. They can only be observed for a short period of time when they appear as either a “morning star” or an “evening star”. Mercury is particularly challenging to spot because even when it is farthest from the Sun, it is still relatively close to our star. Successfully locating Mercury with the naked eye is quite an achievement. On rare occasions when Mercury is at its maximum distance from the Sun, and the atmosphere is calm and clear, the planet can be seen near the horizon. Even with small instruments, it is possible to observe Mercury’s phase.
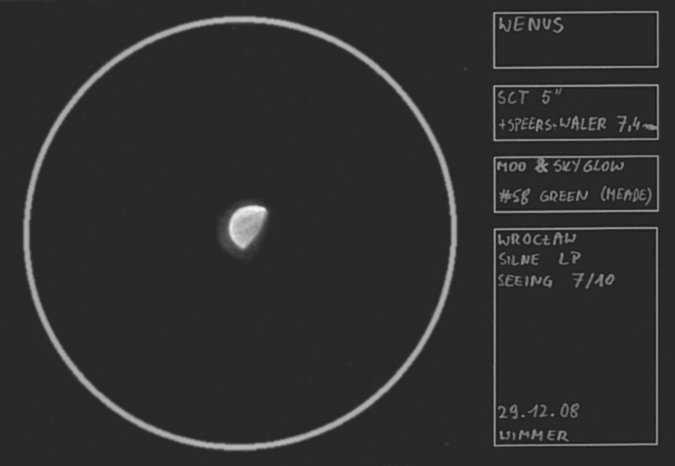
Venus is more visible in the sky. The elongations of the planet can be observed for a few weeks. Even a pair of basic binoculars, such as 10×50, can reveal the different phases of Venus. When observing Venus through large telescopes and using filters, it is occasionally possible to distinguish darker clouds within the planet’s atmosphere.
Mars
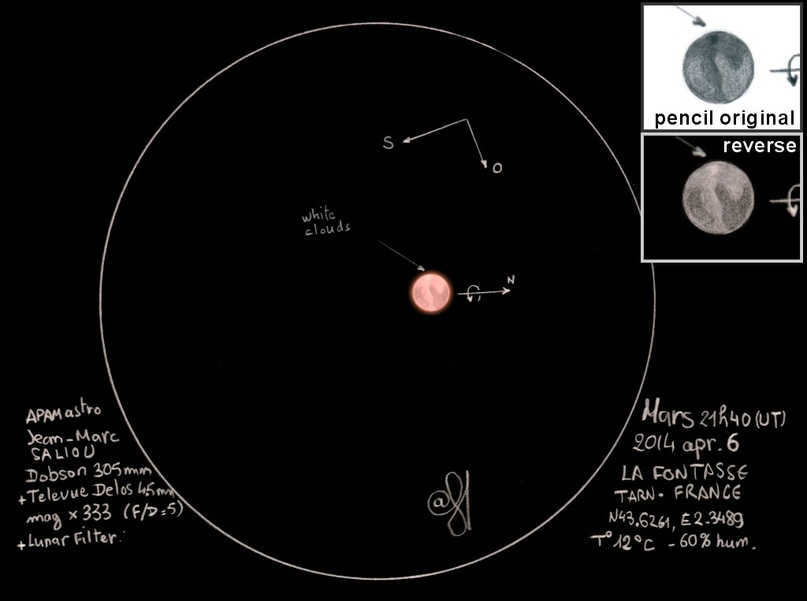
Mars quickly moves through the zodiac constellations throughout the year. When it is visible in the sky, you usually only see a small orange disk without much detail. However, every two years Mars reaches opposition, which means it is directly opposite the Sun, and its apparent size becomes noticeably larger. The next opposition is scheduled for October 13, 2020, so prepare yourself! 🙂 You can start observing the planet as early as July!
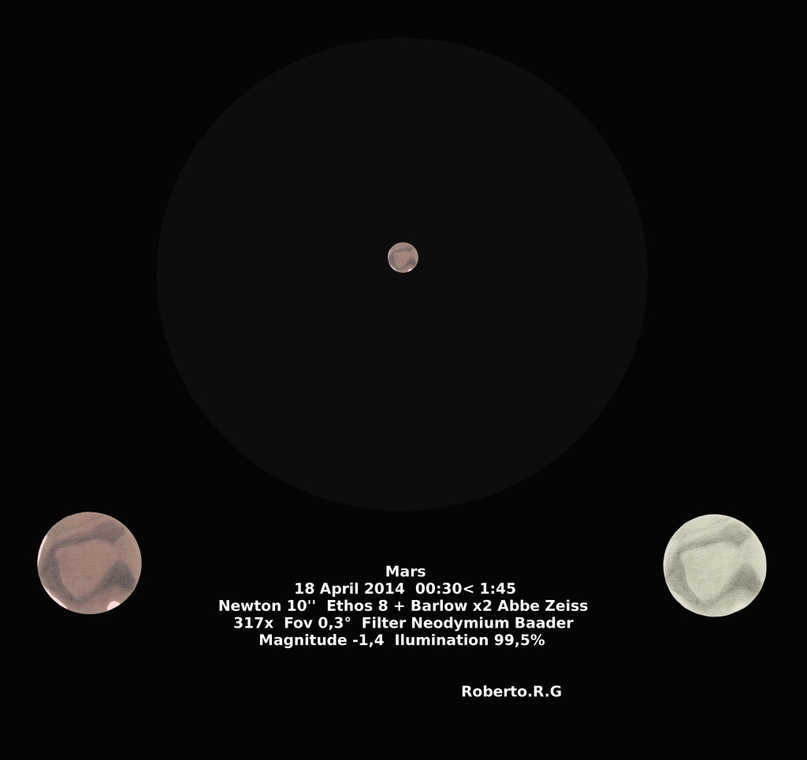
Observing Mars can be quite challenging due to the low contrast of surface features. To improve visibility, it is recommended to use filters and eyepieces. With an 80mm telescope and some patience, it is possible to discern many details on the planet’s surface, especially during the opposition. The key is to take your time, keep Mars within the telescope’s field of view, and wait for moments when the atmosphere becomes calmer, allowing surface details to become more pronounced. This approach is commonly employed when observing other planets like Jupiter and Saturn as well.
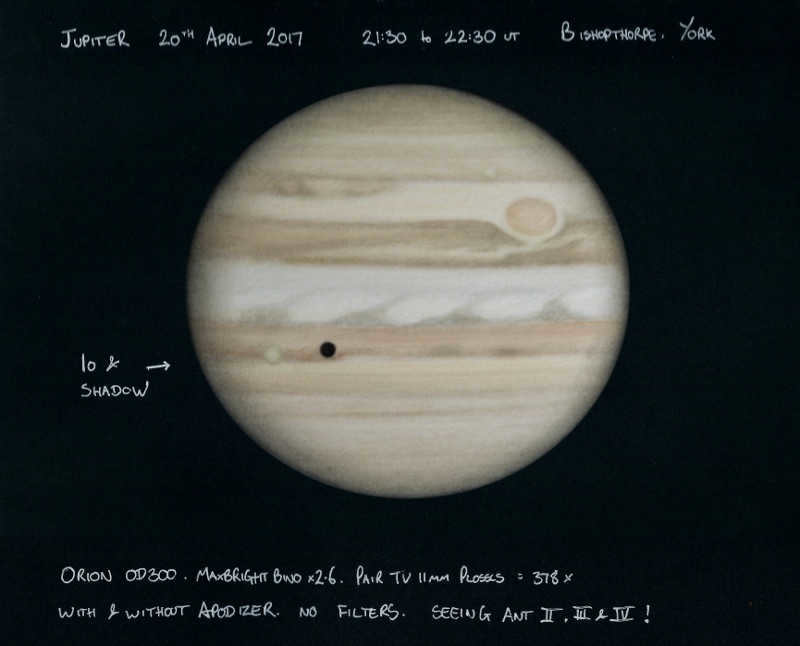
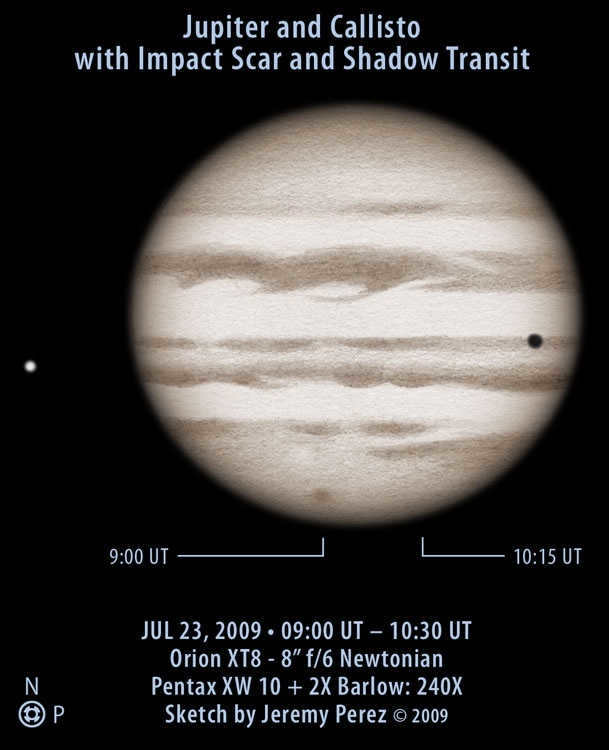
Jupiter
Jupiter is the largest planet in our solar system. It is a gas giant and is known for its beautiful and vibrant atmosphere. With its distinctive bands of clouds and its iconic Great Red Spot, Jupiter is a stunning sight to behold.
In addition to its size and appearance, Jupiter is also home to a fascinating array of moons. The planet has a total of 79 known moons, the four largest of which are known as the Galilean moons. These moons – Io, Europa, Ganymede, and Callisto – are among the most interesting objects in our solar system. They have their own unique characteristics and are the subject of ongoing scientific study.
Jupiter’s size and mass make it a powerful force in our solar system. Its gravity is so strong that it has a significant effect on the orbits of other planets and asteroids. In fact, Jupiter’s gravitational pull has been known to protect Earth from potentially dangerous asteroids by deflecting them away from our planet.
Overall, Jupiter is a fascinating and important part of our solar system. Its size, appearance, and gravitational influence make it a truly unique and awe-inspiring planet.
The planet Saturn
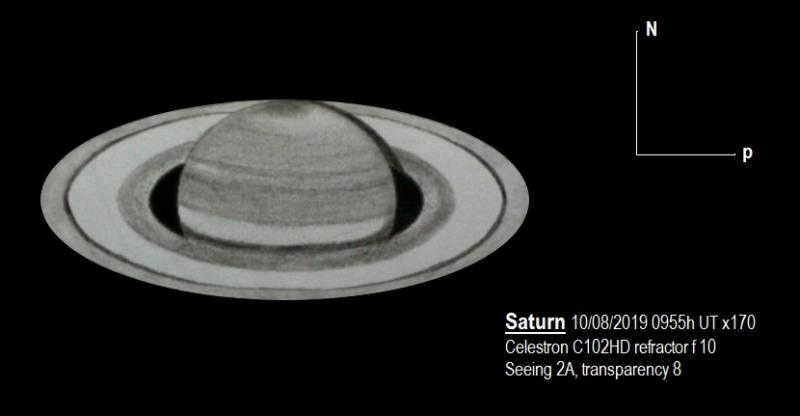
Similar to Jupiter, Saturn can be seen for about 4-5 months each year. However, unlike Jupiter, Saturn appears smaller in size. When viewed through 10×50 binoculars, it has an oval shape, but with some practice and high-quality optics, the tiny rings can be distinguished around its disk when using 15×70 binoculars. These rings can be easily seen even with smaller telescopes. Even a relatively small telescope aperture and magnification will reveal the “Cassini slit” within the rings, without the need for filters. Comparatively, Saturn’s cloud system has lower contrast than Jupiter’s. To observe more details on Saturn’s disk and rings, filters and higher magnification using a telescope with a larger lens diameter are required. Saturn’s largest moon, Titan, is clearly visible even at lower magnifications. With a larger telescope, it is possible to observe several other moons as well.
Uranus and Neptune: A Unique Observation
These two celestial bodies have the fascinating characteristic of remaining in the same constellation for extended periods of time. The fall season has consistently proved to be the optimal time for observing them in recent years. When viewed through binoculars or a small telescope, both Uranus and Neptune appear as striking “blue stars”. However, for a more detailed observation, a larger instrument (8 inches or more) is required to perceive the planets’ small, greenish disks, devoid of any discernible surface features. Additionally, by utilizing a telescope of 8 inches or greater, it is possible to catch a glimpse of Triton, one of Neptune’s satellites, as well as at least three satellites of Uranus.
Pluto
Pluto is still considered a planet in my perception! 🙂 It has been located in the Sagittarius constellation for the past few years. Despite having a very stable atmosphere, it can only be observed as a faint star when using a telescope with a diameter of 8 inches or larger.
“Parade of Planets.”
Every two to three years, there is a phenomenon called the “Parade of Planets” where all the planets align and can be seen simultaneously in one night. I have personally witnessed this awe-inspiring event in the past! 🙂 Next time, I will make sure to provide advanced notice about this phenomenon.
Unfortunately, I couldn’t cover all the intricate details of observing the Moon and planets in a single, concise article. However, I hope I have provided enough information to spark your interest in the fascinating world of planet observation. I also hope that this article proves to be helpful to someone.
If you have any questions, please feel free to ask!
Wishing everyone clear skies and exciting observations!
Konstantin Radchenko is the editor-in-chief of the Open Astronomy group on VKontakte (VK).
For more information about our group, please visit: vk.com/openastronomy
"If there was only one spot on the planet where the stars could be observed, people would flock there in large numbers to contemplate and admire the marvels of the celestial sphere." (Seneca, 1st century A.D.) It is difficult to argue that, in this regard, very little has changed on Earth over the course of thousands of years. The boundlessness and vastness of the starry sky still inexplicably captivates the gaze of individuals, mesmerizes, and fills the soul with a serene and gentle happiness, a feeling of unity with the entire cosmos. And if even the imaginations of adults occasionally conjure up incredible images, what can be said about our children, who are dreamers and fantasizers, inhabiting worlds of fairy tales, soaring in their dreams, and yearning for space travel and encounters with extraterrestrial intelligence. And if your child has reached the age of inquiring "why do stars shine?" and bombards you with questions about why stars shine, who invented summer, how far away the sun is, and what a comet is, then it is time to introduce them to the fundamentals of astronomy, to help them comprehend the structure of the world that surrounds them, and to nurture their curiosity in scientific exploration.
How can I begin my journey into the world of astronomy?
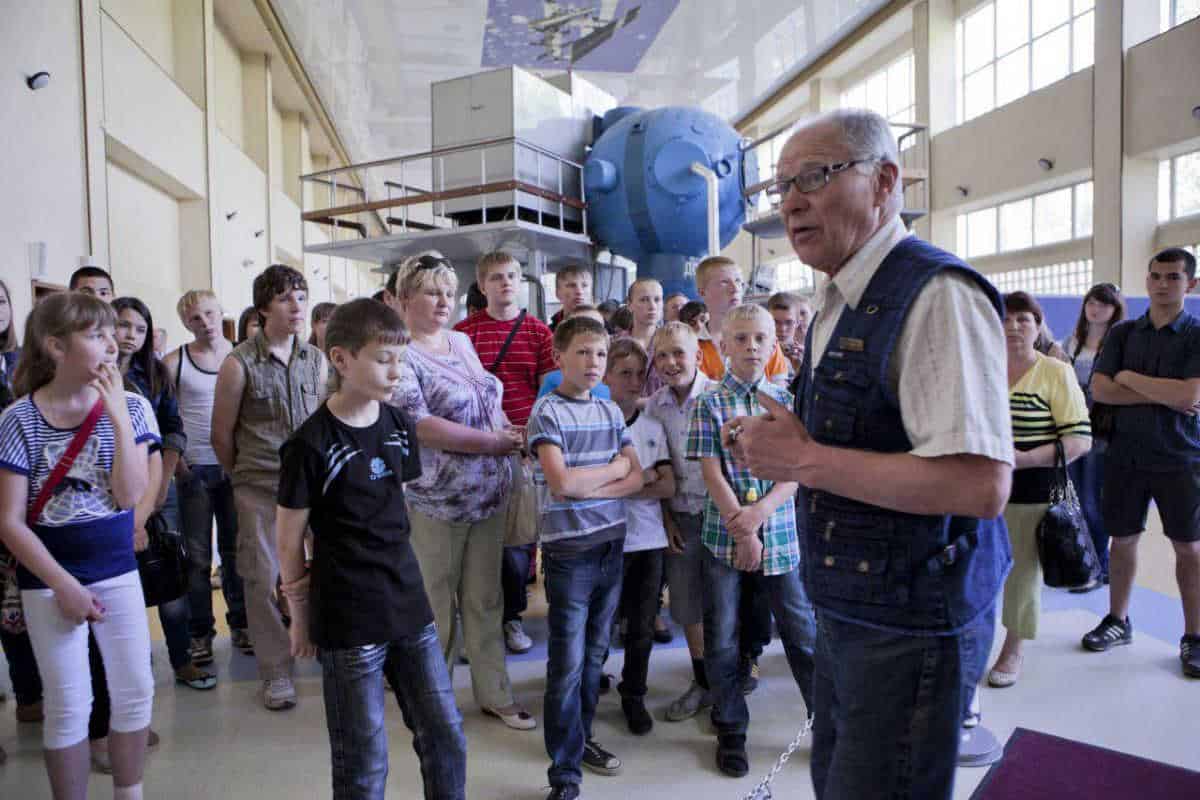
Embarking on the fascinating world of astronomy should not commence with delving into the complexities of the “big bang theory”. Even adults struggle to comprehend the vastness of the universe, let alone young children who may see their own home as a universe in itself. It’s not necessary to immediately invest in a telescope, as it is a device more suitable for more advanced young astronomers. Additionally, many interesting observations can be made using binoculars. It would be better to start by purchasing an informative astronomy book specially designed for kids, and by attending children’s programs at the planetarium, space museum, and, of course, listening to captivating and easy-to-understand stories about the planets and stars from mom and dad.
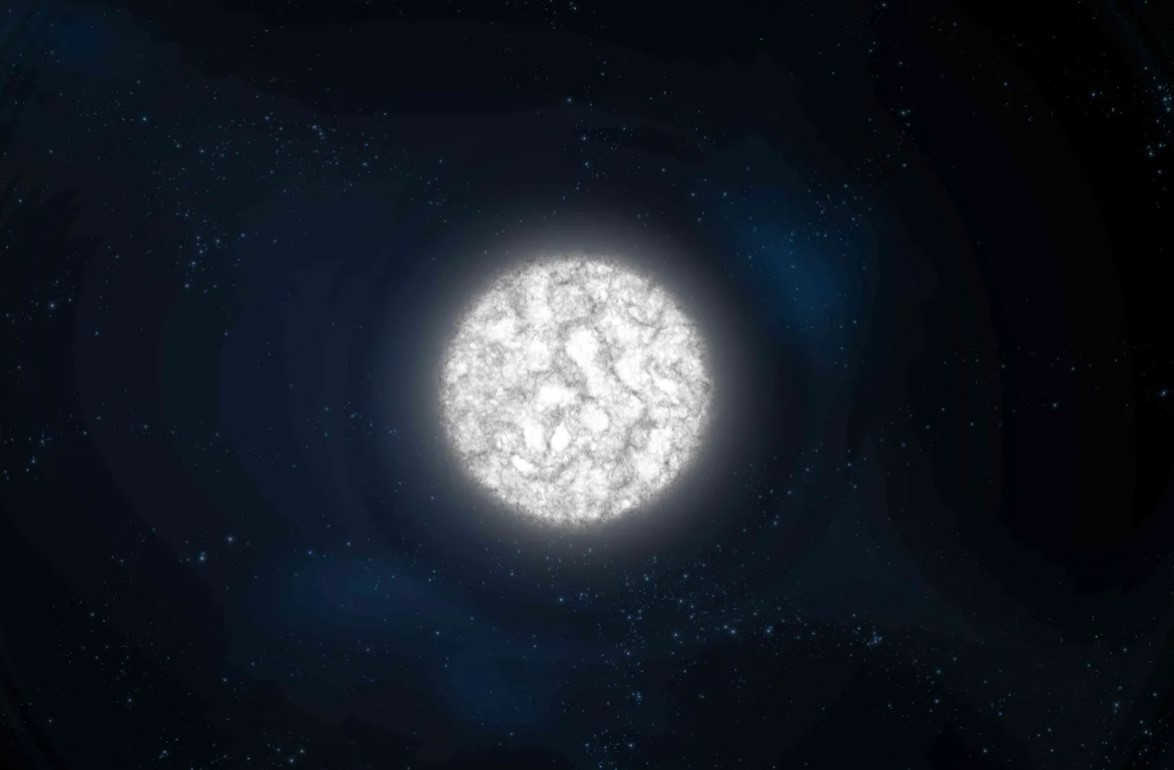
Explain to your child that our planet, Earth, is a massive sphere that is home to rivers, mountains, forests, deserts, and all of us, the people who live here. The entire system of Earth and everything that exists within it is known as the Universe or the cosmos. Space is incredibly vast, and no matter how far we travel in a rocket, we will never reach its boundaries. In addition to Earth, there are other planets and stars in the Universe. Stars are enormous, glowing orbs of fire. The Sun, which is very close to Earth, is also a star. We can see its light and feel its warmth because of its proximity. There are stars that are much larger and hotter than the Sun, but they are so far away from Earth that they appear as tiny specks in the night sky. Children often wonder why stars are not visible during the daytime. You can compare the light of a flashlight during the day and at night to help them understand. In bright daylight, the beam of a flashlight is hardly noticeable, but it shines brightly in the darkness of the evening. The light of stars is similar to that of a flashlight: it is overshadowed by the Sun during the day. Therefore, we can only see stars at night.
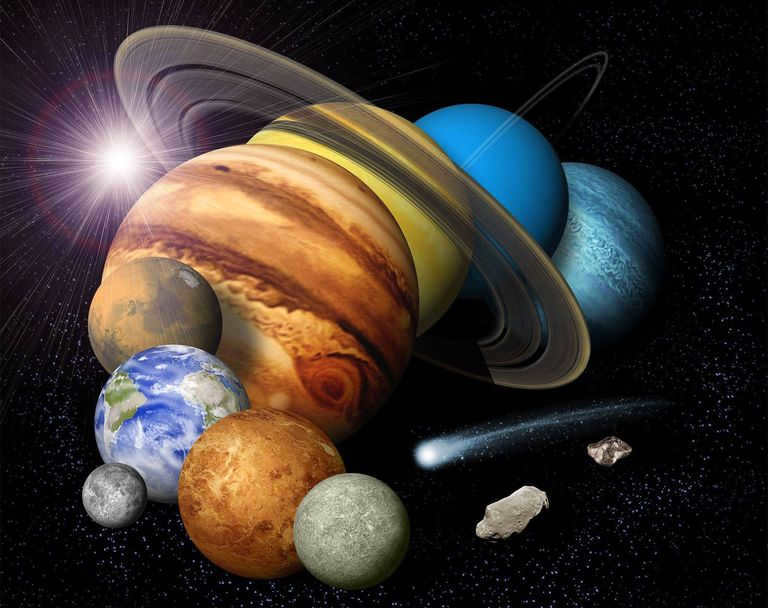
In addition to our planet Earth, there are a total of 8 other planets, along with numerous small asteroids and comets, all revolving around the Sun. This collection of celestial bodies is known as the solar system, with the Sun serving as its central point. Each planet follows its own unique path, referred to as an orbit. It is important for children to learn and remember the names and proper order of the planets, as emphasized by the astronomer A. Usachev in his work “Astronomical counting”:
Within the moon’s domain resides a dedicated observer of the stars,
Who diligently counts the planets.
First comes Mercury, then Venus,
Next is Earth, followed by Mars.
Then we have Jupiter, followed by Saturn,
Afterwards comes Uranus, and finally Neptune.
Pluto, the furthest one, is number nine.
If you can’t spot them, step outside and take a look.
Explain to your child that the sizes of all the planets in the solar system differ significantly. If you visualize Jupiter, the largest planet, as being the size of a large watermelon, then Pluto, the smallest planet, would resemble a pea. With the exception of Mercury and Venus, all the planets in the solar system have moons. Our Earth also has one.
The enigmatic moon
Even a toddler as young as one and a half years old finds joy in gazing at the Moon in the sky. And for an older child, this Earth satellite can become a fascinating object of exploration. After all, the Moon is incredibly diverse and undergoes constant transformations, transitioning from a faint crescent shape to a radiant, spherical beauty. Share with your child, or even better, illustrate with a globe, a small sphere (representing the Moon), and a flashlight (representing the Sun), how the Moon orbits around the Earth and how it is illuminated by the Sun.
Certainly, your child will be curious to learn about what can be found on the Moon. Inform him that the lunar surface is adorned with craters – depressions formed as a result of collisions with asteroids. By observing the Moon with a pair of binoculars (it is recommended to stabilize them on a photo tripod), one can easily spot irregularities on its terrain, including craters. Unlike the Moon, our planet has an atmosphere which shields it from asteroids. When a rock fragment enters Earth’s atmosphere, it quickly burns up. However, there are instances when asteroids are traveling at such high speeds that they manage to penetrate Earth’s surface. These particular asteroids are referred to as meteorites.
Unveiling the Secrets of the Stars
While spending your summer break at your grandmother’s house in the village or at the country cottage, take a few evenings to marvel at the beauty of the starry night sky. It’s perfectly fine if your child deviates slightly from their usual routine and stays up a little later. The memories made with mom or dad under the vast expanse of twinkling stars will be unforgettable. The month of August is particularly ideal for stargazing. The evenings are delightfully dark, the air is crisp, and it feels as if you can almost touch the sky. In August, it’s relatively easy to spot a fascinating phenomenon known as a “shooting star.” While it’s not actually a star but a burning meteor, it still holds a breathtaking beauty. Just like our ancestors did, you and your child can search for various animals, objects, people, and mythological heroes among the clusters of stars. Many constellations have carried their names since ancient times. Teach your child how to locate these constellations in the sky. This activity is an excellent way to spark their imagination and develop abstract thinking. If you’re not familiar with the constellations yourself, don’t worry. Most children’s astronomy books contain star charts and descriptions of the constellations. There are a total of 88 constellations in the celestial sphere, with 12 of them being zodiacal. Stars within constellations are designated by letters from the Latin alphabet, and the brightest stars have their own names (like Altair in the Eagle constellation). To help your child identify specific constellations in the night sky, it may be helpful to study them first through pictures and then create drawings or cardboard cutouts of the stars. Alternatively, you can use special luminous star stickers to create constellations on the ceiling. Once your child locates a constellation in the sky, they will never forget it.
In various cultures, the same group of stars may have different names, as people’s imagination guided them. For instance, the well-known constellation known as the Big Dipper was depicted as both a ladle and a horse on a tether. Many constellations have fascinating legends associated with them. It would be wonderful if parents could read some of these stories beforehand and then retell them to their children while they gaze at the shining dots in the sky, trying to spot the legendary creatures. The ancient Greeks, for example, had a legend about the constellations of the Big and Little Bears. The mighty god Zeus fell in love with the beautiful nymph Callisto. When Zeus’ wife Hera discovered this, she became furious and transformed Callisto and her friend into bears. Callisto’s son Araxes encountered the two bears while hunting and wanted to kill them. However, Zeus intervened and threw Callisto and her friend into the heavens, transforming them into radiant constellations. As he hurled them into the sky, Zeus held them by their tails, which is why their tails became so long.
There is a fascinating tale that encompasses multiple constellations. In the land of Ethiopia, there resided a ruler by the name of Cepheus. His spouse was the stunning Cassiopeia. Together, they had a daughter known as the beautiful Princess Andromeda. As Andromeda blossomed into a young woman, she became renowned for her unparalleled beauty throughout Ethiopia. Cassiopeia took great pride in her daughter’s appearance and even dared to compare her to the goddesses themselves. This act of hubris angered the gods, leading to a dreadful calamity befalling Ethiopia. Each day, a monstrous whale emerged from the depths of the sea, demanding the sacrifice of the most beautiful maiden. It was now Andromeda’s turn to face this grisly fate. Despite Cepheus’ desperate pleas for mercy, the gods remained resolute in their decision. Andromeda was shackled to a rock by the ocean’s edge.
However, in that very moment, a hero named Perseus soared above wearing his enchanted winged sandals. He had recently accomplished the extraordinary feat of defeating the fearsome Medusa Gorgon, a creature with serpents for hair, whose gaze could transform any living creature into stone. Perseus spotted the distressed maiden and the formidable monster, promptly retrieving Medusa’s severed head from his satchel. Displaying the petrifying visage to the whale, the creature succumbed to its power, freezing in place. Perseus then freed Andromeda, filling Cepheus with immense joy. In gratitude, Cepheus bestowed Andromeda’s hand in marriage upon Perseus.
Moved by the tale’s remarkable nature, the gods decided to immortalize its heroes by transforming them into radiant stars, scattering them across the heavens. Henceforth, one can find Cassiopeia, Cepheus, Perseus, and Andromeda embellishing the cosmic tapestry. As for the monstrous whale, it was transformed into an island situated just off the coast of Ethiopia.
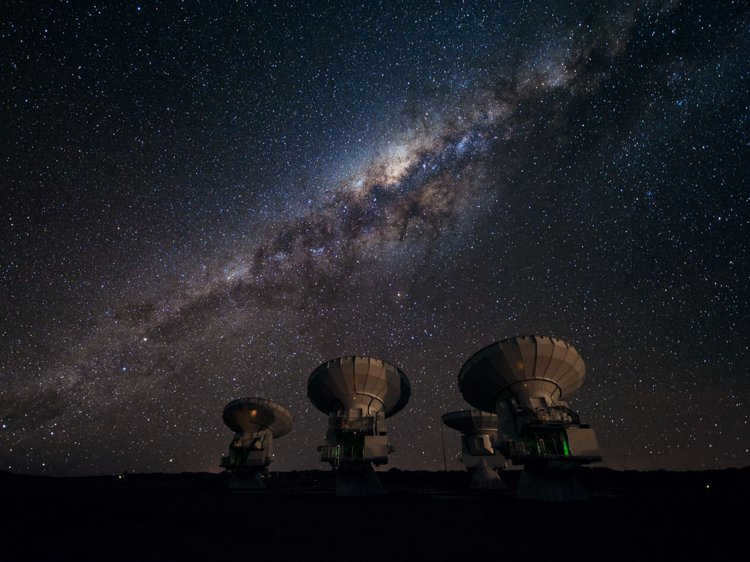
Locating the Milky Way in the celestial sphere is a task that does not require great effort. It can be easily discerned by the unaided eye. Explain to your child that the Milky Way, also known as our galaxy, is a vast assemblage of stars that presents itself as a radiant line of pale specks in the sky, reminiscent of a milky pathway. According to ancient Roman mythology, the creation of the Milky Way is attributed to Juno, the goddess of the heavens. Legend has it that while nursing Hercules, a few droplets of her breast milk spilled and transmuted into stars, thus forming the resplendent Milky Way in the celestial expanse.
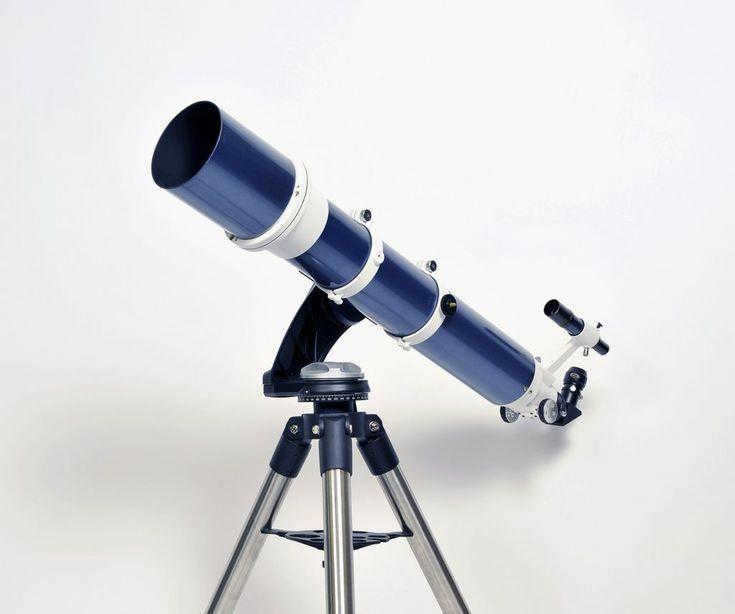
Choosing the Right Telescope
If your child has developed an interest in astronomy, it may be worth considering purchasing a telescope for them. However, it’s important to note that good telescopes can be quite expensive. That being said, there are affordable options available for children that will still allow them to observe various celestial objects and make their first astronomical discoveries. Parents should keep in mind that even the simplest telescope can be quite challenging for a preschool-aged child. Therefore, it is crucial to provide active assistance to the child when using the telescope. Additionally, it is recommended to choose a telescope that is easy for the child to handle. If the child continues to show a serious interest in astronomy in the future, it may be worth investing in a more powerful telescope.
So, what exactly is a telescope and what factors should be considered when selecting one? Contrary to popular belief, the telescope does not primarily magnify objects, but rather brings them closer. Its main function is to provide a clear image of a distant object, allowing for the observation of fine details that cannot be seen with the naked eye. Additionally, the telescope is designed to gather as much light as possible from the distant object and transmit it to the observer’s eye. Therefore, a larger lens will result in a greater amount of light being collected, leading to improved detail in the observed objects.
How to Utilize a Telescope
Observing objects through a telescope may appear to be a simple task, but for a novice, it can be quite challenging. It is essential to understand what to search for, where to direct your gaze, and how to properly use the telescope. Let’s start from the beginning and explore the fundamental guidelines for operating a telescope. Don’t be concerned if you have limited knowledge (or none at all) about astronomy. Finding appropriate resources is easily achievable. However, imagine the excitement and satisfaction of exploring this intricate yet captivating field of science with your child.
So, prior to commencing your search for any celestial object, it is necessary to calibrate the viewfinder of your telescope. This particular process requires a certain level of skill and is best carried out during daylight hours. Select a stationary and easily recognizable object on the ground, situated at a distance of approximately 500 meters to one kilometer. Direct the telescope towards this object, ensuring that it is positioned at the center of the eyepiece. Stabilize the telescope in this position. Subsequently, peer through the viewfinder. In the event that the chosen object is not visible, loosen the adjustment bolt of the viewfinder and rotate the viewfinder itself until the object becomes visible within the field of view. Proceed to utilize the alignment screws, also known as viewfinder fine-tuning screws, to precisely center the object within the eyepiece. Once again, observe through the telescope. If the object remains at the center, everything is functioning as expected and the telescope is prepared for use. If not, simply repeat the calibration process.
As you may be aware, it is more optimal to gaze through a telescope in a secluded tower located at a high elevation within the mountainous region. Naturally, it is improbable for us to venture into the mountains. However, without a doubt, it is preferable to observe the stars in the countryside, such as at a country house, rather than from the window of an urban apartment. In the city, there is an excessive amount of superfluous light and heat waves that will diminish the quality of the image. The further away you are from the urban illumination, the greater number of celestial entities you will be able to perceive. It is evident that the sky should possess the utmost clarity.
Initially, locate the subject using the viewfinder. Then, fine-tune the telescope’s focus by rotating the focus screw until the image becomes sharp. In case you possess multiple eyepieces, commence with the one offering the lowest magnification. Due to the telescope’s highly precise tuning, it is advisable to observe through it attentively, refraining from sudden movements and holding one’s breath. Otherwise, the alignment can easily become misaligned. It is also worth introducing this activity to children at an early age. Furthermore, such observations facilitate the development of self-restraint and can serve as a form of psychotherapeutic treatment for individuals who tend to be overly active. It is challenging to find a more effective calming method than gazing at the boundless starry sky.
What can be observed through a telescope
Depending on the type of telescope, there is a wide range of celestial objects that can be observed. These include planets, stars, galaxies, asteroids, and comets.
Asteroids are essentially small planets made up of large chunks of rock, often containing metal. Most asteroids orbit the Sun in the region between Mars and Jupiter.
Comets are celestial bodies that have a nucleus and a luminous tail. To help your child visualize this “wandering tail,” you can describe it as a giant snowball mixed with space dust. When observed through a telescope, comets appear as hazy spots, sometimes accompanied by a light-colored tail. The tail always points away from the Sun.
There are numerous asteroids that can be observed between the orbits of Mars and Jupiter. Additionally, comets are also visible in this region.
Star clusters. Within our galaxy, there exists a multitude of star clusters, which can be categorized as either scattered (a sizable grouping of stars in a particular section of the sky) or globular (a densely packed collection of stars shaped like a sphere). For instance, the Pleiades constellation, which is easily visible to the naked eye, transforms into a dazzling field of hundreds of stars when observed through even the most basic telescope.
Nebulae. Scattered throughout our galaxy are clusters of gas known as nebulae. These nebulae are typically illuminated by neighboring stars and provide a captivating visual spectacle.
Sun. It is absolutely forbidden to look at the Sun through a telescope that is not equipped with special solar filters. It is important to explain this to your child right away. Doing so can cause the telescope to malfunction, but that’s not the only problem. There is a saying that you can only look at the Sun through a telescope twice in your life: once with your right eye and once with your left eye. These experiments can actually result in blindness. It is also advisable not to leave the telescope assembled during the day, as this may tempt the young astronomer.