Objective: The aim of this lesson is to establish a comparison between the components of the Earth’s sphere and the celestial sphere, to enhance focus and communication skills, and to improve independent learning abilities. The goal is to develop the ability to utilize the horizontal coordinates of celestial bodies in solving qualitative problems.
Download:
Preview:
Astronomy Lesson “Horizontal Coordinate System. Height and azimuth of celestial bodies”
11th grade
Saransk, MOU “Lukhovsky Lyceum”
Lesson type: Introduction to new material.
Lesson objective: To develop an understanding of the celestial sphere, height, and azimuth of celestial bodies. To cultivate the ability to apply acquired knowledge to solve qualitative problems.
Educational: Reviewing concepts covered in the geography course, such as the Earth’s rotation axis, the Earth’s north and south poles, and the Earth’s equator.
Development: the aim is to establish a comparison between the components of the Earth’s globe and the celestial sphere, enhance attention and communication skills, and improve independent work abilities. The objective is to enable the application of horizontal coordinates of celestial bodies to solve qualitative problems.
The purpose is to form a comprehensive understanding of the world (including nature, society, and self), and to recognize the role and significance of astronomy within the field of sciences.
Materials: a model of the celestial sphere, movable sky maps (provided as handouts), the teacher’s computer, a multimedia projector, and the “Astronomy” disk.
Progress of the lesson
1. Organizational aspect
2. Capturing students’ attention
Today’s topic: “The horizontal coordinate system. Elevation and azimuth of celestial bodies”
During this class, we will review the process of defining geographical coordinates and acquire the skills to determine the position of celestial bodies on the celestial sphere.
3. Update of the reference knowledge.
What is referred to as the Earth’s axis? The Earth’s poles?
How are the geographical coordinates of a point on Earth determined?
Exploration of new material
The position of the luminary on the celestial sphere can also be established. Today, we will acquire the knowledge of how to do so. We will utilize the model of the celestial sphere.
The celestial sphere is an imaginary sphere with a large radius, with the observer’s eye positioned at its center.
Demonstration. Model of the celestial sphere, Earth globe.
The principal plane is the plane of the true horizon, and the origin is the point south S. The coordinates are altitude and azimuth.
Plumb line – a line whose direction is determined using a plumb line.
The points obtained by the intersection of the plumb line with the celestial sphere are called Zenith Z and nadir Z.
Vertical is a large semicircle of the celestial sphere that passes through three points: zenith, nadir, and the location where the luminary is situated.
Noon line refers to the straight line along which objects cast a shadow at noon.
The points obtained by intersecting the noon line with the celestial sphere are called North point N and south point S.
Almucantaratus refers to any circle drawn on the celestial sphere that is parallel to the horizon.
The altitude of a luminary above the horizon, h, is the angular distance measured along the vertical of the luminary from the true horizon (similar to latitude). The altitude of a luminary can range from -90o to 90o. A negative altitude indicates that the luminary is below the horizon. For example, the zenith altitude is 90o.
Instead of using the luminary’s altitude, the angular distance from the zenith, known as the zenith distance z, is often employed as the primary horizontal coordinate. This distance is measured along the vertical of the luminary. There exists a straightforward relationship between the zenith distance and the luminary’s height.
The zenith distance can range from 0° to 180°, with luminaries having a zenith distance greater than 90° being situated below the horizon and therefore not observable.
The second horizontal coordinate is azimuth A, which represents the angular distance from the southern point S to the point where the luminary’s vertical intersects the horizon. This distance is measured clockwise along the horizon. The azimuth can range from 0° to 360° and is also referred to as the astronomical azimuth, in contrast to the geodetic azimuth, which is measured clockwise from the northern point N.
The positions of stars in the horizontal coordinate system can vary due to the daily rotation of the Earth. In this system, the reference point is tied to the rotating Earth, with the south point S and point Q lying on the celestial meridian. To prevent the stars’ coordinates from changing due to daily rotation, it is necessary to select a reference point that remains stationary relative to the stars and participates in the daily rotation. The vernal equinox point serves as such a reference point, and the coordinate system in which the stars’ coordinates remain unchanged is known as the equatorial coordinate system, which we will discuss in the upcoming lesson.
Remediation: Solving qualitative problems
a) Identifying all the stars in the celestial hemisphere on any given night;
b) Identifying the stars in only one hemisphere (either north or south).
c) Are all the stars of the celestial sphere visible?
a) Half of the celestial sphere is visible at any moment at any latitude;
b) At the Earth’s poles, the northern and southern hemispheres are visible, respectively;
c) At the Earth’s equator, it is possible to see all the stars of the celestial sphere within a year.
Answer: At latitudes =-90 o , =+90 o .
Answer: At the upper and lower culminations.
- Where on Earth can we find stars with an azimuth that is never zero and stars with an azimuth that is never 180 o ?
Answer: At the Earth’s equator for stars with >0 A=0, and for stars with o .
- Can the azimuths of a star at the upper and lower culminations be the same? What is it equal to in this case?
Answer: In the northern hemisphere, all stars with a declination greater than 90° have the same azimuth in their upper and lower culminations, which is 180°.
Answer: The observer is either at one of the Earth’s poles or the star is located at one of the poles of the world.
Answer: The speed of stars is fastest when they are in the meridian, and slowest when they are in the first vertical.
Take-home. Lesson outline, p. 2 of the textbook “Astronomy” (Vorontsov-Veliaminov)
Methodical Developments, Presentations, and Outlines: Exploring Different Topics
A Lesson Outline on History: Discovering the “Seven Wonders of the World” for 5th Grade Students
Engaging students in a game can be an effective way to review and reinforce their knowledge about the fascinating history of the ancient world. By using a game at the end of the course, students can have fun while also revisiting important historical information.
A Lesson Plan on “Flat Mirror: Understanding the Law of Reflection of Light” for 8th Grade Students
This well-structured lesson plan for 8th-grade students focuses on the concept of a flat mirror and explores the fundamental law of reflection. By following this plan, teachers can effectively prepare for the lesson and ensure that the material is explained clearly. The included EERs (Exercises, Examples, and Reflections) will further enhance student understanding.

Physics lesson outline for 8th grade: “Light Sources. Light Propagation” (incorporating ICT).
Outline of a physics lesson for 8th grade: “Light Sources. Light Propagation”.
Physics lesson plan for 8th grade: “Law of Light Reflection. Flat Mirror. Speed of Light”
Physics lesson plan for 8th grade: “Law of Light Reflection. Flat Mirror. Speed of Light”.

Outline of the lesson titled “Transversality of light waves. Polarization of light”
Notes for a physics lesson in the 11th grade.
Lesson plan: “Technique of high jump ‘stepping over’.”
MAIN OBJECTIVES OF THE LESSON: 1. Introduce students to the technique of high jump ‘stepping over’. 2. Consolidate the understanding of motor actions. 3. Enhance the students’ physical fitness through the development of physical qualities, coordination, and…

Lesson Plan “Solar System: Determining the Height of a Luminary”.
Lesson plan “Solar System: Determining the Height of a Luminary”.


Lesson 2: Celestial Coordinates. Part 2. The construction of the horizontal celestial coordinate system.
Consider the following questions:
– Can the rotation of the Earth on its axis be proven by observing the starry sky?
– How can one navigate using the stars at night?
– Were you aware that in Australia, the sun shines not in the south but in the north, and moves counterclockwise across the sky instead of clockwise? Conversely, the stars near the pole rotate clockwise.
– Is it possible for someone who is not an astronomer to locate a specific star or planet in the sky (visible at a specific latitude and time of day, taking into account the time of year)? And what if there are extraordinary cosmic phenomena occurring nearby, such as an asteroid, comet, or spaceship carrying extraterrestrial beings coming to Earth? What resources or tools would be necessary for conducting such investigations?
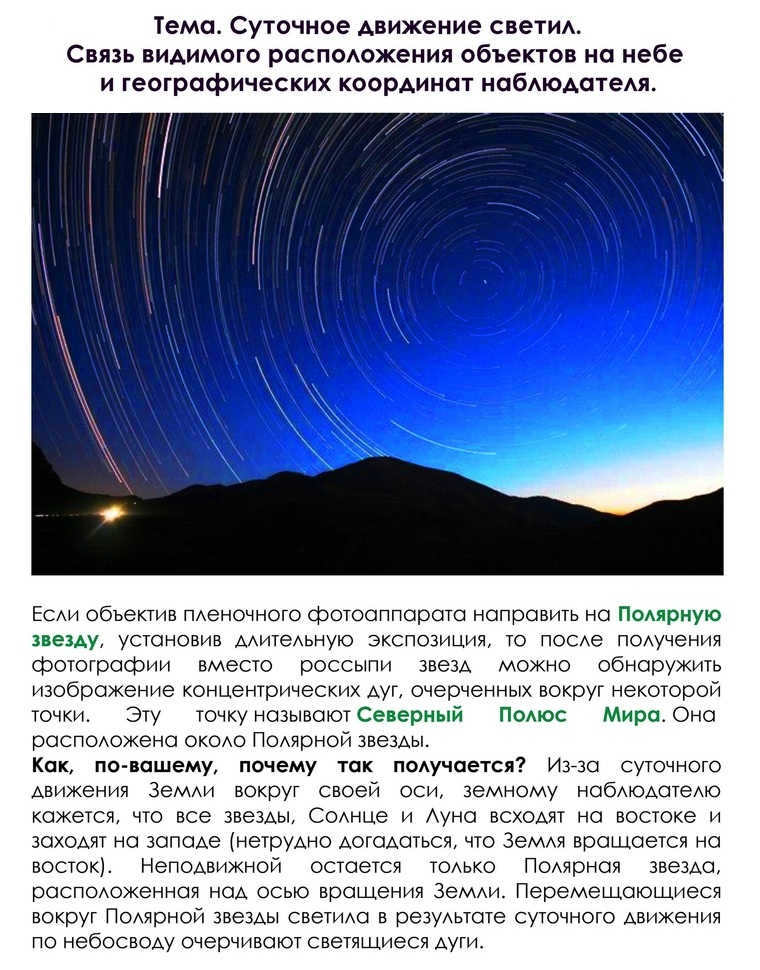
To locate specific celestial objects in the sky, it is necessary to understand how to use a star chart and how the apparent position of objects in the sky relates to the geographic coordinates of the observer.
The Celestial Sphere
Imagine yourself at the center of a vast crystal sphere that encompasses the entire solar system, including the Earth. From space, all stars are projected onto this sphere, and from the Earth’s surface, geographical parallels and meridians are represented. This concept is known as the celestial sphere.
So, where is the center of this imaginary celestial sphere?
– The center of the celestial sphere is defined as the observer’s eye.
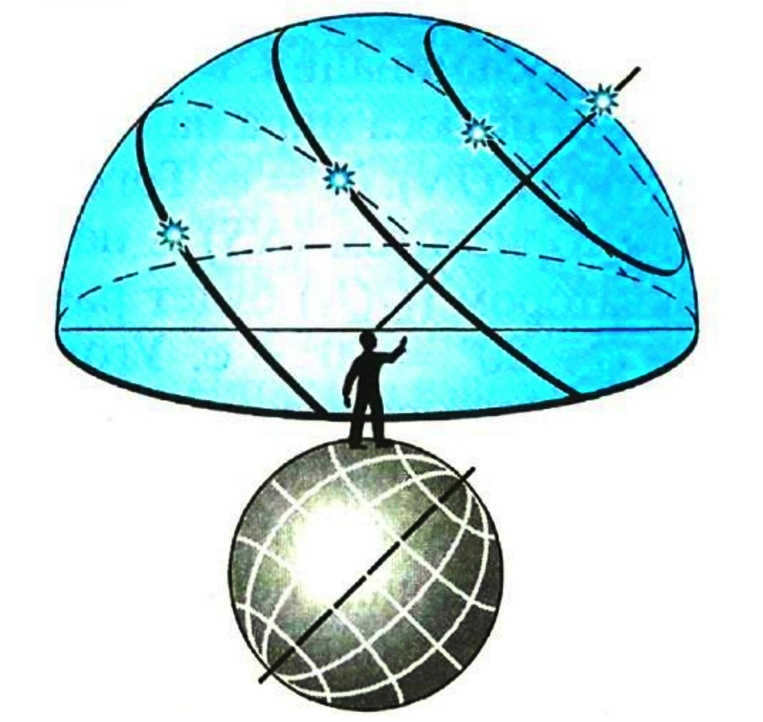
If we extend the Earth’s axis of rotation to intersect with this sphere, we will have two points known as the North and South Poles of the world, and the line itself will be referred to as the Axis of the World.
By extending the Earth’s equator onto the celestial sphere, we create a large circle known as the celestial equator.
This circle divides the surface of the celestial sphere into two hemispheres: the northern hemisphere, which has its apex at the North Pole of the world (near Polaris), and the southern hemisphere, which has its apex at the South Pole of the world.
– Indeed, the celestial sphere, which originated from the brilliant mind of the ancient Greek scientist Ptolemy, continues to be utilized despite his lack of knowledge regarding the law of universal gravitation. Ptolemy envisioned a world where all celestial bodies were affixed to crystal spheres, orbiting around the Earth. Surprisingly, this archaic concept still holds value in modern astronomy. The reason for its enduring utility lies in its unparalleled convenience for conducting calculations, aided by the seamless integration of spherical geometry.
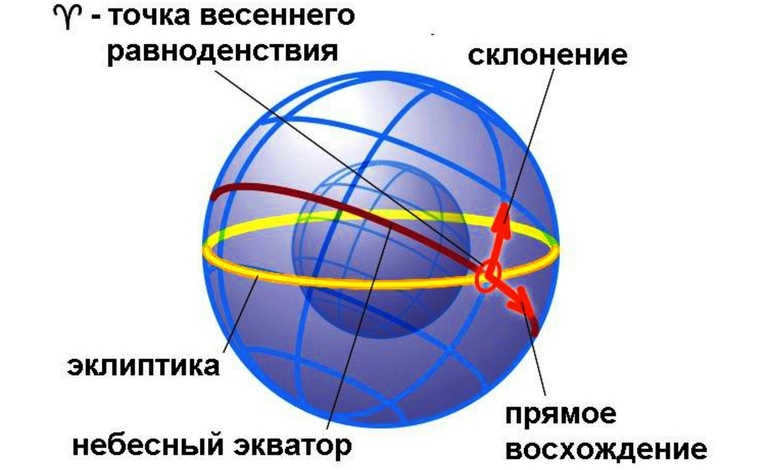
Equatorial coordinate system
In order to create a star map that shows the constellations on a plane, it is necessary to have knowledge of the stars’ coordinates. The equatorial system is the coordinate system that is used on the celestial sphere. It is called the equatorial system because it is based on the plane of the equator. In this system, there are two coordinates that are used to determine the position of a star: the declination (δ), which is the angular distance of the star from the celestial equator, and the right ascension, which is similar to longitude. The declination varies between ±90°, with positive values indicating positions north of the equator and negative values indicating positions south of the equator.
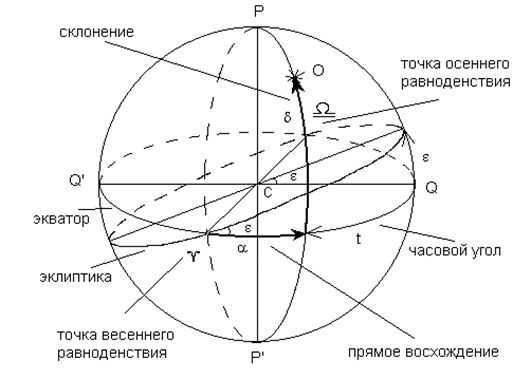
The direct ascent α is the second coordinate that is similar to geographic longitude. It is measured by the angle between two planes of great circles. One plane passes through the poles of the world and the given luminary M, while the other passes through the poles of the world and the point of the vernal equinox on the equator. This point is called the vernal equinox because it is where the Sun is located on the celestial sphere during the spring season, specifically around March 20-21, when the day and night are of equal length.
When determining the height of a luminary, the direct ascension is calculated by measuring the angle along the arc of the celestial equator from the vernal equinox counterclockwise, when viewed from the north pole. This measurement can range from 0 to 360°. However, instead of using degrees, the direct ascension is often expressed in units of time due to its connection to the Earth’s rotation. In a 24-hour period, the Earth completes one full revolution, corresponding to 360°. Therefore, 360° is equivalent to 24 hours, meaning that 15° represents 1 hour, and 1° is equivalent to 4 minutes. For instance, a direct ascension of 90° corresponds to 6 hours. On star charts, atlases, and globes, the direct ascension is typically indicated using units of time on the coordinate grid.
Ecliptic
From the perspective of an observer on Earth, it appears as though the Sun not only orbits the Earth on a daily basis, but also travels across a backdrop of unmoving constellations of the zodiac throughout the year. This apparent movement is a result of the Earth’s rotation around the Sun. The path of this motion is known as the ecliptic plane, which intersects the celestial sphere through the zodiacal constellations.
Observing the Sky from Different Latitudes
When observing the sky from different latitudes, the view of the stars will vary. While they will still move along the celestial parallels, the way they move will differ depending on the observer’s location on Earth. This means that the appearance of the starry sky and the daily movement of stars will change depending on the latitude of observation.
Since the equatorial coordinate system is associated with the celestial sphere, it moves with the stars relative to the Earth’s surface during the day.
So, how did travelers determine their latitude by observing the stars? It turns out that the angular distance from the horizon (referred to as the altitude above the horizon h) of Polaris (the North Star) is equal to the geographic latitude of the area. To determine the geographic latitude of an area, you just need to measure the height of Polaris above the horizon using an angular instrument (h = φ).
To estimate angular distances in the sky, it is helpful to know that the angular distance between the two stars in the “handle” (α and β) of the Big Dipper is about 5°.
The angular units can also be used to express the apparent sizes of celestial objects. For instance, the angular measure of the Sun and Moon’s diameters is approximately 0.5°.
Coordinate System in the Horizontal Plane
In practical terms, the horizontal coordinate system is closely tied to the observer and their location on the Earth’s surface.
In this coordinate system, the primary line is the horizon.
To construct it, you’ll need a plumb line, which is a weight attached to a string. Mentally extend the plumb line upwards and downwards until it intersects with the celestial sphere. The point where the line intersects at the top is called the zenith (Z), while the point at the bottom (below the Earth) is the nadir (Z’). The line connecting the zenith and nadir is known as the plumb line.
The term “zenith” originates from an Arabic phrase that means “head direction,” while “nadir” comes from the Arabic word for “opposite.”
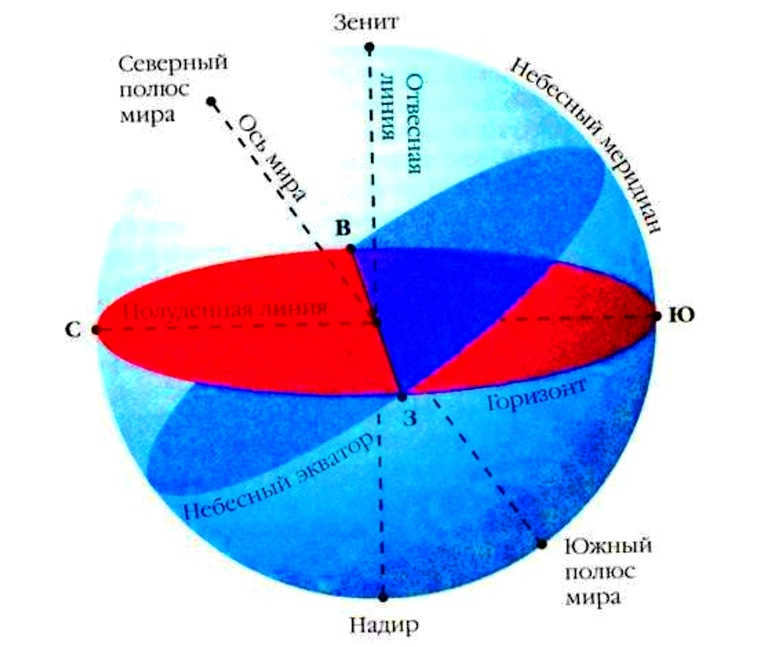
The celestial meridian, also known as the great circle of the celestial sphere that passes through the zenith and poles of the world, is referred to as the celestial meridian.
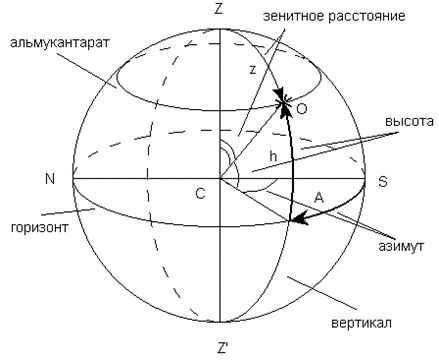
The altitude, denoted by h, is the angular distance of a luminary from the horizon (similar to geographic latitude). It is measured in degrees from 0 to +90°. If the luminary is below the horizon, the altitude is negative. Sometimes, the zenith, denoted by z, is used instead of h, as h + z = 90°. It is measured from 0° to 180° from the zenith to the nadir.
The plane that goes through a celestial object is known as the plane of perpendicular to that celestial object. The major circle where it intersects the celestial sphere is known as the perpendicular of the celestial object. It is utilized to calculate h or z.
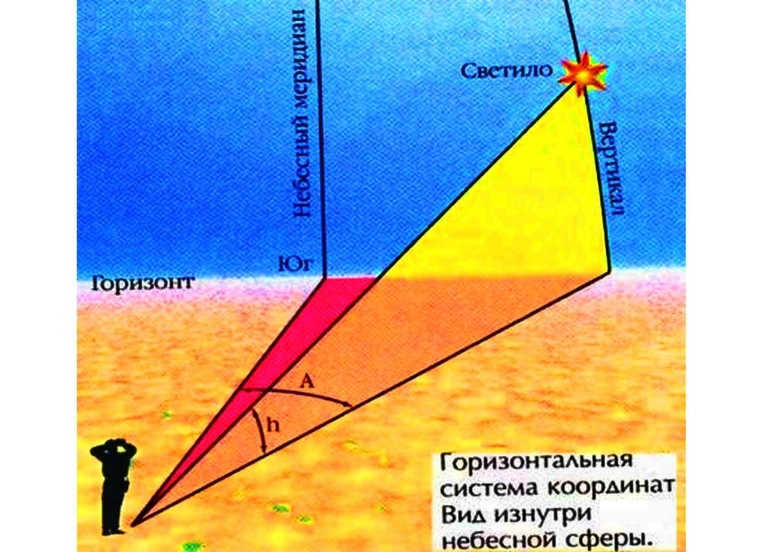
Starting from the southern point and moving along the horizon in a clockwise direction (towards the west), the second coordinate of the luminary is known as the azimuth A (similar to geographic longitude). The azimuth is measured in degrees from 0 to 360°.
The horizontal coordinates of the peace pole are: height h = φ, azimuth A = 180°. For instance, in Simferopol, the height of the peace pole is h = φ = 45°. In Simferopol, all luminaries with declination δ > φ = 45° do not appear, and luminaries with declination δ < – φ = 45° never rise. These are the stars and constellations of the Southern Hemisphere, located near the South Pole of the world.
During sunrise and sunset, the celestial body has an elevation of h = 0°. The celestial body reaches its highest elevation when it crosses the celestial meridian above a southern point. This occurrence is known as the upper apex. When the celestial body has the lowest height above the horizon, it is referred to as a lower culmination.
Stars can be classified as: setting and rising stars (where h passes through 0 during the day), non-setting stars (where h is always greater than 0), and non-rising stars (where h is always less than 0).
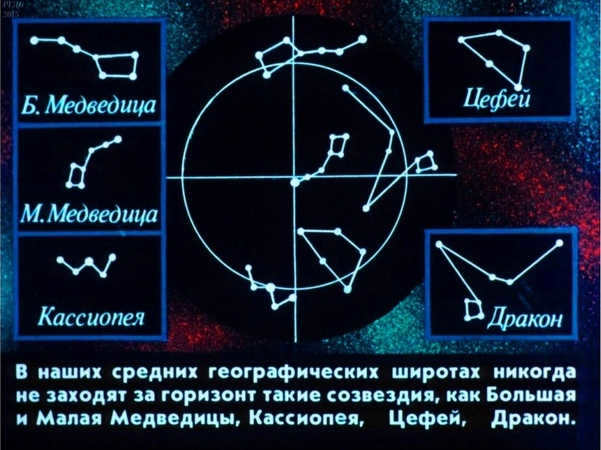
When the luminaries do not appear at a specific spot, they reach their highest point above the horizon and their lowest point below the horizon. If the luminaries never rise and are always below the horizon, both the upper and lower culminations always happen below the horizon. For stars that do rise and set, the upper culmination takes place above the horizon while the lower culmination occurs below the horizon.
Supplementary resources for the lecture
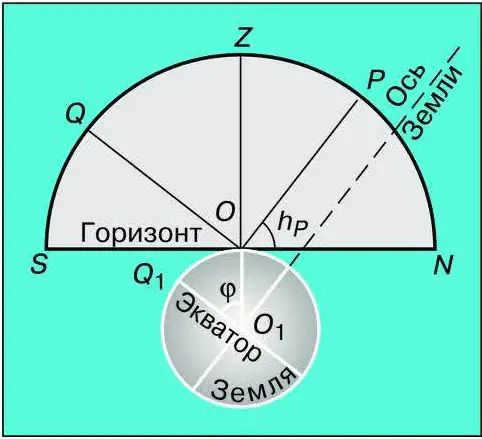
1. Elevation of the Earth’s pole relative to the horizon
Let’s examine the elevation of the Earth’s pole relative to the horizon, as depicted in Figure 2.5, which illustrates a portion of the celestial sphere and the globe projected onto the plane of the celestial meridian.
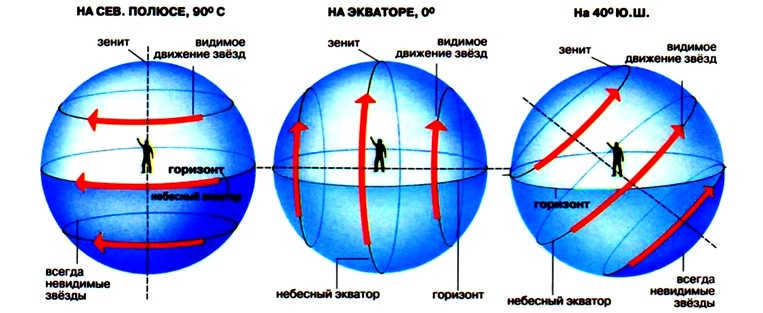
Depending on where the observer is located on Earth, the starry sky will look different and the daily movement of the stars will also vary.
The poles of the Earth provide the best understanding of these phenomena. A pole is a location on the globe where the Earth’s axis aligns with a plumb line and the celestial equator aligns with the horizon (Fig. 2.6).
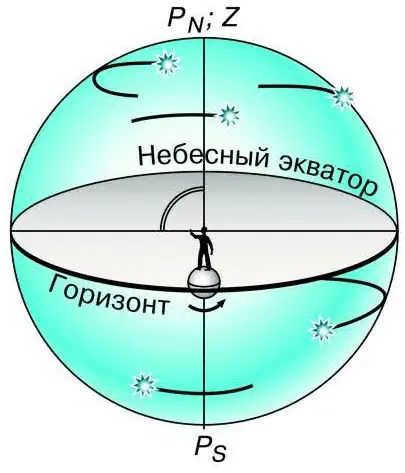
When observing from the North Pole, Polaris can be seen near the zenith, while only stars with positive declination in the Northern Hemisphere of the celestial sphere are above the horizon. Conversely, at the South Pole, only stars with negative declination are visible. In both cases, as the Earth rotates parallel to the celestial equator, the stars maintain a constant height above the horizon and do not rise or set.
Now, let’s shift our focus from the North Pole to more familiar middle latitudes. The altitude of Polaris above the horizon will gradually decrease, while the angle between the planes of the horizon and the celestial equator will increase.

Figure 2.7 demonstrates that in the middle latitudes, not all stars in the Northern Hemisphere of the sky ever set, unlike at the North Pole. Similarly, a portion of stars in the Southern Hemisphere never rise. However, in both the Northern and Southern Hemispheres, the rest of the stars do rise and set.
The celestial bodies cross the celestial meridian twice during their daily movement. When they reach their highest point above the horizon, this is known as the culmination of the luminary.
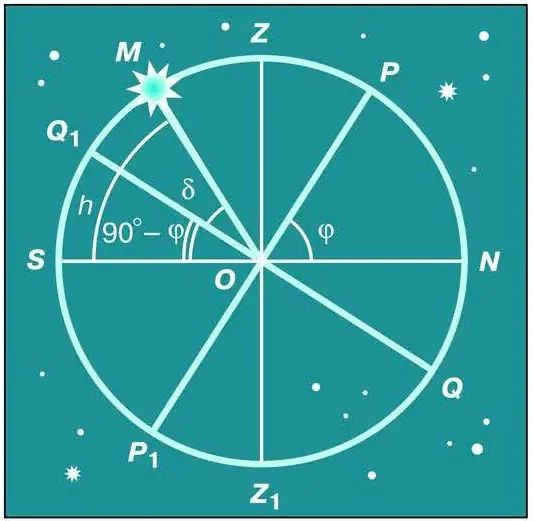
So, we have derived the subsequent equation that connects the height of the celestial body at its peak above the southern horizon with its declination and the geographic latitude of the observation location:
h = 90° – φ + δ.
If δ > φ, then the upper culmination will take place above the northern horizon with an altitude of
h = 90° + φ – δ.
It can be demonstrated that these equations are also applicable for the Southern Hemisphere of the Earth.
By knowing the declination of the celestial body and determining its altitude during culmination from observations, we can deduce the geographic latitude of the observation location.
Let’s proceed with our imaginary expedition and travel from the mid-latitudes to the equator, which has a geographic latitude of 0°. According to the previously derived formula, at this location, the Earth’s axis is positioned in the plane of the horizon, and the celestial equator crosses through the zenith. At the equator, all celestial bodies will be visible above the horizon throughout the entire day (Fig. 2.9).

Interrogatives
1. Where does the horizon line intersect the celestial equator?
2. In relation to the Earth’s axis of rotation and the plane of the celestial meridian, where is the world axis located?
3. Which circle of the celestial sphere do all the luminaries cross twice a day?
4. How are the daily paths of the stars positioned in relation to the celestial equator?
5. By observing the appearance and rotation of the starry sky, how can an observer determine that they are at the North Pole of the Earth?
6. At what point on the globe are no stars in the Northern Celestial Hemisphere visible?
1. What altitude in Kiev corresponds to the upper culmination of the star Antares, which has a declination of -26°? Please include a relevant illustration.
2. If the star Altair reaches an altitude of 12° at its upper culmination and has a declination of +9°, what is the geographic latitude of the observation location? A visual representation is required.
3. At an altitude of 47° above a southern point, determine the declination of the star that reaches its upper culmination in Moscow (which has a geographic latitude of 56°).
4. What is the declination of the stars that reach the zenith in your city, specifically at a southern point?
5*. What specific condition must the declination of a star satisfy in order for it to be non-sunsetting in a place with a geographic latitude φ, without being superior?
6*. Demonstrate that the height of the celestial body during its lowest point in the sky in the Northern Hemisphere of the Earth can be calculated using the equation h = φ + δ – 90°.

If the observer is on the meridian of the luminary (which often occurs at the moment of the upper culmination), the meridional height H represents the luminary’s height. In this scenario, it is simple to determine the latitude. It is worth noting that the altitude h does not have a specific name. However, when the luminary is on the observer’s meridian, the meridional height H coincides with the point (N or S) at which the altitude is measured. In this case, the zenith distance Z = 90 – H differs from H. Let’s explore several scenarios of the luminary’s culmination depicted in the following diagram and derive a formula for calculating the latitude.
The terms “homonymous” and “> 90 -” are synonymous. However, it is important to note that the luminary is not setting.
Hcc
upper culmination
and eponymous,
but > 90 –
The luminary is unsunsetting
Hnk
lower culmination
Remember that = 90 – is the distance between the pole and the luminary.
By combining the options for luminaries C1 – C3, we obtain the following general formula:
That is, if Z and are the same, the sign is +.
If Z and have different names, then the sign is -, and we subtract the smaller value from the larger value and assign the sign of the larger value to the latitude.
If we use the Sun as luminary C, then the option for luminary C3 is only possible in the tropics, and the options for luminaries C4 and C5 are only possible beyond the polar circle.
Sequence of observations and computations
Find the Sun’s latitude on September 7, 2001 by measuring its meridional height.
To do this, choose the culmination time from the MAE based on the date.
To perform this operation mentally, the following relationships must be known:
15 degrees = 1 hour; 1 degree = 4 minutes; 15 minutes = 1 minute. When planning observations, it is necessary to know the Greenwich time of culmination and select the Sun’s declination from the MAE.3. Approximately 5 minutes before the culmination, go to the observation site and start measuring until the altitude starts to decrease. Take the maximum measured altitude as the meridional altitude and note whether the measurements were made on the northern or southern horizon. Also, note the measured edge of the disk, the index correction, instrumental sextant correction, eye height, and if the altitude is less than 30 degrees, the air temperature and pressure. 4. Calculate latitude in three steps:
- Get the zenith distance Z by subtracting the altitude H from 90°. Give Z a name that is always the opposite of H.
- Using the formula, calculate the latitude as = Z ±. If Z and the same name have the same sign, add them together. If Z and different names have different signs, subtract the smaller value from the larger value and give the name of the larger value to the latitude.
Advantages and disadvantages of the method
Benefits and drawbacks of this approach.
For the Sun, this technique can only be employed once per day (excluding polar latitudes). Unfavorable weather conditions during the time of culmination prevent the use of this method.
This technique can only determine one coordinate – latitude.
All files are exclusively accessible to registered users. The registration process takes no longer than a few minutes.
opredelenie_wiroti_po_meridionalnoi_visote_svetila.doc (142.5 KiB, 68 hits)
You do not have permission to download this file.
Determination of latitude can be done by measuring the meridional altitude of a luminary. The method involves observing the luminary when it is on the meridian of the observer, which typically occurs during its upper culmination. At this moment, the altitude of the luminary is meridional H. By knowing this altitude, it is possible to calculate the latitude. It is important to note that the altitude h does not have a specific name. While this method has its advantages, such as being relatively straightforward, it also has some disadvantages. The order of observations and calculations is crucial in obtaining accurate results. Overall, the theory of this method provides a reliable way to determine latitude.
Rating of the Article
Please take a moment to rate the article!
Further Reading on the Subject:

Employment in the maritime industry. Getting a head start. How can one pursue a career at sea without formal education? The required documents for a seafarer.
Arranging navigational hydro-meteorological observations.
Evaluation of a second engineer’s qualifications.
Download the file here:
Website Assistance
Live monitoring of a vessel’s location on the global map

Many astronomical problems involving the apparent positions and movements of celestial objects can be simplified by solving spherical triangles. These tasks can include converting coordinates from one celestial coordinate system to another, calculating the longitude of a solar system planet’s central meridian, creating a sundial, and accurately aligning a satellite dish to the correct satellite for receiving satellite TV channels.
In this article, we will explore how to determine the times and azimuths of the rising and setting of celestial bodies on any given day of the year.
The formulas of spherical trigonometry and the spherical triangle.
Let’s review the three fundamental equations of spherical trigonometry (Fig. 1)

- The cosine theorem, also known as the law of cosines, states that:
The cosine of one side is equal to the product of the cosines of the remaining two sides and the product of the sines of the same sides multiplied by the cosine of the angle between them.

The sine of a side multiplied by the cosine of the adjacent angle is equal to the sine of the other side that bounds the adjacent angle multiplied by the cosine of the third side minus the cosine of the side that bounds the adjacent angle multiplied by the sine of the third side and by the cosine of the angle opposite to the first side.

There exists a constant value that represents the ratio between the sine of a side of a spherical triangle and the sine of the opposing angle.
Parallactic triangle and coordinate transformation
It is well-known that in the field of spherical astronomy, multiple celestial coordinate systems are employed to define the location of a celestial body on the celestial sphere:
- Horizontal system. The body’s position is determined by its height h and azimuth A. This system is used to ascertain the direction to the luminary in relation to earthly objects or with angular measuring devices when the telescope is mounted on an azimuthal apparatus.
- First equatorial system. The body’s position is determined by declination and hour angle t. This system is primarily used for determining precise time, one of the key objectives of practical astronomy, when observing with a telescope mounted on an equatorial apparatus.
- The second equatorial system. The body’s position is determined by declination and right ascension. This system is widely accepted in astrometry. Catalogs of star and other celestial body positions, as well as star charts, are compiled using this system.
Being able to convert between different celestial coordinates is an important skill. To accomplish this, we can utilize the formulas of spherical trigonometry.
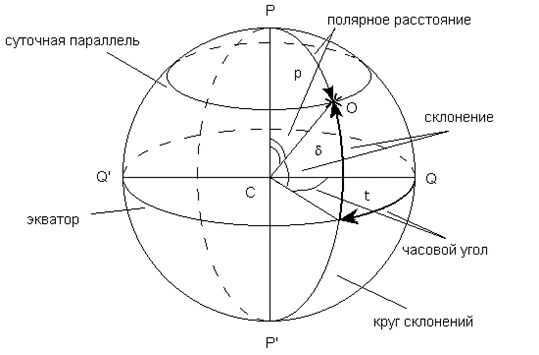
A parallactic triangle refers to a triangle on the celestial sphere that is formed by the intersection of the celestial meridian, the vertical circle, and the hour circle of the celestial object. The vertices of this triangle are the pole of the world P, the zenith Z, and the celestial object M. If the celestial object M is located in the western hemisphere of the celestial sphere (Fig. 5), then the length of side ZP (arc of the celestial meridian) can be determined by the equation , where represents the latitude of the observer’s location. Similarly, the length of side ZM (arc of the vertical circle) corresponds to the zenith distance of the celestial object. Additionally,
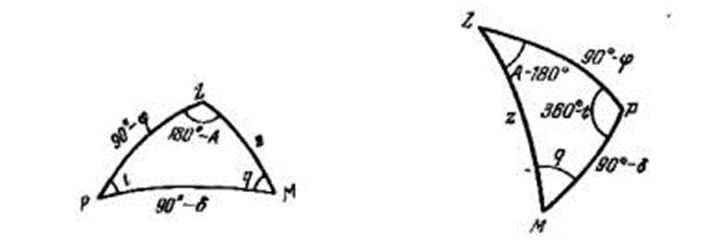
The PM (arc of the hour circle) can be calculated by subtracting the polar distance of the luminary p from 90 degrees, where p=90°- δ. The angle PZM is equal to 180 degrees minus A, while the angle ZPM is equal to the hour angle of the luminary, denoted as t. Additionally, the angle PMZ, known as the parallactic angle, is represented as q.
In the case where the luminary is situated in the eastern half of the celestial sphere (as shown in Figure 6), the values of the sides of the parallactic triangle remain the same as when the luminary is in the western half. However, the values of the angles at the vertices Z and P differ. Specifically, angle PZM is equal to 180 degrees minus A, and ZPM is equal to 360 degrees minus t.
The parallactic triangle’s appearance varies depending on the latitude of the observation site and the time of observation, specifically the hour angle t.
By using formulas (1), (2), and (3) of spherical trigonometry on the parallactic triangle (Fig. 5) and taking side PM and angle t as the starting point, we can derive the following:
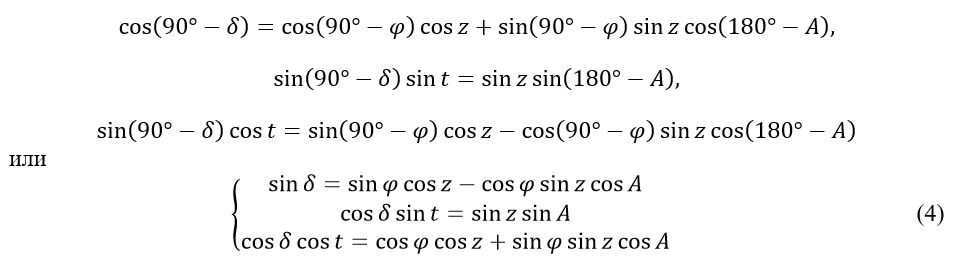
Formulas (4) are utilized to determine the luminary’s declination and hour angle t (and subsequently the right ascension α=s-t) based on its known zenith distance z and azimuth A at the specific moment of sidereal time s. The sidereal time for any given latitude and local time can be obtained from an astronomical reference book (e.g., http://allcalc.ru/node/254). To put it simply, formulas (4) enable the conversion from the luminary’s horizontal coordinates to its equatorial coordinates.
If we consider side ZM = z and angle PZM=180°-A as the initial values, the fundamental formulas, as applied to the parallactic triangle, can be expressed in the following manner:

The equations (5) are utilized to compute the zenith distance z and the azimuth of the celestial body A (at any given moment of sidereal time s and at any latitude ) based on the known declination of the celestial body and its hour angle t=s-α. In other words, they enable the conversion from the equatorial coordinates of the celestial body to its horizontal coordinates.
Furthermore, equations (4) and (5) are employed in calculating the times of sunrise and sunset for celestial bodies and their respective azimuths at those times, as well as in solving two crucial problems in practical astronomy – determining the geographical latitude of the observation site and determining the local sidereal time s.
Calculation of time intervals and azimuths for the rising and setting of celestial bodies
In order to determine the time intervals for the rising and setting of celestial bodies, it is initially essential to calculate the hour angles of these bodies. The hour angle of a celestial body can be determined using the following equation (5):

When any point in the sky is either rising or setting, it can be observed on the horizon, and therefore its apparent zenith distance (z’) is equal to 90°. However, the true zenith distance (z) at this point will be slightly greater than the apparent zenith distance due to the effects of refraction. Specifically, the true zenith distance is increased by an amount of 35 minutes of arc (‘). Additionally, the daily parallax also affects the position of the luminary above the horizon. This parallax causes an increase in the apparent zenith distance (z’) by a value equal to the horizontal parallax (p), which is calculated as the ratio of the Earth’s radius (R⨁) to the distance from the Earth to the luminary (a).
In addition, for celestial bodies like the Sun and the Moon, which have visible sizes, their coordinates are based on the center of their visible disk. When these luminaries rise or set, it is considered the moment when the upper point of the disk’s edge appears or disappears on the horizon. As a result, the true zenith distance of the disk’s center at the time of rising or setting will be greater than the zenith distance of the upper point of the disk’s edge by the apparent angular radius R of the disk. For the Sun and Moon, their apparent angular radii are approximately the same and average 16′.
Therefore, the true zenith distance of a point at the time of its rising or setting is equal:
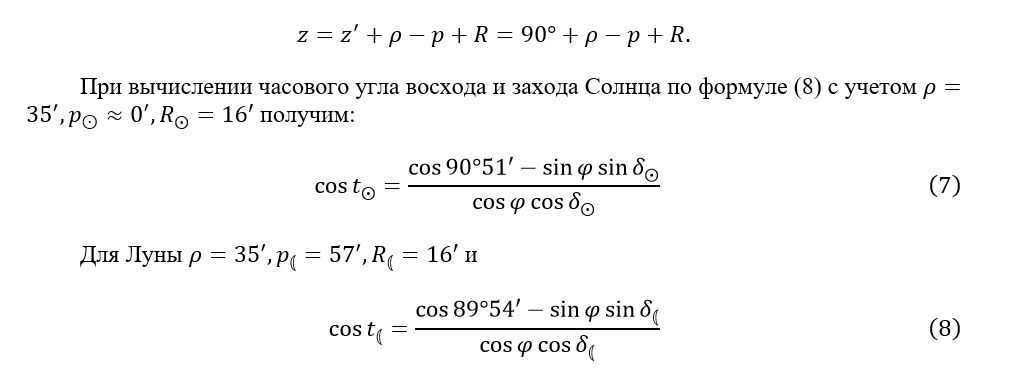
When it comes to stars and planets, we can disregard their visible sizes and determine the hourly angles of their rising and setting using the following equation:

In conclusion, when ignoring refraction, the formula to calculate the hourly angles of sunrise and sunset is:

Two values of the hour angle can be obtained from each of the equations mentioned above. A positive value indicates the setting of the luminary, while a negative value indicates its rising. To determine the local sidereal time of rising and setting, follow these steps:

It is possible to determine the moments of sunrise and sunset of the luminary using either the local mean solar time Tm or the zone time Tn=T0+n h (where the zone number is expressed in hours).
If you are calculating sunrise and sunset, there is no need to calculate the sidereal time of the phenomena. This is because the local true solar time is equivalent to the hour angle of the Sun plus 12 hours. Therefore, the local mean time is:

The equation of time, denoted as η, is obtained from the Astronomical Yearbook, along with the direct ascension and declination of the Sun.
To determine the azimuths of the sunrise and sunset points (without considering refraction, parallax, and angular radius), we can use the first formula (4) by setting z=90°. In this case, sin z=1 and cos z=0.

Using equation (10), we can calculate the azimuth of the luminary at two different points: A = A and Aasc = 360° – A. The first value represents the azimuth of the sunset point, while the second value represents the azimuth of the sunrise point.
Lastly, we can express equations (9) and (10) in the following format: