
Here are some fundamental equations that provide an estimate of a telescope’s capabilities.
It’s important to note that these are theoretical calculations and actual performance can vary based on factors such as product quality, proper setup, and atmospheric conditions.
Magnification or telescope power (G)
G=F/f where F represents the focal length of the objective lens and f represents the focal length of the eyepiece.
Typically, the focal length of the objective lens (F) cannot be changed, but by using eyepieces with different focal lengths (f), you can adjust the magnification or power of the telescope. The magnification or power of the telescope G.
Maximal enlargement (G max)
Luminosity
The luminosity of a telescope is determined by the ratio D:F. To put it simply, the smaller the ratio, the more ideal the telescope is for observing galaxies and nebulae (for example, a ratio of 1:5). Conversely, a telescope with a longer focal length and a ratio of 1:12 would be better suited for observing the Moon.
Resolution (b)
The resolution of a telescope refers to the smallest angle between two stars that are close enough to be seen as separate entities, rather than appearing merged into one. In simpler terms, resolution can be thought of as the “sharpness” of an image (apologies to the optical professionals).
The formula for resolution is b=138/D, where D represents the aperture of the lens. This measurement is typically expressed in arc seconds.
Due to atmospheric factors, the resolution is usually not less than 1″ (1 second). To provide an example, on the Moon, a resolution of 1″ would correspond to a crater with a diameter of approximately 2 km.
For lenses with longer focal lengths and aperture values of 1:12 or greater, the formula is slightly adjusted to b=116/D (Dunlop).
It is evident from the aforementioned information that under normal circumstances, a minimum resolving power of 1″ can be achieved with an aperture of 150mm for reflectors and approximately 125mm for planetary refractors. Larger aperture telescopes theoretically provide a clearer image, especially in areas with clear atmospheres such as high mountain regions or on fortunate weather days.
Nevertheless, it is important to consider that as the size of the telescope increases, the image becomes brighter and more dim details and objects become visible. Thus, from the perspective of the average observer, larger telescopes still offer a superior image compared to smaller ones.
Furthermore, there are instances where the atmosphere above can become significantly calm, resulting in a larger telescope displaying a clearer picture beyond the 1″ limit. This can be quite frustrating for owners of smaller telescopes that are limited by this threshold.
In conclusion, it is not particularly logical to confine oneself to a 150 millimeter aperture. 😉
Limit of Stellar Magnitude (m)
The magnitude at which a telescope can see a star is limited by its aperture:
m = 2.1 + 5 * lg(D), where D is the telescope’s diameter in millimeters and lg is the logarithm.
If we calculate, we find that the largest “store” telescope with a 300 mm aperture can see stars up to magnitude 14.5. Fainter objects are observed using photography and subsequent computer processing of frames.
For your convenience, here is a table showing the relationship between telescope aperture D and the limit of stellar magnitude:
Exit pupil
Exit pupil refers to the size of the beam of light that exits the eyepiece of a optical instrument, such as a telescope or binoculars, and enters the eye of the viewer. It is an important factor to consider when choosing a optical instrument, as it determines the brightness of the image that will be seen by the viewer. The exit pupil is calculated by dividing the diameter of the objective lens by the magnification of the instrument. A larger exit pupil will result in a brighter image, while a smaller exit pupil will result in a dimmer image. It is important to note that the human eye has a maximum pupil size of about 7mm, so an exit pupil larger than this will not provide any additional benefit.
The formula for calculating the exit pupil of a telescope is D/G
It is ideal to have the exit pupil of the telescope at 6 mm, as this ensures that all the light gathered by the lens will reach the eye (6 mm being approximately the diameter of the human pupil in the dark). If the exit pupil is larger, some light will be lost, similar to when we use a diaphragm on the lens.
In practice, it is more convenient to work backwards. For example:
For my telescope with an aperture D of 250mm, the maximum magnification without any loss in brightness is 250mm/6mm = 41.67x. This means that at a magnification of 41.67, the exit pupil will be 6mm.
So, what eyepiece do I need for this telescope to achieve this “equal magnification”?
Let’s remember: f=F/G.
Therefore, the focal length F of my Dobson telescope is 1255mm. “G” has already been determined: 41.67x.
This means that I require an eyepiece with a focal length of f=1255/41.67=30.1mm. Yes, that’s roughly the eyepiece that came with the kit :).
42x magnification might not seem like a lot, but it is sufficient for observing star fields, although it may not be enough for Andromeda.
(If we use an eyepiece with a shorter focal length, yay, the magnification will be higher! However, the image will be darker. And the higher the magnification, the darker the image will be.)
This calculation was for a telescope with a rather large aperture, and for ordinary telescopes, calculating the magnification for equal brightness is quite complex – it’s enough to make you cry. That’s why they say “aperture rules” – the higher the aperture, the brighter the image at the same magnification (with the same telescope design).
Field of View of a Telescope
The field of view of the telescope is equal to the field of view of the eyepiece divided by L
The field of view of the eyepiece is specified in its passport, and we already know how to calculate the magnification G of a telescope with a given eyepiece: G=F/f.
What is beneficial to understand about the field of view of the telescope?
The larger the field of view of the telescope, the more of the sky can be observed, but the smaller the objects.
By knowing the field (angle) that your telescope will capture at a given magnification, and knowing the angular size of the object you are searching for, you can estimate the portion of the field of view that this object will occupy, thus estimating the overall view of what you will see in the eyepiece.
If you are searching for an object not by coordinates, but by maps, it can be helpful to create wire rings that correspond to the angular fields of view of your eyepieces in the telescope. This makes it much easier to orient yourself: by moving the telescope from star to star and simultaneously adjusting the ring on the map, you can easily compare both images.
Now that we have a general understanding of the telescope’s characteristics, we can examine the different observations that can be made using telescopes of varying sizes.
Vladimir, I appreciate your humor, but I am not involved in the development of spy equipment 🙂
I am unsure how to solve this problem.
For a camera with a lens focal length of 9 cm, it was able to capture images of distant objects at the closest possible distance of 81 cm. I need to determine the amount the lens had to be moved forward in order to achieve this.
What is the formula for determining the range of a telescope to observe stars with atmospheric temperatures of, for example, 10000K?
It would be helpful to understand the context behind this question. Without specific details, in general, a white star with a temperature of 10000K can be observed with a telescope based on its apparent stellar magnitude. Additionally, the ability to distinguish colors, such as red, may require a telescope with a slightly larger aperture. There are sensitivity curves available for the human eye online that can be used to derive a formula, but in practice, amateur astronomers tend to use whatever telescope is readily available rather than selecting one specifically for each star.
There is an error in the text: “G max=1.5*D, where D is the focal length of the lens”. I believe it should be: D is the aperture of the lens or the main mirror.
Maxim, I appreciate your attention 🙂 Yes, I made a mistake in that part. “D” stands for aperture, as mentioned at the start of the article. It has been corrected.
Regarding my telescope, it is likely the most basic model. I have the Levenhuk Skyline 76*700AZ. It is quite frustrating that I can only observe the outer edges of the stars and the center appears dark. Can you please provide an explanation?
Tatiana, February 16, 2020
Tatiana, when observing a star through an amateur telescope, it should appear as a single point. However, due to various distortions, it may appear as a cluster of deviations. It seems that your telescope’s focus is not properly adjusted, resulting in a “bagel” shape instead of a point. I recommend researching the terms “pre-focal” and “out-of-focal” for reflector telescopes, as there are many photos available online that demonstrate these concepts. It appears that your telescope is simply out of focus, which is a common issue. Once you become comfortable with focusing, I suggest looking up instructions on how to align a reflector telescope, as this is often necessary for mirror telescopes like yours. Please note that mirror telescopes require more precise manual adjustments compared to lens telescopes, which are typically recommended for beginners. In short, try adjusting the focuser wheel back and forth. It is a double wheel located on the part where you insert the eyepiece. It is possible that you are turning it, but the focus travel is limited. However, this is unlikely unless you are using a non-standard interchangeable eyepiece or if the eyepiece is inserted incorrectly. I recommend starting with the standard eyepiece that came with your telescope.
Elena Alexandrovna, August 16, 2019.
8mm is the ideal scenario: when the eyes are in perfect health, the eye muscles are functioning optimally, and the measurements are taken in complete darkness. However, in reality, our eye muscles rarely work as they should. Unfortunately, it is usually around 7mm. Additionally, there is some light coming from the eyepiece of the telescope, so it is not completely dark. This causes the pupil to shrink even further, resulting in an approximate measurement of 6mm. And if you are looking at the moon, it may be even smaller 🙂
Thank you for the article and the other articles on your website. They are very clear and detailed. Thank you.
Alexander, August 16, 2019.
You’re welcome. Feel free to ask if you have any questions 🙂
Great article. Much appreciated. Celestron 120/1000 OMNI
A highly captivating and comprehensive depiction of various aspects. This article holds immense importance for me, as I have recently embarked on my journey in the field of astronomy. My telescope, the Sturman HQ1400150EQ, has proven to be an invaluable asset. Thank you wholeheartedly for providing such invaluable information!
Reply:
Your gratitude is greatly appreciated 🙂 With an impressive aperture of 150 mm and the inclusion of an equatorial mount, you are off to a fantastic start. It is crucial to ensure that your observing location is devoid of any excessive light pollution. Wishing you all the best in your astronomical endeavors!
Nicholas.
Typically, when we talk about the focal length of a telescope, we are referring to the focal length of the lens (F). This is because eyepieces can be interchanged and each has its own focal length.
The focal length not only determines the magnification, but also plays a role in the image quality. Generally, a longer focal length results in better image quality. For instance, in refractor telescopes, a longer focal length reduces chromatic aberration, which is a common issue in this type of telescope. On the other hand, shorter reflector telescopes have limitations in terms of focal length and image quality, regardless of what a salesperson may claim.
The focal length of a telescope depends on its design, particularly in Newtonian reflectors and refractors.
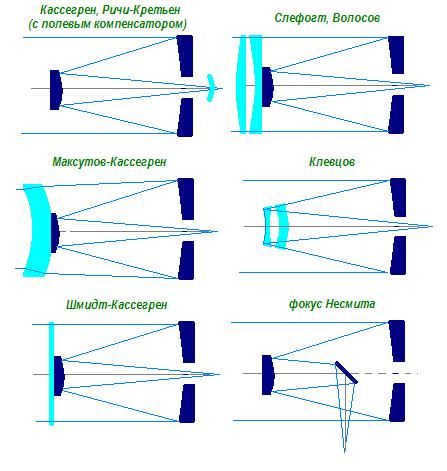
In the case of catadioptric telescopes, the light undergoes multiple reflections inside the tube, resulting in a shorter overall length. However, this does not affect the focal length of the catadioptric system.
Take a look at the illustration on the left-hand side, which depicts various catadioptric designs and the path of light rays. It is evident that the “geometric cone of convergence of rays” is folded, resembling a sheet of paper.
For more detailed information about catadioptric telescopes, please refer to the article on catadioptric telescopes.
From all of this, it can be concluded that choosing telescope models with short focal lengths (around 500 mm) is not advisable. While they may be space-saving and convenient for balconies, the trade-off is a lower image quality.
On the other hand, the Sky-Watcher BK 909AZ3 refractor, with its focal length of 900mm, is widely regarded as a classic option for beginners (priced at 7500r. in 2014).
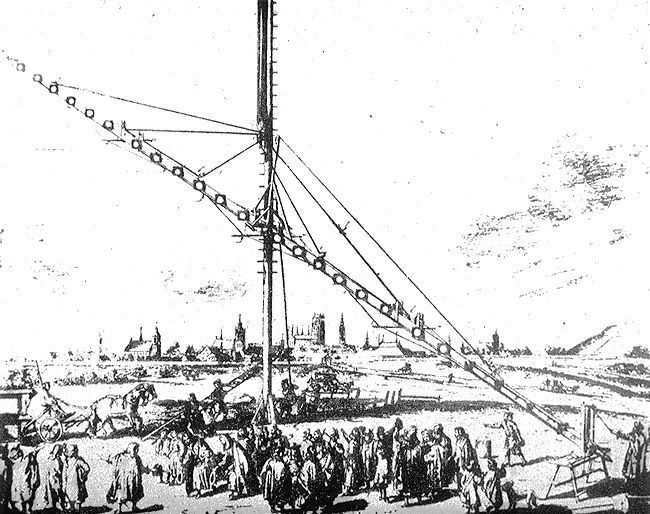
Incidentally, prior to the development of achromatic refractors, the problem of chromatism in lens-based telescopes was addressed by increasing the focal length of the lenses. You can observe this in the case of Jan Hevelius’ telescope, which measured 50 meters in length and was suspended from a pole. The telescope was operated by ropes manipulated by the astronomer’s assistants.
Here are some basic formulas that provide an approximate idea of what the telescope is capable of.
Keep in mind that these are theoretical values and the actual performance heavily relies on factors such as product quality, proper calibration, and atmospheric conditions.
Telescope magnification (G)
G=F/f where F represents the focal length of the objective lens, and f represents the focal length of the eyepiece.
In most cases, F cannot be easily changed, but by using eyepieces with different f values, you can adjust the magnification or power of the telescope. the magnification or power of the telescope Г.
Maximum amplification (G max)
The size of the objective lens determines the maximum magnification of a telescope. It is commonly believed that G max=2*D, but due to factors such as distortion correction, manufacturing precision, and adjustment, it is recommended to slightly underestimate this value:
Гmax = 1.5*D, where D refers to the diameter of the lens or main mirror (aperture).
If the telescope proves to be capable of a higher magnification, it can be a pleasant surprise. Using a Barlow lens can increase the maximum magnification of the telescope, but it only results in a blurry, larger image without any additional details.
However, there is an alternative approach: slightly larger sizes often provide a better view of the same object, even though it doesn’t add any extra details. This is likely why the standard formula advises L max=2*D, as it depends on the specific object and personal preference.
The brightness of a telescope is determined by the D:F ratio. If you don’t give it much thought, the smaller the ratio, the more ideal the telescope is for observing galaxies and nebulae (e.g. 1:5). On the other hand, a telescope with a longer focal length and a ratio like 1:12 is more suitable for observing the Moon.
Definition of Resolution (b)
Definition The resolution of a telescope refers to its ability to distinguish between two closely spaced stars, allowing them to be seen as separate entities rather than a single merged image. In simpler terms, resolution can be thought of as the “clarity” of the image (apologies to the optical professionals).
b=138/D where D represents the diameter of the lens aperture. This measurement is typically expressed in arc seconds.
However, due to atmospheric conditions, the resolution of a telescope is rarely smaller than 1″ (1 second). To put this into perspective, on the Moon, a 1″ resolution would reveal details as small as a 2 km diameter crater.
For lenses with longer focal lengths and aperture values of 1:12 or greater, the formula slightly differs: b=116/D (Dunlop).
It is evident from the information above that, under normal circumstances, the minimum resolving power of 1″ is attained with a reflector telescope having an aperture of 150mm, while for planetary refractors it is around 125mm. Theoretically, telescopes with greater aperture provide a clearer image, especially in areas with clear atmospheric conditions, such as high mountain regions or on fortuitous weather days.
Nevertheless, it is important to consider that larger telescopes yield brighter images and enable the observation of fainter details and objects. From the perspective of a casual observer, larger telescopes still offer superior image quality compared to smaller ones.
Furthermore, there may be brief periods when the atmosphere above you becomes exceptionally calm, resulting in a sharper image with a larger telescope surpassing the 1″ limit, while the smaller telescope is limited by this threshold, which can be quite disappointing.
Therefore, it is not particularly logical to confine oneself to a 150mm aperture. 😉
Limit of Stellar Magnitude (m)
The limit of stellar magnitude that can be observed through a telescope depends on its aperture:
m=2.1+5*log(D) where D represents the diameter of the telescope in millimeters, and log is the logarithm.
By performing the necessary calculations, one can determine the limiting stellar magnitude. Fainter celestial objects are typically detected through the use of photography, followed by computer analysis of the captured frames.
For your reference, I will provide a table that shows the corresponding values between telescope aperture D and the limit of stellar magnitude:
| 32 | 9.6 | 132 | 12.7 |
| 50 | 10.6 | 150 | 13 |
| 60 | 11 | 200 | 13.6 |
| 70 | 11.3 | 250 | 14.1 |
| 80 | 11.6 | 300 | 14.5 |
| 90 | 11.9 | 350 | 14.8 |
| 114 | 12.4 | 400 | 15.1 |
| 125 | 12.6 | 500 | 15.6 |
| 32 | 9.6 | 132 | 12.7 |
| 50 | 10.6 | 150 | 13 |
| 60 | 11 | 200 | 13.6 |
| 70 | 11.3 | 250 | 14.1 |
| 80 | 11.6 | 300 | 14.5 |
| 90 | 11.9 | 350 | 14.8 |
| 114 | 12.4 | 400 | 15.1 |
| 125 | 12.6 | 500 | 15.6 |
Exit pupil explained
The formula for calculating the exit pupil of a telescope is D/G
It is ideal to have the exit pupil of the telescope at 6 mm, as this ensures that all the light collected by the lens will reach the eye. (6 mm is approximately the diameter of the human pupil in the dark). If the exit pupil is larger, some light will be lost, similar to using a diaphragm on the lens.
In practical terms, it is often more convenient to work backwards. For example:
For my telescope with an aperture of D=250mm, the maximum magnification without loss of brightness would be 250mm/6mm = 41.67x. This means that at a magnification of 41.67, the exit pupil will be 6mm.
So, what eyepiece do I need for this telescope to achieve this “equal magnification”?
Let’s recall the formula: f=F/G.
Therefore, the focal length F of my Dobson telescope is 1255mm. “G” has already been determined as 41.67x.
This means that I would need an eyepiece with a focal length of f=1255/41.67=30.1mm. Interestingly, this is roughly the same as the eyepiece that came with the kit :).
A magnification of 42x may not be very high, but it is sufficient for observing star fields. However, it may not be enough for observing Andromeda.
(If we were to use an eyepiece with a shorter focal length, the magnification would be greater. However, the image would also be darker. As magnification increases, the image tends to become darker).
This calculation was for a telescope with a fairly large aperture. For ordinary telescopes, the magnification for equal brightness would require more complex calculations. This is why it is often said that “aperture rules” – the larger the aperture, the brighter the image at the same magnification (assuming the same telescope design).
Field of View of a Telescope
The telescope’s field of view is equal to the eyepiece’s field of view divided by L
The eyepiece’s field of view is specified in its manual, and we already know how to calculate the magnification G of a telescope with a given eyepiece: G=F/f.
What is important to understand about the telescope’s field of view?
The larger the telescope’s field of view, the more of the sky you can see, but the smaller the objects appear.
By knowing the field (angle) that your telescope will capture at a certain magnification, and knowing the angular size of the object you are searching for, you can estimate what portion of the field of view that object will occupy. This allows you to get a general idea of what you will see through the eyepiece.
If you are searching for an object using maps instead of coordinates, it can be helpful to create wire rings that correspond to the angular fields of view of your eyepieces in the telescope. This makes it much easier to navigate: by moving the telescope from star to star and simultaneously adjusting the position of the ring on the map, you can easily compare both images.
Now that we have a general understanding of the telescope’s characteristics, we can explore the different perspectives provided by telescopes of various sizes.
Vladimir, I appreciate your sense of humor, but I am not involved in the development of spy equipment 🙂
I’m having trouble figuring out how to solve this problem. A camera with a lens focal length of 9 cm took photos of distant objects at a minimum distance of 81 cm. I need to determine how much the lens needed to be moved forward.
In this format, I am not comprehending the condition either. However, assuming that the problem omitted is that you initially captured images of distant objects, and then moved in closer at the closest possible distance for a given camera, it appears to be a problem related to the thin lens formula:
1/f2 = 1/F-1/d2 = 1/9-1/81 = 9/81-1/81 = 8/81;
f2 = 81/8 = 10.125 cm
f2-f1= 10.125-9 = 1.125cm.
What formula can be used to determine the range of a telescope if it is necessary to observe stars with atmospheric temperatures of, for instance, 10000:K?
There is a mistake in the text: “G max=1.5*D, where D is the focal length of the lens”. I believe it should be: D – the aperture of the lens or the primary mirror.
Maxim, thank you for catching that 🙂 Yes, I made a typo there, D represents the aperture, as mentioned at the start of the article. It has been corrected.
As for my telescope, it is probably the most basic one. I have the Levenhuk Skyline 76*700AZ. It’s very frustrating that I can only see the outer ring of the star and the middle is dark. Can you explain why? Please answer if you can.
Tatiana, February 16, 2020
Tatiana, when looking at a star through an amateur telescope, it should appear as a single point. However, due to various distortions, it may actually appear as a distorted shape. It seems that your telescope’s focus is not properly adjusted, which is why you are seeing a “bagel” instead of a point star. I suggest researching the terms “pre-focal” and “out-of-focal” for reflector telescopes on the internet, as there are many photos available that show what happens when the telescope is out of focus. I believe this may be the issue you are experiencing. Once you have adjusted the focus, I recommend searching for information on how to align a reflector telescope, as this process is described in detail online. Unfortunately, reflecting telescopes like yours require precise manual adjustment, unlike lens telescopes which are easier to use and are often recommended for beginners. In short, try rotating the focuser adjustment wheel back and forth. This double wheel is located on the part of the telescope where you insert the eyepiece. It is possible that you are already turning the wheel, but the focuser may not have enough range of motion. However, this is unlikely unless you are using a non-standard interchangeable eyepiece or if you have inserted the eyepiece incorrectly. I suggest starting with the standard eyepiece that came with your telescope.
According to your article, the human pupil’s approximate diameter in the dark is 6 mm. However, I have come across mentions that our pupil can reach 8 mm in the dark. So, what is the actual size?
Elena Alexandrovna, August 16, 2019.
An 8 mm diameter is considered the ideal case, assuming perfectly healthy eyes and optimum functioning of the eye muscles, with measurements taken in complete darkness. However, in reality, our eye muscles rarely perform at their best. Unfortunately, the pupil size usually shrinks to about 7 mm. Additionally, there is some light entering from the eyepiece of the telescope, so it’s not complete darkness. As a result, the pupil further contracts, reaching around 6 mm. If you observe the moon, the pupil size may be even smaller.
Thank you for the article and other informative content on your website. It is very clear and detailed. Much appreciated.
Alexander, August 16, 2019.
Welcome! Feel free to ask if you have any questions 🙂
This article is fantastic. Thank you for sharing. I appreciate your detailed description of everything. As a beginner in astronomy, this article is very helpful to me. My telescope is the Sturman HQ1400150EQ. Thank you again!
Response:
You’re welcome 🙂 Your telescope has an aperture of 150 mm and an equatorial mount, which is a great choice for observing the night sky. Just make sure to find a location with minimal light pollution for optimal viewing. Wishing you success in your astronomy journey!
Nikolay.
There are two concepts to consider when determining the magnification of a telescope: the maximum useful magnification and the magnification achieved with a specific eyepiece. The maximum useful magnification represents the highest level of optical efficiency that can be achieved. Going beyond this magnification will result in a deterioration of image quality. To calculate the maximum useful magnification, simply multiply the diameter of the lens by two. For example, a telescope with a 70mm aperture will have a maximum useful magnification of 140x. On the other hand, the maximum magnification achieved with a specific eyepiece depends on the accessory used with the telescope. This can be calculated using an astronomical calculator.
Astronomy Calculation Tool
Use our online calculator to determine the magnification of your telescope and choose the right eyepieces for your stargazing needs. Simply fill in the required information in the “Initial Parameters” section and click the “Calculate” button.
Initial Parameters
Telescope Magnification with Selected Eyepiece
Choose an eyepiece from the catalog
Copying any content from this website without an active link is strictly prohibited! “Four Eyes” © 2002-2023
© 2023 Discovery, as well as its logos and trademarks, are the property of Discovery and its affiliated companies. Used with permission. All rights reserved. Discovery.com.
This website is intended for informational purposes only and in no way constitutes a public offer as defined by Article 437 (2) of the Civil Code of the Russian Federation.
Tips on enhancing the magnification power of a telescope
Content:
Telescope capability
Calculating the Magnification of a Telescope
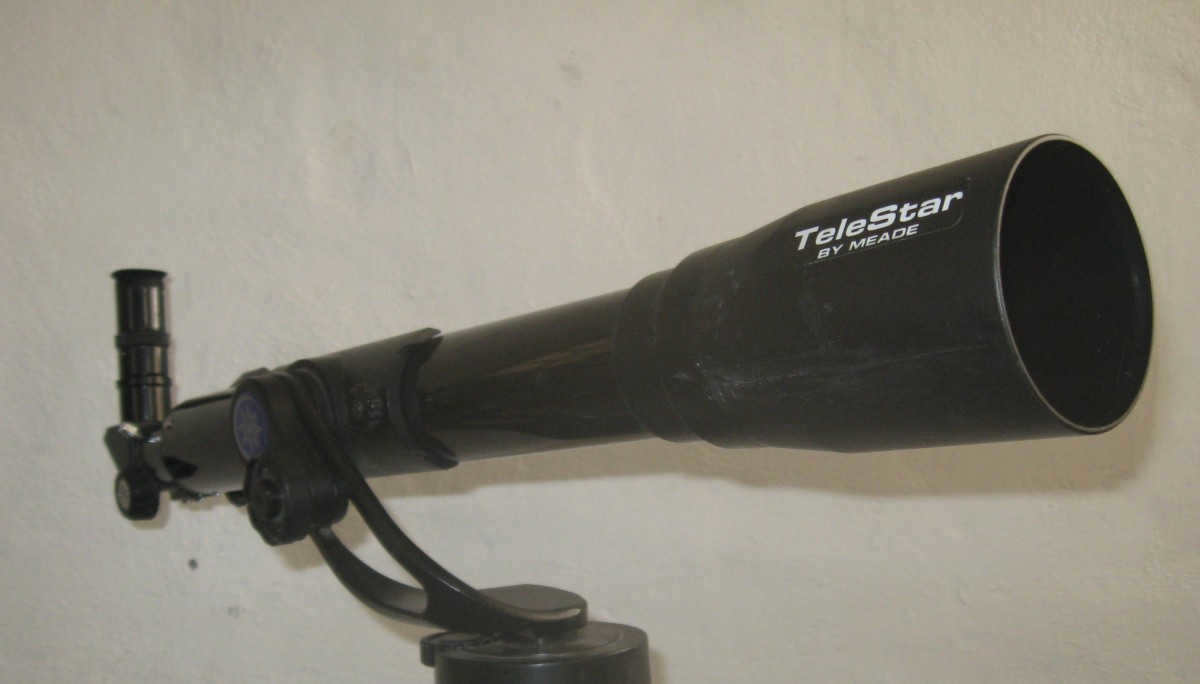
One way to determine the power of a telescope is by dividing the diameter of the objective lens by the focal length of the telescope. In this guide, I will explain how you can enhance the magnification of the telescope shown above. This particular telescope has a focal length of 70mm and an objective lens diameter of 60mm. However, the techniques I will demonstrate can be applied to other types of telescopes to increase their magnification.
What is the method for calculating magnification in a telescope?
The magnification in a telescope can be determined by dividing the focal length of the main objective lens by the focal length of the eyepiece. In this particular scenario, I will be demonstrating how to calculate the magnification of a telescope with a focal length of 700mm using 9mm and 25mm eyepieces.
If you are using a 25mm eyepiece on the telescope, all you need to do is divide the focal length of the telescope by the focal length of the eyepiece. In this case, the difference between the 700mm focal length of the telescope and the 25mm eyepiece is 675mm. This results in a magnification of 28x for the telescope when using the 25mm eyepiece. Consequently, you will be able to observe objects at a size that is 28 times larger than their actual size.
If you were to utilize a 9mm eyepiece with a 700mm telescope, the resulting magnification would be 77x, mirroring the magnification achieved with a 9mm eyepiece. As a general rule, shorter eyepieces provide greater magnification compared to longer ones. This is due to the fact that shorter eyepieces possess a shorter focal length, resulting in increased magnification.
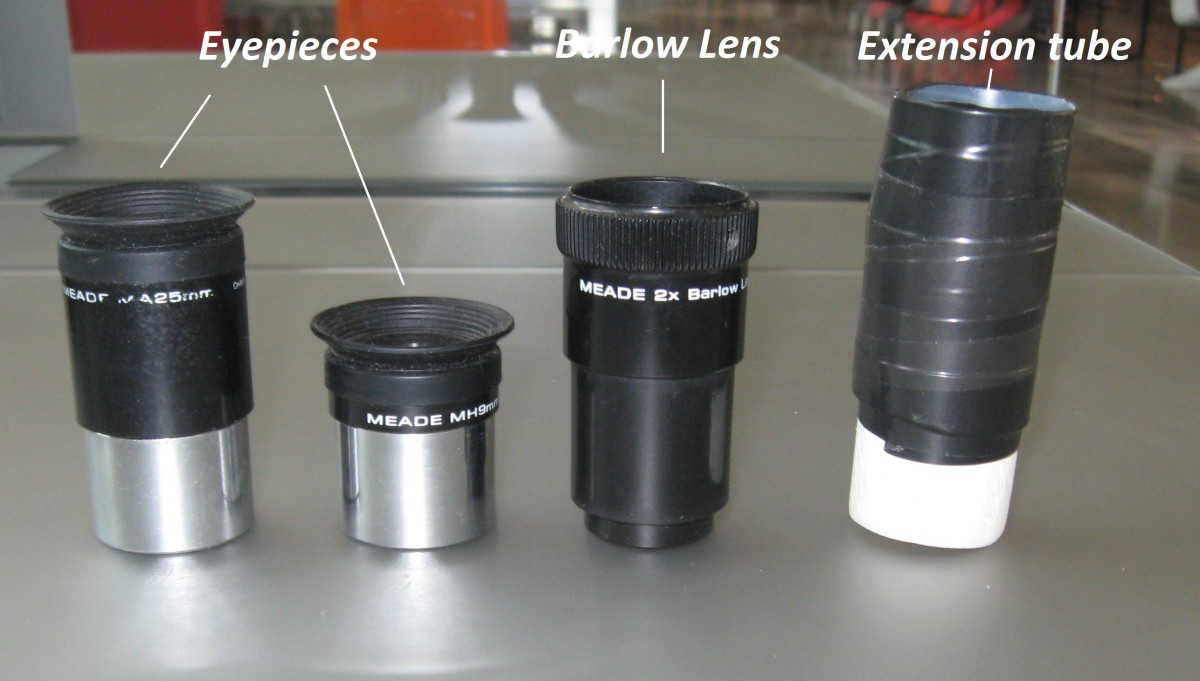
Eyecup and Barlow lens
How to Enhance the Magnification of Your Telescope with a Barlow Lens?
There is an additional method you can use to further enhance the magnification of your telescope. You can achieve this by inserting a Barlow lens in front of your eyepiece. A Barlow lens is a type of lens that scatters light rays, causing them to spread out. When utilized in a telescope, a Barlow lens increases the telescope’s focal length, thereby magnifying the image.
Barlow lenses are typically positioned in front of the eyepiece, and they have the ability to double or triple the magnification of a telescope. Barlow lenses are usually classified as 2x and 3x, which indicates that they increase the telescope’s original magnification by a factor of two or three, although other magnifications are available.
Using a 3x grating Barlow lens will also result in increased magnification for the telescope, depending on the eyepiece used. If a 25mm eyepiece is used, the magnification will be tripled to 84x, while a 9mm eyepiece will triple the magnification to 233x.
How can I further increase the magnification of my telescope with an extension tube?
To achieve even greater magnification, you can incorporate an extension tube between the Barlow lens and the eyepiece. One option is to purchase a PVC tube with a 1-inch diameter and sand down one end to fit perfectly with the Barlow lens barrel. On the other end of the tube, you can cut and attach a piece that serves as an eyepiece holder. In the attached image, you can see an example of an extension tube created using this method.
By inserting the extension tube between the Barlow lens and the eyepiece, you can enhance the telescope’s magnification by a factor of two, three, or even more, depending on the length of the extension tube. The concept behind this is that by increasing the separation between the Barlow lens and the eyepiece, you effectively reduce the focal length of the eyepiece, resulting in an amplified magnification of the telescope.
Enhanced image achieved by combining a Barlow lens and an extension tube
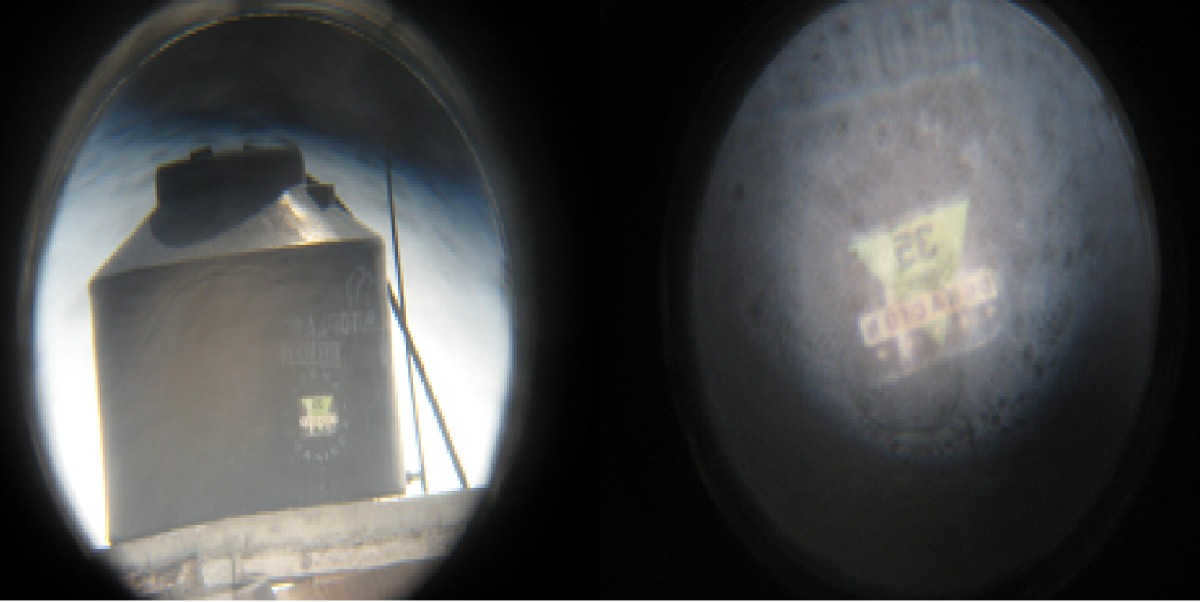
The left image shows a telescope with a Barlow lens and a 25mm eyepiece. On the right, the same image is shown with the same optical devices mentioned earlier, along with an extension tube that increases the distance provided by the Barlow lens fourfold.
This image depicts a water tank located on the roof of a house approximately two miles away. Without the assistance of a telescope, it would be extremely challenging to discern any letters or details on a body of water.
Summary
These three optical devices discussed in this section offer a way to enhance the magnification capabilities of your telescope. By increasing the magnification, you can view finer details of celestial objects, although the brightness may be slightly reduced. This is because as the magnification increases, the sharpness of the image decreases.
When using a 700mm telescope, the maximum magnification achievable without a Barlow lens is with a 25mm eyepiece. However, by incorporating a Barlow lens, the planets can still be observed, albeit with a narrower field of view.
A practical approach is to initially locate an object in the sky using a low magnification eyepiece, such as the 25mm one, and then switch to a higher magnification eyepiece, like the 9mm or a Barlow lens. Another option is to use an extension tube, although this may result in a decrease in image quality.
The described magnifications may enable you to observe avian creatures or other remote items while journeying away from urban areas or sailing from the coast. The greater the magnification, the higher the image’s quality that you are observing.
© 2012 Jose Juan Gutierrez
Steps for determining the magnification of a telescope lens
Understanding Telescope Magnification and Choosing the Right Eyepieces
To learn more about telescope magnification and selecting the optimal set of eyepieces, please visit the following article:
https://star-hunter.ru/eyepieces/
When beginners purchase a telescope, they often make the mistake of immediately setting it to maximum magnification, only to be disappointed by a dark and empty view. It’s important to understand that certain celestial objects are best observed with high magnification, such as planets, the Moon, and double stars. On the other hand, objects like galaxies, nebulae, and clusters are better observed with minimum or medium magnification. Keep in mind that the higher the magnification, the lower the brightness and contrast of the image. If you use too much magnification when observing planets, all you’ll see is a blurry, faint spot.
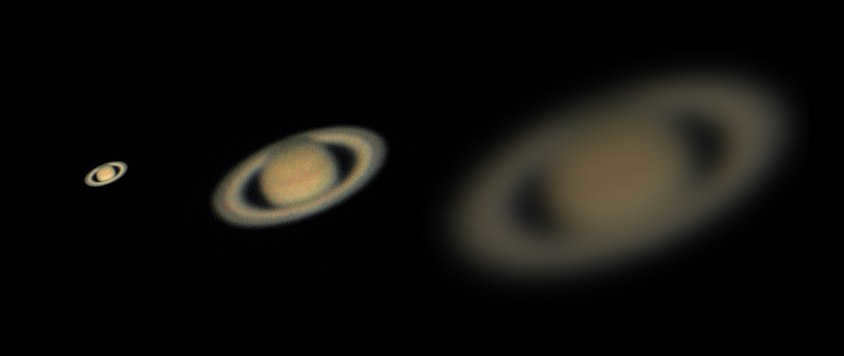
An observation of Saturn using different levels of magnification through a telescope reveals that higher magnification does not always result in more detailed images.
To determine the magnification of a telescope, divide the focal length of the telescope by the focal length of the eyepiece. For example, if the telescope has a focal length of 1000mm and the eyepiece has a focal length of 10mm, the magnification would be 100x.
The maximum magnification of a telescope is determined by the diameter of its objective lens and is approximately equal to 1.5 times the diameter to 2 times the diameter. For instance, a telescope with a 150mm objective lens and high-quality optics can achieve a maximum magnification of around 300x.
There is a formula to calculate the minimum magnification of a telescope, which is D\6, where D represents the diameter of the lens in mm. For instance, if the telescope has a 150mm lens, the minimum magnification would be 25x. This minimum magnification is also referred to as equal magnification. It is not practical to use a lower magnification, such as 20x, because the light beam from the eyepiece would have a larger diameter than the observer’s pupil, causing the light to pass by the eye.
One can determine the size of the exit pupil of a telescope by dividing the telescope’s diameter by its magnification. This exit pupil is the size of the output beam. For instance, if a telescope has a diameter of 300mm and a magnification of 100x, the exit pupil will be 3 millimeters in diameter.
Observing different celestial objects requires the use of various magnifications:
1) For searching eyepiece and large nebulae, an equal opacity of D/5…D/7 (exit pupil 5-7 mm) is used.
2) Messier catalog objects can be observed with a moderate D\3 (exit pupil 3mm).
3) Bright galaxies and nebulae are best observed with a medium D\2 (exit pupil 2mm).
4) Small galaxies, planetary nebulae, and clusters require a penetrating 0.7*D (exit pupil 1.4mm).
5) The Moon, Sun, and planetary satellites are best observed with a large 1*D (exit pupil 1mm).
6) Details on the surface of the Moon, planets, and the Sun can be resolved with a resolving 1.4*D (exit pupil 0.7mm).
7) For observing double stars, the Moon, and Mars, a limiting 2*D (exit pupil 0.5mm) is used.
Typically, two or three eyepieces with different focal lengths and a good Barlow lens are sufficient to observe nearly all types of space objects.
If you discover an error, please highlight the text fragment and press Ctrl+Enter.
The value of magnification depends on several factors, including the size of the objective lens, the brightness of the sky, the atmospheric conditions, the properties of the observed object, and the observer’s visual acuity. These conditions can vary from night to night and from object to object, so the optimal magnification is not constant. Instead, it is more accurate to consider the range of useful magnifications for a telescope. In the following section, we will outline the limits of this range.
Prohibition on minimalism
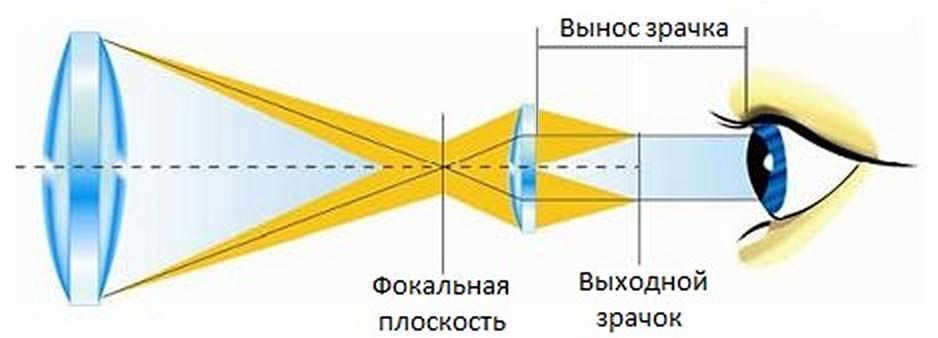
In addition to what has been mentioned above, there is an alternative way to define the magnification of a telescope – by comparing the diameter of its entrance pupil (or, in other words, the diameter of the objective lens) to the diameter of its exit pupil. The exit pupil can be observed as a bright spot behind the eyepiece when the telescope is pointed towards a luminous sky and observed at a distance of 20-40 cm. The relationship is such that the higher the magnification of the telescope, the smaller the diameter of its exit pupil, and vice versa.
When making observations, it is important to align the pupil of the eye with the exit pupil of the telescope. It is crucial to note that the diameter of the exit pupil should not be greater than the diameter of the observer’s eye pupil, as this would result in the loss of some of the collected light by the telescope. This factor establishes the minimum range of useful magnifications for the telescope.
It is a well-known fact that the size of the eye pupil changes depending on the level of lighting. In bright light, the pupil decreases in size, while in darkness it increases. Numerous experiments have demonstrated that in most individuals, the pupil can dilate up to 7 mm in the dark. However, there have been cases where the maximum diameter of the pupil reached an astonishing 9 mm! Additionally, research has shown that the degree of pupil dilation tends to decrease with age. Before the age of 30, any changes in pupil size are hardly noticeable. However, as individuals reach their 50s or 60s, the maximum size of the pupil generally does not exceed 4-6 mm. After this point, the aging process slows down once again, with the pupil size stabilizing at around 3-5 mm.
To find out the largest size of your pupil, you can utilize the apparatus presented in the container on page 25. By having this measurement, you will be able to ascertain the smallest allowable level of magnification for your telescope (by dividing the diameter of the lens by the diameter of the pupil) at which the light gathered by the telescope will reach your eye. This level of magnification is referred to as the equivalent eye magnification since, at this level of magnification, the diameter of the exit aperture of the telescope is equal to the diameter of the observer’s pupil.
Based on the information provided, it can be inferred that when determining the minimum effective magnification of a telescope, it is important to allow for a slight discrepancy (approximately 1 mm) between the exit aperture diameter and the pupil size. For instance, if it has been determined that the pupil can dilate up to 7 mm in low light conditions, the magnification can be calculated using the formula: D/(7-1)=D/6, where D represents the diameter of the telescope lens in millimeters.
When should the minimum magnification be used? Primarily, it is necessary when aligning the telescope with an object. As the instrument’s magnification decreases, its field of view expands. Additionally, lower magnification is suitable for observing celestial objects with larger angular sizes, such as the Moon, expansive clusters, or nebulae. These objects would not fit within the telescope’s field of view at higher magnifications. For other types of observations, higher magnifications are preferred, as we will delve into in the following chapter.
Increased magnifications can be achieved
While the minimum useful magnification of a telescope is primarily influenced by human visual capabilities, the maximum magnification must also take into consideration various factors, including the characteristics of the observed objects. Therefore, we will examine this matter individually for double stars, planets, stars, and non-stellar objects.
Twin stars
When using this level of magnification, the eye is pushed to its limits. However, we can make it easier for the eye by increasing the telescope’s magnification to 3-5 times higher than the resolving magnification. This will cause the size of the diffraction pattern to increase to 180-300 angular seconds (instead of 60), making it much easier for the eye to observe its structure.
Increasing the magnification beyond a certain point does not provide any significant advantage as it results in a dim and low-contrast image. Additionally, the field of view of the instrument is greatly reduced and there is a higher requirement for atmospheric stability and telescope mount stability. After thoroughly studying the effects of these factors, Paul Couteau, a renowned French observer of double stars, concluded that it is impractical to use magnification greater than 2.5 times the diameter of the telescope in millimeters (2.5D) for visual work.
Moon and planets
Observing double stars provides valuable insights that can also be applied to studying planets and the Moon. However, there is one key difference – the fine and low-contrast details of planets are more susceptible to the effects of atmospheric instability. Even a small disturbance in the atmosphere can greatly impact the clarity of the observed image and cause fine details to appear blurry. As a result, the maximum useful magnification for observing planets with a telescope is typically lower than that for observing double stars. For instance, V. A. Zinoviev, an experienced planetary observer from Volgograd, recommends using a magnification of no more than 2D to examine details on the surfaces of the Moon, Venus, and Mars, and a magnification of 1.6D for Jupiter and Saturn.
What if we want to observe the most dimly lit stars through our telescope? It is commonly understood that these stars are easiest to detect in the darkest skies, which is why there are more stars visible in the untouched night sky of the countryside compared to the city. However, with the use of a telescope, we can easily diminish the brightness of the sky background to the required degree, enabling our eyes to perceive the faintest stars. It’s important to note that the sky always appears darker through a telescope than to the naked eye, and this discrepancy is particularly noticeable when using high magnifications.
This phenomenon can be explained by the distinction between how point-like and extended objects are perceived through a telescope. The brightness of a point-like object appears greater as the diameter of its lens increases. This is why, when using a telescope, we are able to see stars (which, at low and medium magnifications, appear as point sources of light) that are much fainter than what is visible to the naked eye.
When it comes to extended objects, the situation is completely different. The surface brightness of an extended object does not increase when observed through a telescope compared to what can be seen with the naked eye. At best, when using a magnification that doesn’t degrade transparency, the surface brightness can stay the same (although this is unlikely due to light losses in the telescope). However, when using magnifications higher than the transparency limit, the surface brightness of the extended object inevitably decreases.
The atmosphere is a vast expanse, so when we zoom in, it seems dimmer to us. Consequently, by enlarging the telescope’s magnification, we enhance our ability to spot stars by amplifying their distinction from the surroundings. As a result, an intriguing outcome emerges: when observing exceedingly faint stars amidst urban illumination, a greater magnification is needed compared to observing in a non-urban setting – it is necessary to “dim” the luminous sky background to the desired level.
Does this imply that the magnification can be extended indefinitely? Absolutely not. We have not stated without reason that the stars merely appear to us as dots – in reality, the telescope constructs their images as diffraction disks encircled by rings, which becomes evident at higher magnifications (approximately twice the resolving power). And once the star is no longer a point source, its surface brightness also decreases significantly.
Undoubtedly, it is impossible to derive any aesthetic pleasure from observations with such excessive magnification: any object within the field of view, which has a brightness exceeding the utmost faintness, will appear faint and excessively blurred. The use of such magnification can only be justified in one specific scenario – to observe an extremely faint star against a bright sky background. In conditions of a dark sky, the telescope’s limit for stellar magnitude can be achieved with significantly lower magnification.
Astrophysical entities beyond our solar system
Let’s now focus on the topic of observing non-stellar objects – specifically, nebulae, clusters, and galaxies. As previously mentioned, a telescope is unable to enhance the surface brightness of extended objects, but it is capable of increasing their size. We also discussed how the eye’s resolving power is limited in conditions of insufficient illumination, making it easier to spot larger objects even if their surface brightness is considerably lower at the same magnification. Those who have been interested in searching for faint celestial objects in the night sky have likely noticed that faint galaxies can blend into the background sky when viewed at low magnifications, but become visible when using a shorter focal length eyepiece. The minimum magnification required to detect an object depends on the diameter of the telescope objective, the object’s surface brightness and size, and the brightness of the sky background. Furthermore, according to Clark, detecting an extended nebular object with a small instrument necessitates a higher magnification compared to a large telescope.
Nevertheless, even in this case, the level of magnification cannot be endlessly escalated. Firstly, it is crucial to bear in mind the diminishing field of view and the escalating requirements for mount stability and atmospheric tranquility. Secondly, and more significantly, once a certain threshold magnification value is achieved, the object’s surface brightness decreases to such an extent that it becomes invisible once again! Therefore, the reality, as always, lies somewhere in between – for each object (or its specific features) under the given conditions of observation, there exists an optimal magnification.
The only way to find it is through experience, and to do this you need a set of eyepieces that allow for a wide range of magnifications. Everyone can choose their own suitable set, but the most optimal option seems to be as follows: the smallest magnification should be equal to the minimum useful magnification of the telescope, and each subsequent magnification should be 1.4-1.6 times greater than the previous one. For example, if the lowest usable magnification of your telescope is 30x, it would be ideal to have a set of eyepieces that provide magnifications of 30, 50, 75, 125, 200, 315, 500x. The minimum magnification is used to center the object (or its intended location) in the field of view of the instrument, and then the magnification is adjusted to view the object (or its details) with the greatest amount of clarity.
How to determine the maximum pupil diameter
If you want to calculate the minimum useful resolution of your telescope, it’s important to know the diameter of your pupil. Luckily, there’s a simple method to determine it using the ruler provided here. All you need to do is cut it out of a magazine or make a photocopy, and then create holes with a needle in the designated spots. Now you’re all set for the experiment!
Begin by entering a dark room and giving your eyes a few minutes to adjust to the darkness. Next, hold the ruler close to one eye while using your hand to cover the other. Look through the holes and find a pair where the borders of the holes, through which you can see the objects, just barely touch each other. By referring to the scale on the ruler, you can easily determine the diameter of your pupil in millimeters.

Choosing the Right Eyepieces and Barlow Lens
As you may have come to understand, an amateur astronomer requires a rather extensive collection of eyepieces for complete satisfaction. However, the cost of high-quality astronomical eyepieces is quite steep nowadays. Additionally, it’s challenging to acquire eyepieces with all the recommended focal lengths mentioned earlier. A sensible solution to this predicament is to utilize a Barlow lens, which allows for a reduced number of eyepieces while maintaining the same level of telescope magnification.
Nowadays, there are a variety of lenses available for sale that offer magnification ranging from 1.4 to 4 times. These numerical values indicate that by using one of these lenses in combination with an eyepiece, the telescope will provide a magnification that is significantly greater than if it were used without the lens. Essentially, the level of magnification achieved with a Barlow lens determines the extent to which the focal length of the telescope’s objective lens (or the eyepiece’s focal length, for that matter) is increased.