Observing celestial objects often requires frequent adjustments in magnification, which is done by changing eyepieces. However, this can sometimes lead to the observed object going out of focus. One reason for this is the use of non-focal eyepieces, which have a front focal plane that is at a different distance from the eyepiece body support. Additionally, even technically parfocal eyepieces may require different focusing positions due to the observer’s strong myopia.
It is recommended for telescope owners to adjust the parfocality of their eyepieces to their own eyes. This can be done using parfocalizing rings, which can be either homemade or purchased. These rings are placed on the barrels of the eyepieces and securely fixed, eliminating the need for refocusing when changing eyepieces.
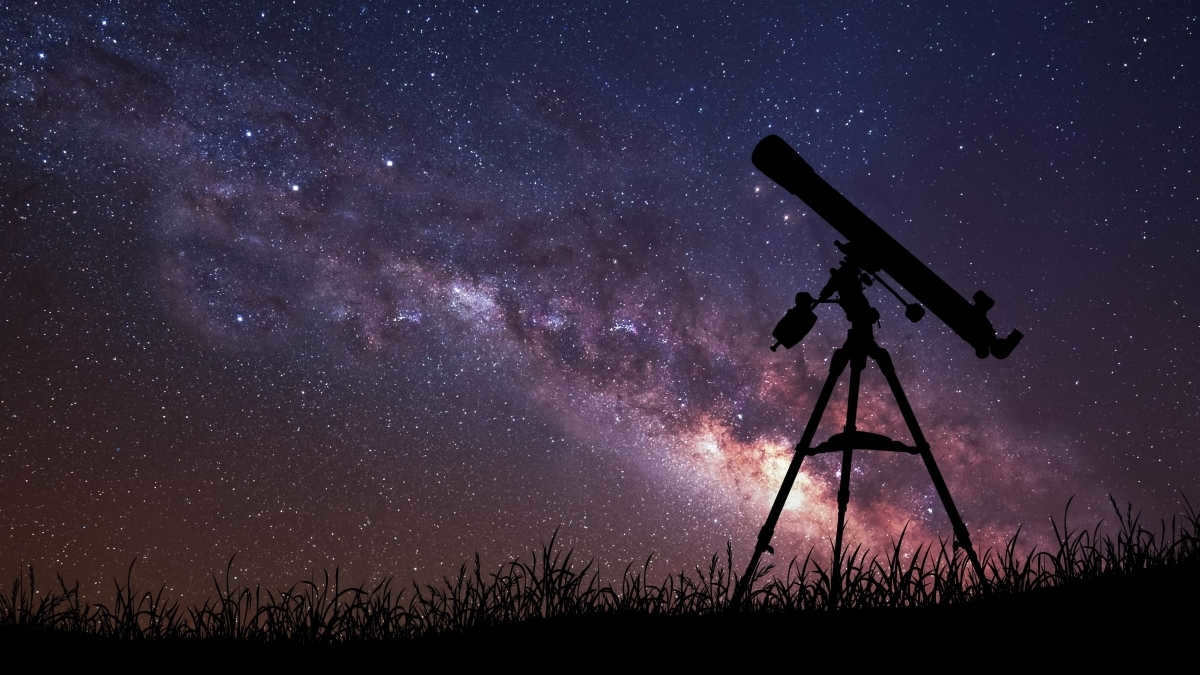
Why do the visual observations through my telescope differ significantly from the images found on the Internet?
- Ensure that the atmosphere is calm, as haze and light fog can affect visibility.
- Use optics with excellent aberration correction and ensure they are in thermal equilibrium with the environment.
- Equip the mount with a clockwork mechanism to maintain stability.
- Exercise patience and observe for extended periods, taking advantage of rare moments of atmospheric calm.
- Research and familiarize yourself with the specific morphological features of the planet’s surface you wish to observe.
- Focus on the first and last hour of the night, as these times often offer the most favorable atmospheric conditions for high-resolution observations.
Why do nebulae photos appear colorful, while I observe gray shadows through my telescope eyepiece?
- The human eye possesses an extraordinary sensitivity (able to detect almost single photons under specific circumstances), but it is less effective in accumulating signals compared to photographic receivers: it is commonly accepted that the retina accumulates signals for fractions of seconds. This is why images of diffuse astronomical objects (such as galaxies and most nebulae) appear dimmer and with lower contrast.
- Additionally, the responsibility for night vision, especially sensitive vision, lies with the light-sensitive cells in the retina known as “rods”. Rods do not differentiate between colors and instead combine the entire visible spectrum, ranging from blue to yellow, into a single bright signal. The brain typically perceives this signal as gray, although variations in perceived tone may occur depending on the color of the background and surroundings. Consequently, when observing faintly luminous astronomical objects through a telescope, they often appear as grayish shadows against a dark gray background, accompanied by surrounding stars. Some exceptionally bright nebulae may exhibit a slight green or blue hue, but the perception of color is subjective and varies from person to person, depending on how the brain processes the rod signal. Interestingly, the concentration of rods is particularly low in the central field of vision, so dim objects are best observed using peripheral vision, where rods are more densely distributed in the retina.
- Finally, the vision of rods is distinguished by a significantly lower spatial resolution – they are not as densely packed on the retina as the “cones” responsible for color vision. This is why dim, diffuse objects lack the level of detail that can be compared to photographs.
Why do I see dark spots that cover and make parts of my field of vision disappear when I look through the eyepiece?
There is an issue with aligning the observer’s eye pupil with the telescope eyepiece exit pupil. Usually, it is possible to adjust the eye position in relation to the eyepiece to minimize the described blackouts. This can be achieved by adjusting the eyepiece eyecup height. However, in some cases, it may be necessary to avoid using wide-angle eyepieces or eyepieces with significant spherical aberration in the exit pupil. These can cause bean vignetting of the field of vision, where the middle part is partially shaded, resembling the shape of a bean or a banana. This shading quickly changes with small eye movements.
Where can I get my telescope aligned?
What can I use to replace the broken front glass on a Schmidt-Cassegrain?
Typically, there is no replacement option. The front glass is not just a piece of glass, but a spherical aberration compensator with a highly complex planoidal profile. Without the Schmidt plate, the telescope will not function properly and will not produce high-quality images. The best course of action is to contact the manufacturer for a replacement. However, it’s important to note that the cost of shipping may be comparable to the price of the telescope.
How can I address the issue of the front glass fogging up on a Schmidt-Cassegrain?
You can use anti-crowns, which can be homemade or purchased. These are long hoods made of sheet material that attach to the front end of the telescope tube to block out moisture. Alternatively, you can use special electric warmers designed to heat the front component of the telescope. It is also possible to combine these two techniques for added effectiveness.
Why doesn’t Newton have a glass in front like a Schmidt-Cassegrain? Dust can get in, right?
The front “glass” in the SQ tube serves a different purpose than protecting the internal volume from dust and dirt. It is actually designed to compensate for spherical aberration caused by the subsequent pair of spherical mirrors: the main concave mirror and the secondary convex mirror (which is attached to the inside of the front plate). In the case of a Newtonian telescope, spherical aberration is compensated for by shaping the main mirror into a paraboloid of rotation. However, having a cap on the front end of the tube wouldn’t necessarily prevent this type of telescope. There is also a rare optical arrangement known as the Schmidt-Newton telescope, where the front opening of the Newtonian tube is covered by a Schmidt plate and the main mirror has a spherical shape.
What is the optimal clamping level for the mirror (lens) in the frame?
Typically, the main mirror should have a slight amount of freedom in its frame, both horizontally and vertically. This allows for a small displacement, usually just a fraction of a millimeter, to prevent the mirror from being compressed by the frame in cold weather. Although the mirror will not break, the quality of the image is likely to be greatly affected. It is recommended to check the mirror mount in the frame after purchase and, if it is tightly clamped (to avoid any movement during transportation), loosen it until the mirror moves freely within the gaps.
What causes the telescope to “sweat” during observation?
When observing the night sky with clear conditions, the telescope experiences a rapid drop in temperature due to infrared radiation. This cooling effect is faster than the surrounding humid air, resulting in dew forming on the telescope tube. While dew on the telescope tube is an unavoidable inconvenience, it is important to protect the optical components from getting wet or covered in frost. One way to achieve this is by heating the front optical parts such as the refractor front lens, Schmidt-Cassegrain, or Maksutov-Cassegrain. Alternatively, anti-dew shields can be installed, which are cost-effective and consist of long hoods that cover the lens barrel or tube.
What is meant by thermal stabilization?
When the temperature of a telescope is close to the ambient (air) temperature, it is in a thermal state where the difference is minimal, usually within a degree. This state is beneficial for image quality as it prevents the formation of convection currents that disrupt the optical path.
However, if there is a significant temperature difference between the telescope and its surroundings, the images of stars will have halos and the resolution of the telescope will be severely diminished.
Thermal stabilization is a major challenge for aperture instruments, particularly those using the Maksutov-Kassegren and Newton designs. It can take up to an hour or two for the telescope to reach thermal equilibrium after being moved from a warm room to an outdoor setting. This should be taken into consideration when planning an observing session.
What is the purpose of a fan in a telescope?
The fan incorporated inside the telescope tube improves the natural cooling process by facilitating convection air currents. This, in turn, expedites thermal stabilization and enables efficient observations to commence.
What exactly is an artificial star and what is its purpose?
An artificial star is utilized for testing telescope optics when natural stars are unavailable. It can be created using a tiny hole in foil or by reflecting the sun’s glare on a steel ball. The advantage of using an artificial star is that it is not affected by weather conditions and its distance is much shorter than that of a real star. Consequently, atmospheric inhomogeneity has minimal impact on the test results. To assess the state of aberration correction optics, a star test is conducted on the artificial star placed at a sufficient distance. This test involves examining the defocused image of the star.
Can telescope/eyepiece lenses be cleaned if they are contaminated? If so, how?
I have noticed that the mirror on my telescope appears to be dusty, with visible streaks. How can I effectively clean it?
It is important to be cautious when cleaning the telescope mirror, as improper cleaning methods can potentially scratch the surface and make it even dirtier. One way to remove dirt and dust is by using a medical blower, such as an enema, to blow off the particles. Another option is to gently sweep away the dirt with a soft brush. However, if these methods do not prove effective and the dirt has accumulated to an unacceptable level, it may be necessary to remove the mirror from the frame and wash it. It is advisable to search for a reliable instruction guide online, as there are many nuances involved in mirror washing. The delicate mirror coating can easily be damaged, and restoration can only be done in a specialized optical workshop.
How frequently should the telescope optics be cleaned?
The more infrequent, the superior. It is absolutely extraordinary to admire such excellent picture clarity that exceedingly filthy mirrors can produce an apparently exceptional image. And only when the star images are consistently encircled by bothersome halos, does the image appear hazy and lackluster – one can opt to undertake this not-so-simple task.
Why does moisture condense on the telescope when I bring it from the outdoors into a heated room? Is it detrimental?
Optical surfaces can be significantly damaged by dust. When dust falls on a wet surface, it can form a hard, dirty crust that is difficult to remove.
To prevent dew from forming on cold optics when transitioning from outdoors to warm rooms, it is recommended to pack the telescope in an airtight plastic bag. It is important not to unpack the telescope until it has reached the same temperature as the room. Storing the telescope in a cold room can also help eliminate temperature differences. The most crucial factor is to ensure that the room is dry.
What should be done if the telescope tube becomes wet during observation?
When observing outdoors (beyond the observatory), the telescope experiences rapid cooling due to radiation, particularly in the infrared range. This causes it to lose the heat it has accumulated from the room or daytime, resulting in supercooling similar to other objects in the street. The warm and humid air in contact with the supercooled telescope structure releases its moisture, leading to the formation of dew. While this is a normal occurrence, it is important to protect the optical elements of the telescope, such as the lens, mirrors, finder, and eyepieces, from dew. To achieve this, both passive and active (heated) dew shields and covers are employed to shield these critical components from excessive cooling caused by radiation. It is therefore not advisable to leave all eyepieces exposed on the open sky shelves of the mounts during observations. Instead, when not in use, they should be stored securely in an accessory box that is well-insulated or even heated to prevent dew formation.
What is the best way to store my telescope when I am not using it?
It is recommended to store your telescope in a dry room that is free from dust. To protect the most important optical surfaces, such as the mirrors, it is ideal to have them facing down to prevent dust from settling on them. Additionally, using covers and protective cases can provide extra protection.
A good storage solution is to use standard covers for the barrel and eye lens, place the telescope in plastic cartridges, and store it in a special box that has shockproof liners made of polyethylene foam. This box should also have compartments for each of the eyepieces.
What should I do after acquiring a telescope?
Attention, new telescope owners! I frequently receive complaints about a blurry image and the inability to see anything at all.
A telescope, even a large one, is not a device that you can aim randomly at any part of the night sky and expect to see colorful nebulae as if you were using the Hubble Space Telescope. It is important to know how to properly use a telescope, and I hope the following tips will assist you in enjoying your observations and immersing yourself in the wonders of the cosmos.
1. Select a set of eyepieces. Instead of immediately using the highest magnification, it is always better to start observing any object with the lowest magnification. A beginner often wants to test what will happen at 525x when observing with a 70mm telescope. You don’t have to look far for an example – a good Celestron 70 EQ telescope comes with a 20mm eyepiece (35x), a 4mm eyepiece (175x), and a 3x Barlow lens (which, when used with the 4mm eyepiece, gives you 525x magnification). While I can still understand using 175x on a 70mm refractor (for observing the Moon, for instance), 525x is an impractical magnification.
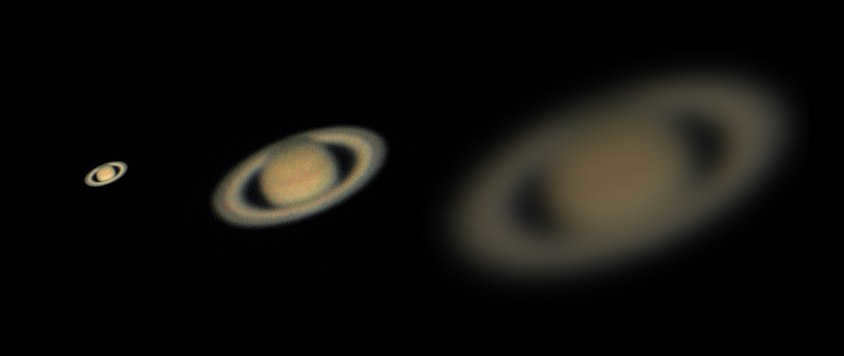
Observing Saturn through a telescope at different magnifications reveals that the highest magnification does not always result in the most detailed image.
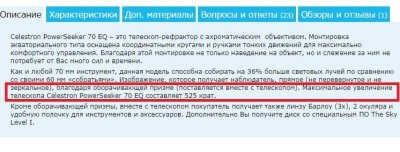
In addition, novice astronomers should be cautious when shopping online. It is possible to be misled by product descriptions, such as stating that the Celestron PowerSeeker 70 EQ telescope has a maximum magnification of 525x. A beginner may excitedly attach a 3x Barlow lens and a 4mm eyepiece, only to be disappointed by the lack of clarity.
By the way, typically, Barlow lenses are of subpar optical quality and have the potential to negatively impact the image. Therefore, it is advisable to store them in a safe place (rather than discarding them completely). If you happen to acquire a high-quality Barlow lens, you can repurpose the lens and utilize the housing as a speed bushing.
2. Avoid observing through the window glass! Never, under any circumstances! Do you believe regular window glass has optical quality?
WHAT TO DO. Open a window or, even better, observe from the yard or a dark place. Observing through a window can also be problematic because warm air from the room can escape and degrade the image. Even with a balcony, there can be issues as heat streams from the house can spoil the picture.
3. If you own a Newtonian telescope, it is ESSENTIAL to check the alignment. This is not a suggestion or a request, it is an OBLIGATION. This is particularly important for fast telescopes (f/4…f/6). Don’t be afraid of alignment, it is not overly difficult. You do NOT need an expensive factory collimator – a light-colored film can or a Kinder Surprise toy will suffice.
Refractor owners can relax for the time being, as alignment is generally not included in most affordable refractor models. And even if it is included, it is not advisable to tamper with it without the appropriate knowledge. The alignment of mirror-lens models, on the other hand, is a different matter altogether.
4. Ensure the telescope has been left to cool for at least thirty minutes before starting observations – allowing the optics to reach the surrounding temperature! Optics that have not had time to cool will result in distorted images, making stars and planets appear blurry. Newtonian telescope owners can use this time productively by testing the optics. It is worth noting that there is a misconception that refractor telescopes do not require temperature stabilization – this is not true! Both refractors, reflectors, and catadioptric telescopes all benefit from cooling down (especially the latter). To expedite this process, Newtonian telescope owners can attach a standard computer cooler to the primary mirror (directing airflow onto the mirror). This will significantly reduce the time required for temperature stabilization. Smaller telescopes with a diameter of up to 114mm cool down relatively quickly and do not require additional cooling.
5. Here’s another common situation. “I purchased a telescope and when I use it in the city, I can’t see any galaxies. I have a Sky-Watcher BKP150750 telescope with a diameter of 150mm. Could it be that the diameter is too small?”
Well, there’s only one solution to that problem. Take your telescope and find a dark location! In the city with all the light pollution, you won’t be able to see nebulae, galaxies, or globular clusters.
If the Moon is in the sky, you can forget about observing faint objects. Instead, focus on observing the Moon, planets, and double stars.
Even with 50-60mm binoculars, you can see a large portion of the Messier catalog in a dark sky. Do you have a car? That’s great! On a new moon, load up your telescope and drive to a remote location, preferably to the south of the city.
Narrowband filters, such as OIII, can offer some assistance for various observed objects, but they do not provide a complete solution. LPR, CLS, and UHC-S filters are not without merit – they do noticeably reduce the glare, but they also noticeably dim the stars.
PLEASE NOTE! IT IS IMPORTANT TO DRESS WARM, EVEN IN THE SUMMER! IF YOU REMAIN MOTIONLESS IN THE COLD, YOU CAN BECOME SO COLD THAT YOU WILL NEVER FORGET IT! I ALWAYS WEAR A HAT EVEN IN THE SUMMER! A THERMOS WITH TEA WOULD ALSO BE USEFUL ON YOUR TRIPS! TAKE CARE OF YOURSELF!
6. In order to perceive dim objects, it is necessary for your eyes to become accustomed to the lack of light. If your intention is to search for galaxies, nebulae, and clusters, it is imperative that you extinguish all sources of light, equip yourself with a weak red flashlight, and then commence your observation. While observing faint objects, it is important to utilize your peripheral vision, focusing your gaze slightly to the side rather than directly at the object itself – for instance, fixate on a neighboring star. For exceedingly faint objects, a gentle oscillation of the telescope tube can prove effective, as it enhances the visibility of the faint object through displacement. Those who utilize star maps on their phones or tablets should adjust the backlight to its lowest setting; most standard applications possess a night mode, wherein the screen assumes a red hue without the need for a filter. It is advised against using regular flashlights, as they emit excessive illumination. Full adaptation to darkness typically requires approximately 30-40 minutes, although after just 10 minutes, you will already observe a significant improvement in your visibility. If your intent is to observe bright objects (such as planets), it is recommended to save them for the final part of your observation.
8. Explore the celestial expanse. Even without a telescope, you can begin your journey! Download a planetarium software onto your computer, tablet, or phone – there are numerous options available!
https://www.star-hunter.ru/software/
Recommendations: Increase your observations. Seek out a tranquil atmosphere. Typically, when there are strong winds, you cannot rely on a calm atmosphere, known as “seeing”, but even in calm weather, the picture can be distorted. Personally, I utilize the Meteoblue astronomical forecast to determine optimal viewing conditions. While it may not always be accurate, it has still been a valuable tool for me.
If your telescope is on the blacklist (https://www.star-hunter.ru/black-list/), don’t expect to have great views of planets. One simple solution is to reduce the aperture of your telescope by 1.5 times – this should improve the image quality at higher magnifications. If you have any questions, feel free to reach out to me and I will do my best to assist you.
For those who have not yet purchased a telescope, I highly recommend thoroughly reading the following articles:
Do you have any inquiries? Feel free to ask!
Wishing you the best of luck with your observations!
In case you come across any mistakes, kindly select the text and press Ctrl+Enter.
Reasons behind the lack of visibility through the telescope
Gallery of photos: focuser, eyepiece, finder

Photo collection: equatorial and azimuthal mounts
Photo gallery: tips for better astronomical observations
Unable to observe anything through the telescope!
I purchased an amateur telescope and pointed it at the moon, but unfortunately, I am unable to see anything clearly. All I can see is a yellow spot, with no visible craters or other objects. I was only able to properly focus on the moon once. Has anyone else experienced this issue? Could someone please provide me with instructions and help identify the problem? Thank you in advance!
I bought a Chinese children’s telescope for my child, and even with that, I am able to see the craters, but only on the moon’s edge and with a weaker lens. With a more powerful lens, I still only see a yellow spot and it is not properly focused.
Please adjust the focus settings.
Understanding focal length is essential. Learn about it,
where xNNNN represents the NNNN number, set the highest NNNN.
if there is a dial, adjust it to infinity or a suitable value for your needs (depending on the telescope model). Make sure there are no bright light sources or hot objects (such as fire, gases) between you and the moon – this will eliminate light refraction and glare.
Also, please provide information about your telescope so that I can provide you with more specific instructions.
According to Michael Porcellino, a skilled amateur astronomer from the United States, “Just like a musician tunes his instrument before going on stage, you should also tune your instrument, the telescope, to fully appreciate the magnificent symphony of stars that awaits us during the next night of observation.”
Undoubtedly, achieving accurate alignment and perfect symmetry of every optical component along the optical axis is crucial for a telescope. Meeting this criterion will enable the telescope to accurately reproduce an image of the object being observed and, under favorable observing conditions, reveal details that align with the instrument’s theoretical capabilities.
Although the process of aligning a telescope may appear complex at first glance, it becomes quite simple with experience and yields significant results. Many beginners who complain about the subpar image quality of their telescopes are often experiencing issues with misalignment of the optics. While some telescopes naturally provide better image quality than others, even a telescope with excellent optics will fail to produce a perfect image if it is misaligned.
Newton telescopes are extremely popular among astronomy enthusiasts, however, there are instances where they may be delivered from the manufacturer’s factory without proper styling. Additionally, during transportation, the telescope may experience minor misalignment due to vibrations or small shocks. While these errors may not significantly impact the observation of star fields and dip-sky objects at low magnifications, they become more noticeable when observing planets or double stars at higher magnifications, resulting in distorted images.
Before attempting to realign the telescope, it is important to confirm whether it truly requires adjustment. This can be determined by utilizing methods outlined below and assessing the star image provided by the telescope at a sufficiently high magnification.
Newton telescopes that are already quite advanced must have mirror frames that allow users to adjust the telescope. The main mirror frame is typically composed of two plates. One plate is securely fixed to the tube, while the second plate, which holds the mirror, can be tilted using three adjusting screws. The frame usually includes six screws in total. Three of these screws are spring-loaded and are used for alignment, while the other three are counteracting screws that rest on the plate with the mirror to maintain its position during alignment. To align the mirror, the locking screws are loosened first. Then, using the alignment screws, the mirror is carefully adjusted to the desired orientation. Finally, the locking screws are tightened with care and without applying too much force.
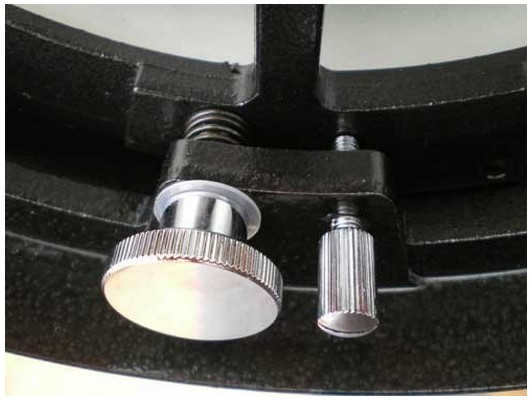
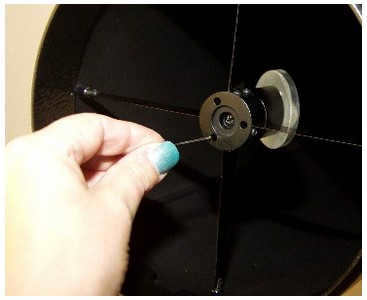
The tube contains three or four stretchers which secure the frame of the secondary mirror. The secondary mirror, positioned at a 45-degree angle, is affixed to one of the metal parts. The other metal part features three adjustment screws and a central locking screw that is spring-loaded. To properly align the secondary mirror, slightly loosen the center screw and make adjustments using the other three screws.
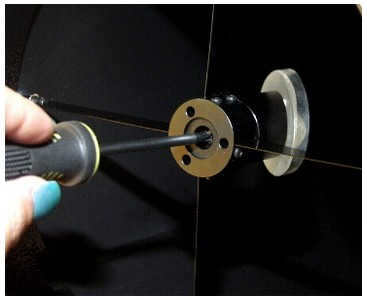
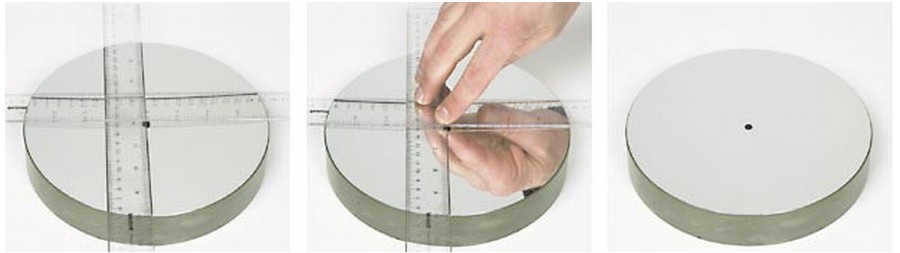
The second approach involves placing two undamaged plastic or wooden rulers in a perpendicular position on the mirror’s surface. By measuring the center of the circle in this manner and marking it with a dot, one can proceed with the task. It is crucial to exercise caution during this process in order to avoid causing any harm to the delicate mirror coating. Additionally, it is advisable to wear clean gloves in order to prevent any accidental hand or fingerprint marks on the mirror.
Initial approximate alignment
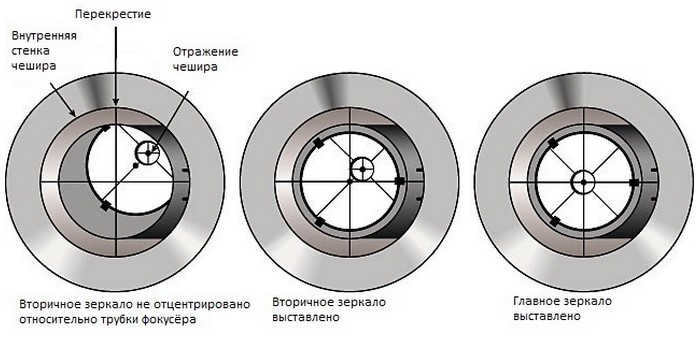
To facilitate the alignment process, it is helpful to break it down into two stages – initial approximate alignment and precise alignment. During the initial approximate alignment, the goal is to roughly position the mirrors in a way that achieves an approximate concentricity of all reflections in the telescope. The next stage, precise alignment, involves observing the image of a star to ensure that the telescope accurately constructs the image. To perform the initial approximate alignment, simply remove the eyepiece from the focuser and look into the aperture with the naked eye to observe the arrangement of reflections within the telescope tube.
Begin the alignment process by focusing on the secondary mirror. The initial goal is to ensure that the edge of the secondary mirror is concentric with the inner wall of the telescope’s focuser tube. This can be accomplished by adjusting the position of the secondary mirror along the optical axis. To do this, you will need to either loosen or tighten the central screw of the frame. If you need to tighten, apply pressure to the central screw while also loosening the three adjusting screws. If you need to loosen, simply loosen the central screw without applying pressure and tighten the three adjusting screws.
To start the alignment process, it is important to achieve concentricity. It should be noted that even if the secondary mirror is slightly displaced from the axis, it will not cause any major aberrations in the image, such as coma or astigmatism, since it has an optically flat surface. However, when the mirror is not accurately aligned on the axis and the center of the mirror ellipse does not coincide with the optical axis, it will result in an irregular shape in the diffraction pattern. This misalignment can also cause uneven vignetting in photographic observations, affecting the field of view of the image receiver matrix.
To ensure a complete reflection of the main mirror, the secondary mirror must be centered and aligned in such a way that the edge of the main mirror and the legs holding it are concentric with the secondary mirror. At this stage, it is not necessary to focus on the visibility of the primary mirror itself, as we will address any errors later on.
When adjusting the secondary mirror, it is crucial to be cautious about dropping the tools into the main mirror tube, as this can cause substantial damage to the mirror. To prevent this from happening, it is recommended to maintain a strictly horizontal orientation of the tube during alignment. By doing so, if any of the tools are accidentally dropped, they will land on the inner wall of the tube and stay there. The tools typically used for this adjustment are a Phillips screwdriver and a hexagonal wrench.
When aligning the primary mirror, it is important to ensure that it reflects the secondary mirror in the center concentrically, and the sections of the primary mirror housing divide the visible image into evenly sized sectors. Once this concentricity is achieved, it is important to tighten all locking screws carefully and in a consistent manner, without disturbing the alignment, while keeping your eye on the focuser.
If the length of the telescope tube exceeds 1m, it is advisable to have an assistant who can follow the observer’s instructions accurately during the adjustment process.
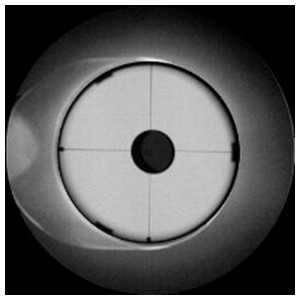
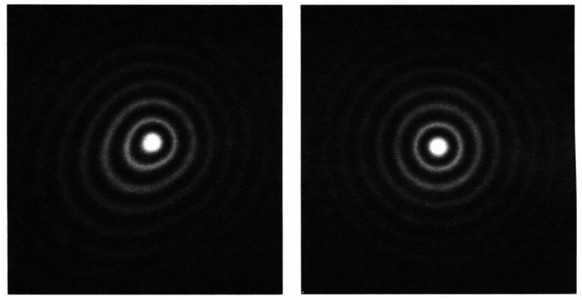
Ultimately, the goal is to achieve a result that closely resembles the image depicted in the photograph below. The secondary mirror is positioned concentrically with the focuser tube, while the main mirror is precisely situated at the center of the secondary mirror. Three securing feet are visible along the edges of the main mirror. The entire image is divided into four equal sections by the extension of the secondary mirror frame.
Alignment Tools
There are convenient instruments available to facilitate or enhance the accuracy of telescope alignment. Let’s explore some of them.
Sight
When initially aligning a telescope, looking through the focuser aperture may cause the observer to misalign their eye, resulting in alignment errors due to an incorrect viewing angle. To address this issue, a simple sighting device can be utilized, allowing the observer to view the overall image precisely from a specific point on the optical axis.

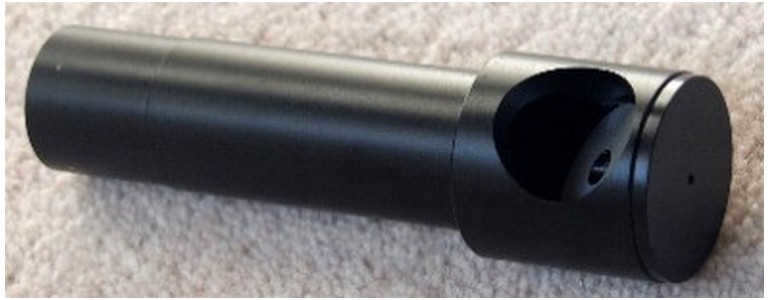
It is possible to create such a device on your own using a film canister, although it may be challenging to find one in today’s digital photography era. The canister from a photographic film is ideal due to its outer diameter, which is approximately equivalent to a 1.25-inch fitting. A small hole with a diameter of about 1mm is made in the center of the canister lid, and the bottom is cut off using a knife.
The canister is then inserted into the focuser hole in place of the eyepiece, allowing you to enhance the alignment quality of your telescope without spending much money.
The main drawback of the viewfinder described above is its inability to show the inner wall of the jar lid, which is essential for proper alignment. As a result, you must alternate between using the viewfinder to adjust the concentricity and relying on natural side lighting to align the optical axes.
To address this issue, a convenient solution comes in the form of a Cheshire eyepiece, also known as simply a Cheshire. This accessory is a metal tube with a small hole at the back and a crosshair at the front. What sets it apart is the inclusion of a 45-degree angled sleeve with a reflective coating inside the tube. Additionally, the tube features finely threaded crosshairs for precise targeting.
An advantage of this method is that the observer can maintain visual contact with the optical axis at all times while still being able to see the reflection in the focuser tube. The alignment process is performed in the usual manner, with the center mark on the mirror needing to be aligned with the crosshairs of the threads in the cheshire. By using this device, the alignment becomes even more accurate and faster.
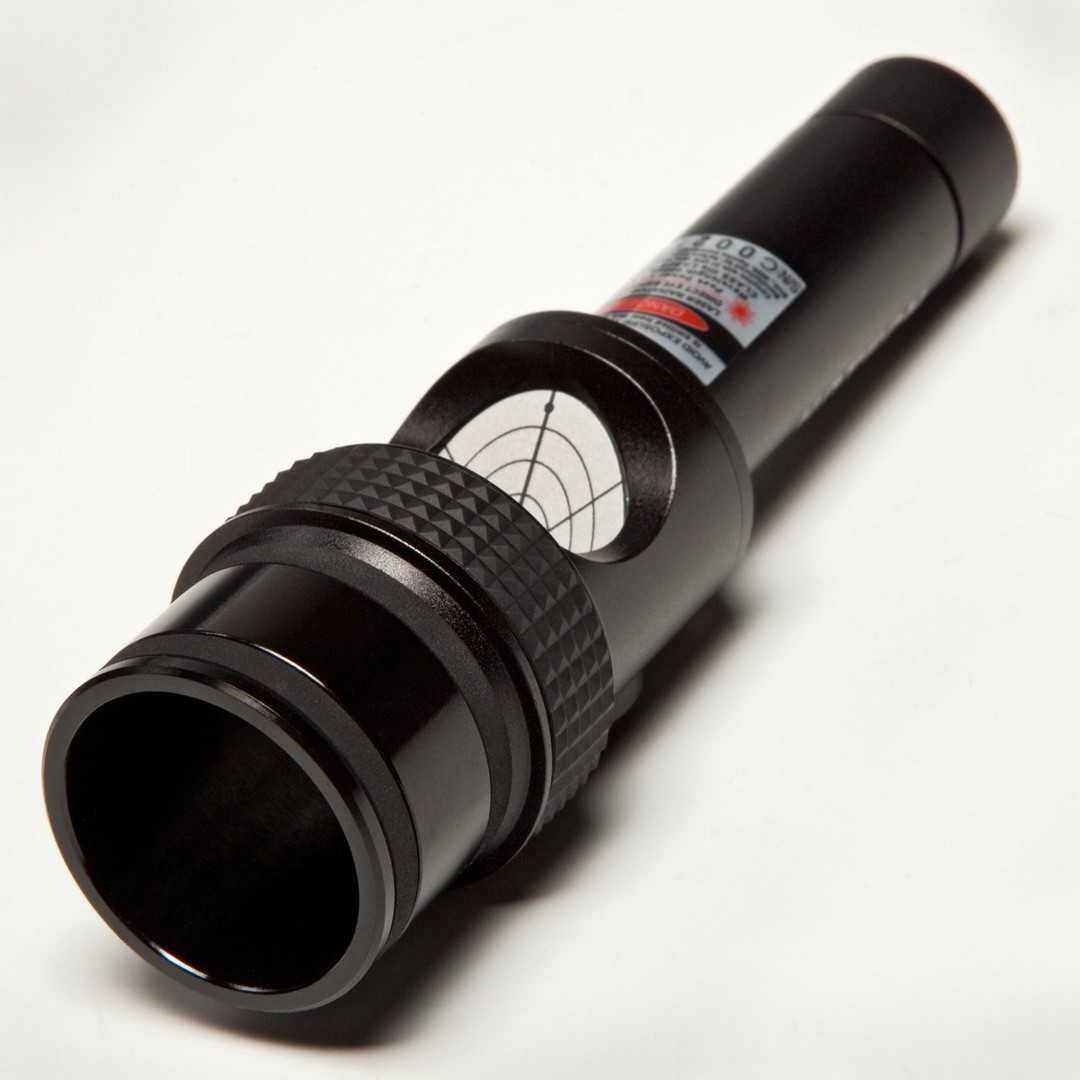
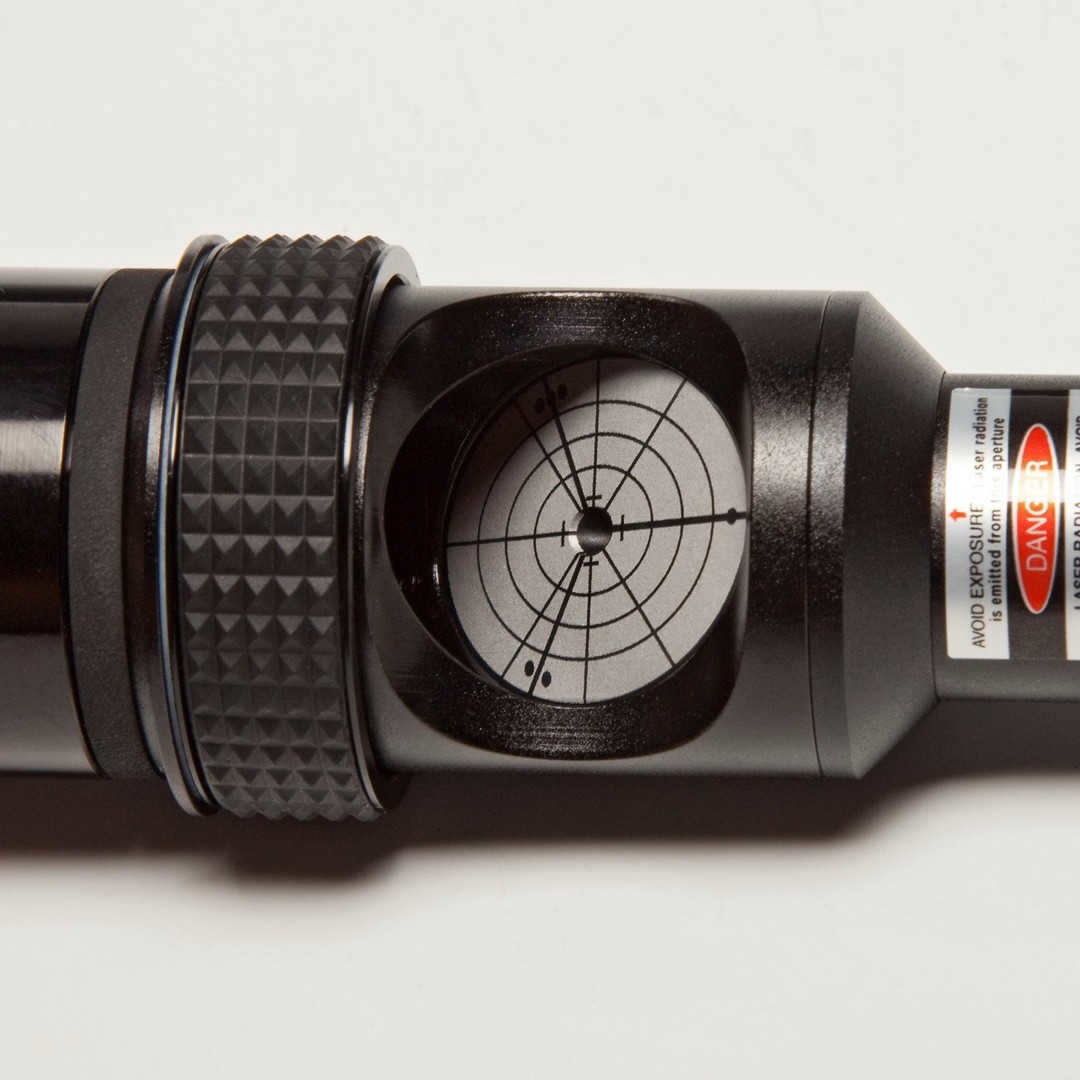
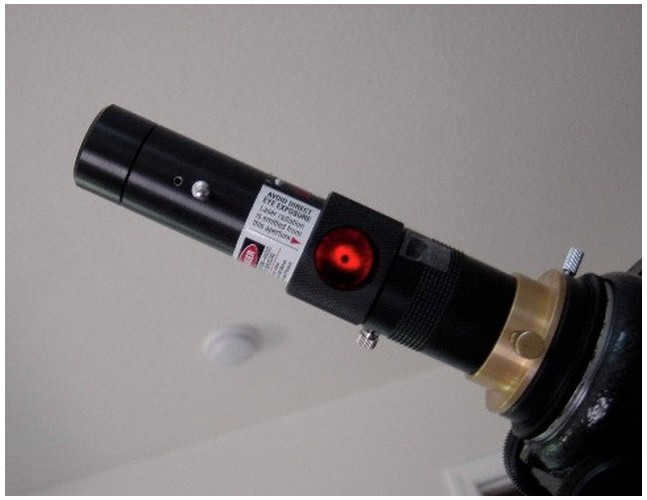
Laser collimator
One of the latest trends in the world of amateur astronomy is the utilization of laser collimators to align Newton reflector telescopes. The laser collimator is a relatively simple device. It consists of a metal case with a 1.25″ fitting, where a regular laser pointer and a target for beam return are precisely installed. The working principle of the collimator involves aligning the beam in the center of the secondary mirror and then adjusting it to hit the center of the main mirror, where the marker is located. Once this is achieved, the main mirror is fine-tuned to ensure that the beam returns to the center of the collimator target, from where it was initially released. The brilliance of this concept lies in the fact that the laser beam represents the optical axis of the telescope, making it incredibly convenient to work with, especially for those who possess some level of skill in this area.
One more fascinating aspect of the laser collimator is its ability to verify the dependability and steadiness of the telescope’s mechanical components while enduring various loads, deformations, and sags. This can be accomplished by rotating the tube at different angles, putting the supporting structural elements through different levels of stress. Astrophotographers are typically most concerned about these matters, since any issues with the telescope’s mechanics can result in a loss of focus and ultimately ruin a series of photographs.
However, if the beam remains centered on the target in various positions of the telescope’s tube, you can be confident that the telescope is not only properly aligned, but also has excellent mechanical craftsmanship.
Precise alignment of a telescope with stars
While there are many techniques and alignment aids available, the most reliable test of the alignment is the star test performed under real observing conditions. Even the slightest deviations of the optics from the optical axis are clearly visible in the star’s diffraction pattern. Before aligning the telescope to a star, it is important to allow the optics to cool down and wait for a relatively calm atmosphere to ensure comfortable observations at magnifications of 1.5-2D.
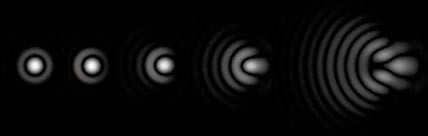
An assessment of the alignment quality can be made by observing the coma of the star in the center of the field (different from the coma present in Newtonian telescopes, which is visible at the edge of the field). If the optics are not properly aligned, the star will appear distorted, with elongated rings instead of a crisp circular shape and a few rounded diffraction rings. The necessary adjustment would involve correcting the tilt of the optical axis of the mirrors to achieve a star image with a correct, rounded appearance and concentric rings.
After successfully completing the task of precisely aligning a reflector telescope, you will acquire a sufficient amount of expertise, which will enable you to perform the same procedures in less time if needed. Furthermore, a properly calibrated telescope will provide you with exquisite and refined views of stars, as well as reveal new, high-quality details on planets. This will undoubtedly leave you with marvelous impressions from your observations and instill a sense of confidence in the telescope’s ultimate capabilities.


Many people who have little knowledge of astronomy can feel inspired by the captivating images captured by telescopes like the Hubble or James Webb. This inspiration often leads them to purchase their own amateur telescope in the hopes of witnessing the wonders of space firsthand. The anticipation builds as they approach the eyepiece, eager to immerse themselves in the mysterious world of the cosmos and witness its hidden details and vibrant colors.
However, reality often falls short of these expectations. The experience of looking through a telescope is often vastly different from the awe-inspiring images seen in photographs. Yet, this does not mean that buying a telescope is without merit. Simply take a look at these photos, and you will understand the profound beauty and significance that can be found in exploring the universe.
The view of space through a telescope is not what most people expect.
What Sets Apart an Expensive Telescope from a Cheap One
When perusing through various online stores, you’ll quickly notice that the price range for amateur astronomical telescopes can be quite wide. Starting as low as $25 (or about 1560 rubles), these telescopes can also go up to several thousand dollars. It’s easy to assume that the more expensive the telescope, the better it will be at capturing the wonders of space. But just how significant is this difference?
From a technical perspective, telescopes vary in terms of their optics, construction type, lens diameter, and, of course, their overall size. Amateur telescopes can be categorized as lenticular, lenticular-mirror, or mirror-based. If you’re in the market for an affordable telescope with a diameter of up to 100 mm, it’s advisable to opt for a lenticular or lenticular-mirror model. On the other hand, if you’re aiming for a telescope with a lens diameter exceeding 100 mm, it’s best to go for a mirror-based one.
When using a high-priced telescope, the clarity and level of detail of objects are significantly enhanced.
How do the features of low-cost telescopes compare to their expensive counterparts, and is the higher price tag justified? Even in the most budget-friendly telescopes, it is possible to observe planets. The only question is the quality and level of detail one can expect.
A common misconception is that objects will appear larger in a pricier telescope due to its stronger magnification, thus allowing for finer details to be observed. However, this is not entirely accurate. While expensive telescopes do offer stronger magnification, the difference is not as pronounced as the difference in price. This is particularly evident when observing objects located at a significant distance.
However, when it comes to the clarity of the image, the contrast will be noticeable. To get a better grasp of this, one can compare telescopes of various price ranges to different video resolutions on YouTube – the disparity between 360p, 1080p, and 4k videos is immense. Therefore, observing the same object through an inexpensive telescope would yield a similar visual experience as watching a 360p video, while using a pricier telescope would offer a 720p or even 1080p level of detail.
The factors affecting the visibility of objects
The visibility of objects is influenced by various factors, not just the quality of the telescope. It is not limited to cloudy weather. The visibility is significantly affected by light and atmospheric pollution. This is due to the scattering of urban lighting in the atmosphere and the reflection of light by airborne dust particles.
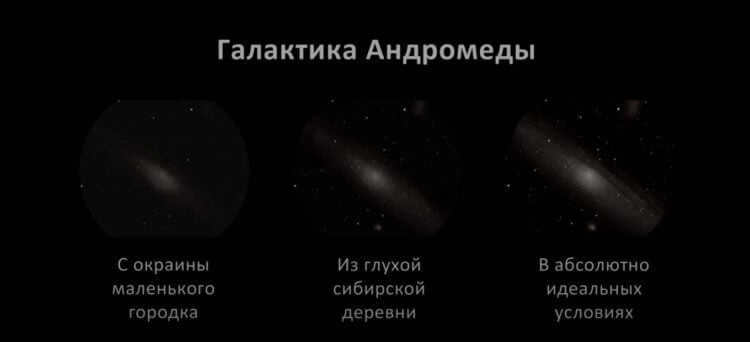
The visibility of the Andromeda Galaxy varies depending on the circumstances
In certain conditions, objects can appear blurred and distorted, even when viewed through high-end telescopes. Therefore, attempting to engage in astronomy from your own balcony, particularly in a densely populated city, is not advisable. To observe planets and other celestial objects, it is necessary to venture outside of urban areas, where there is minimal street lighting and atmospheric pollution. This is why observatories are typically situated in remote mountainous regions, far from human civilization.
What is visible through a telescope?
There is a common misconception that a telescope allows you to observe the planets of our solar system in great detail, resembling the captivating images published by NASA. However, amateur astronomers often experience disappointment when they realize that even with a high-quality telescope, the planets may appear as small, blurry dots. Nevertheless, this doesn’t mean that there isn’t anything fascinating to see through an amateur telescope.

This is what Venus looks like when viewed through an affordable telescope
Mercury and Venus
Because Mercury is so close to the Sun, it’s challenging to see and rarely observable. Even if you can spot it through a telescope, it will appear as a small, blurry spot.

In an expensive amateur telescope, Venus can be observed. However, the view is not particularly impressive as it appears as a small, silvery crescent-shaped object. There are no significant details visible, even when using a high-end apparatus.

In an affordably-priced telescope, Mars appears as a blurry reddish spot.
Mars
While Venus and Mercury may not capture the same level of interest as Mars, it is the red planet that continues to fascinate scientists as they strive to uncover signs of life, or at least evidence that it once existed, potentially leading to its demise. However, obtaining a clear view of Mars is no easy feat. Even during its closest approach to Earth, a rudimentary telescope will only reveal a reddish spot with indistinct features. When Mars is far from our planet, it becomes even more challenging to observe any details.

Observing Mars through a high-end telescope offers a more captivating experience. In such a telescope, one can discern finer details, and if fortunate, catch a glimpse of the polar caps. Nonetheless, the resulting image may not align with the common perception held by many individuals.
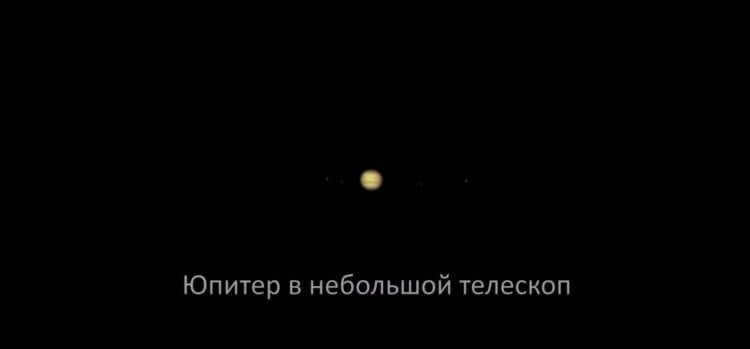
Here’s how you can observe Jupiter through an affordable telescope
Jupiter and Saturn
Observing Jupiter is a much more fascinating experience. Even Galileo Galilei was able to see this planet through his telescope, so you don’t need a powerful one. With an affordable telescope, you may not be able to see Jupiter’s equatorial bands. In a more expensive telescope, the image will be clearer and you’ll be able to distinguish the distinct boundaries between the equatorial bands. You can also observe Jupiter’s four satellites with any telescope. Unfortunately, the satellite Enceladus, which may harbor life, is not visible through an amateur telescope.
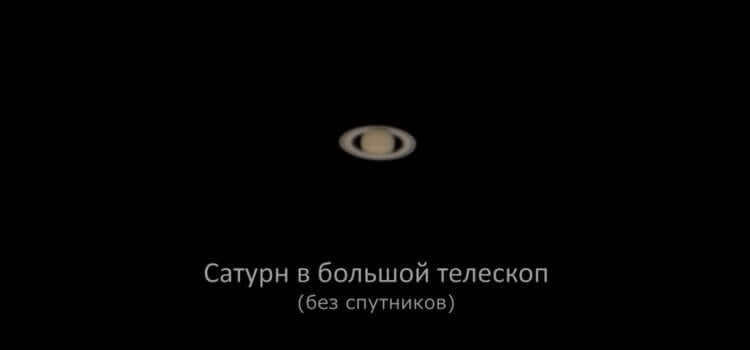
This is the appearance of Saturn when observed through a high-end telescope.
Saturn is truly remarkable. Its iconic rings and moons are visible through any telescope. Furthermore, when observed with a costly instrument, one can also discern the equatorial bands on the planet.
Uranus, Neptune, and Pluto
When it comes to observing Pluto, it is virtually impossible to get a clear view of it using either an affordable or a high-end telescope. This is primarily due to its considerable distance from Earth and its relatively small size.

Despite using a high-priced telescope, Uranus is not easily observable.
Uranus and Neptune are visible, and with a costly telescope, one can even perceive the distinct coloration of these celestial bodies. However, they will still appear as indistinct, diminutive blotches. Consequently, these planets hold limited appeal for amateur stargazers.
Exploring the Depths of Space
When it comes to observing objects in the depths of space, it may seem strange, but high magnification is not actually necessary. Instead, the diameter of the lens plays a crucial role in determining the telescope’s luminosity. Simply put, the larger the lens diameter, the more light it can capture. This ability to capture light is what enables us to see galaxies and nebulae in the night sky.
Therefore, when it comes to observing objects in deep space, the difference between cheap and expensive telescopes becomes more apparent. However, an even more critical factor is the absence of light pollution. Attempting to view deep space objects from the heart of a bustling city is futile, no matter the quality of the telescope.

This is the appearance of the Hercules cluster when viewed through amateur telescopes at different price points.
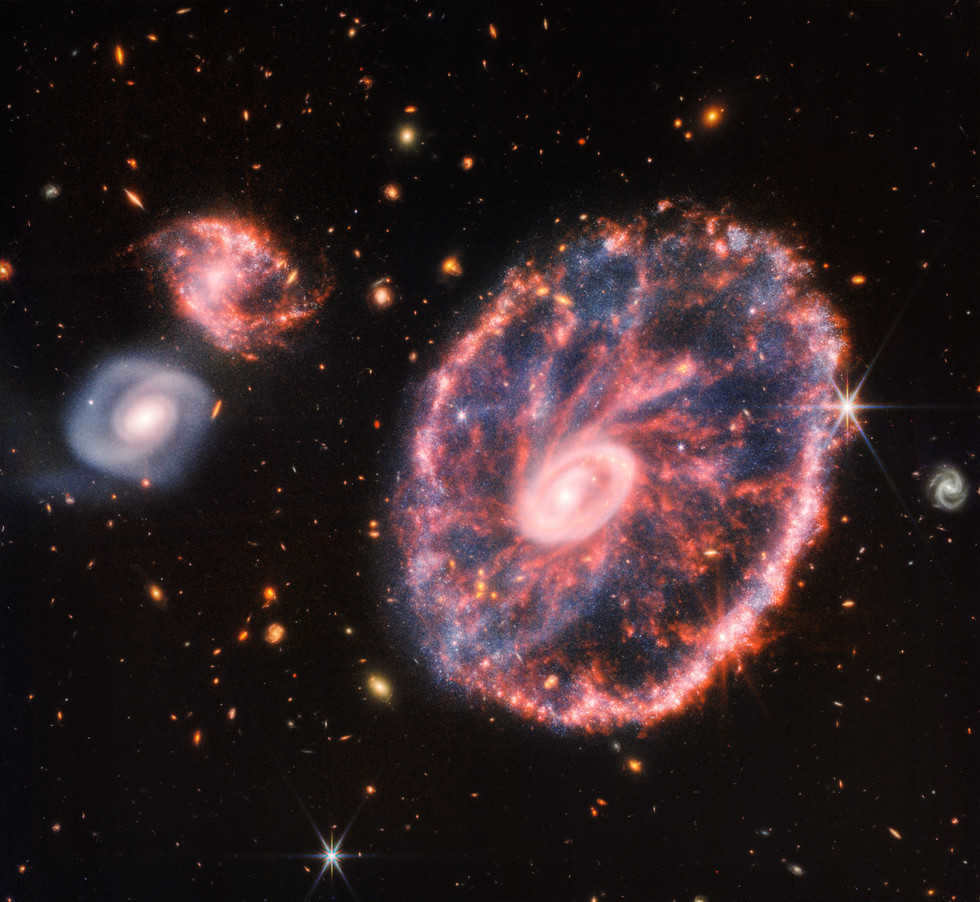
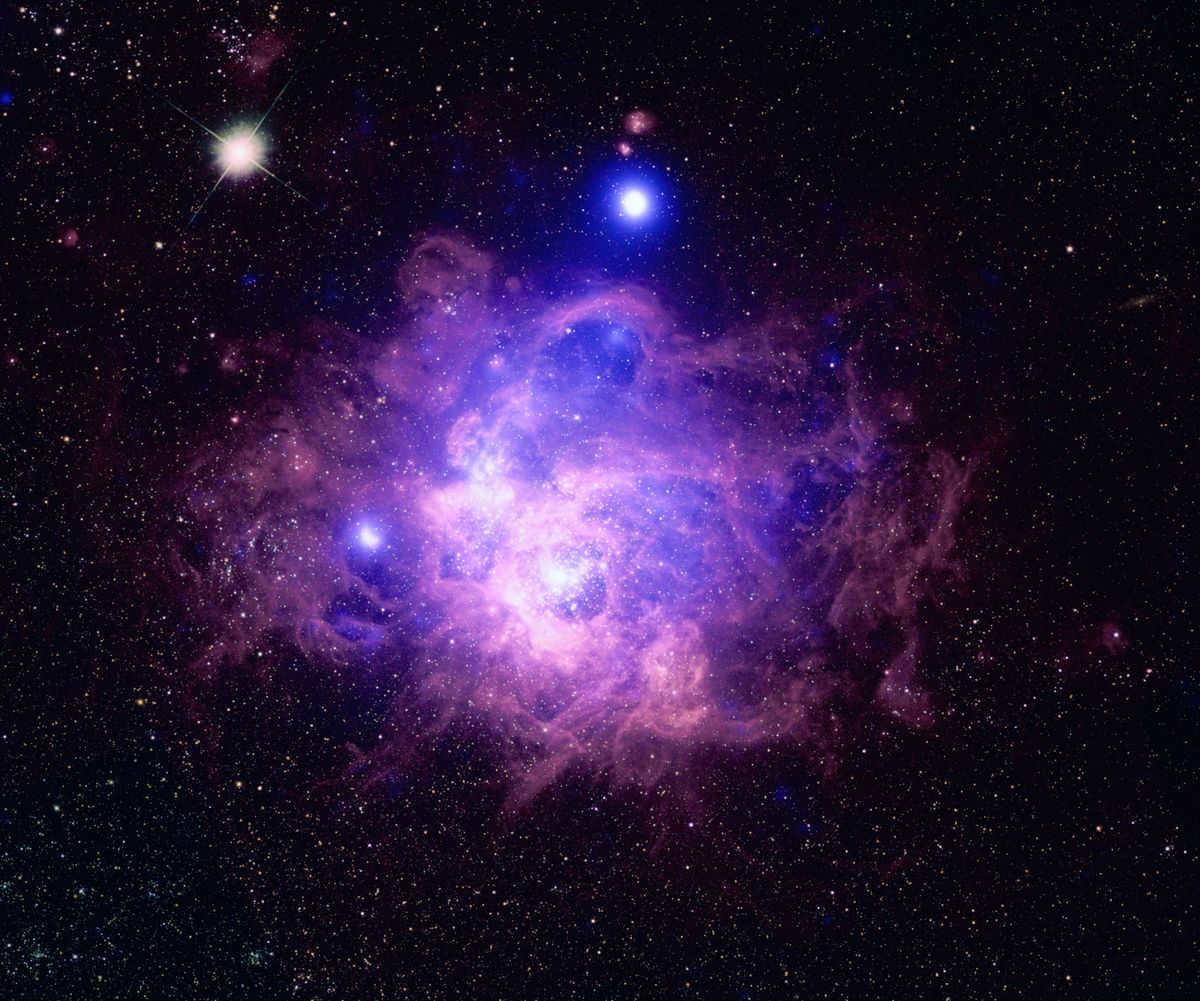
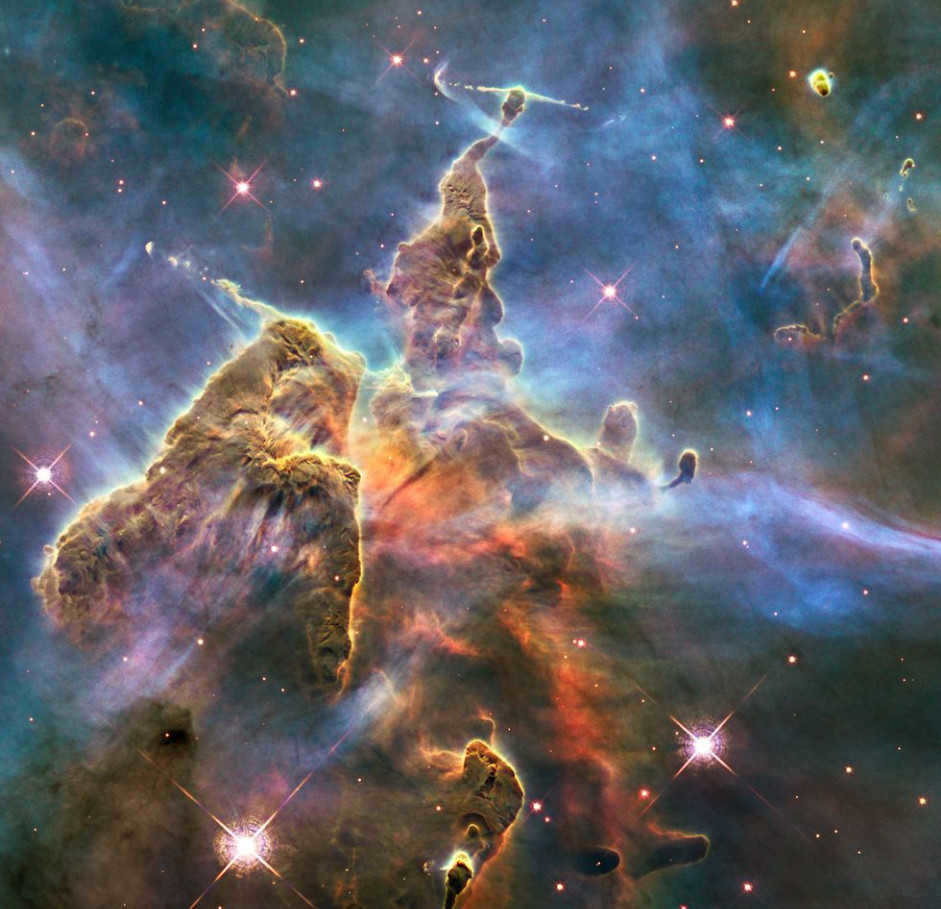
In order to achieve the desired outcome, it is necessary for the sky to be free of clouds and the moon, and the atmosphere must not be contaminated. Under these conditions, the high-priced telescope will have the capability to observe numerous celestial objects. However, only a select few will be clearly visible. It is important to note that vibrant colors should not be expected, as outer space appears predominantly black and white. As for photographs, they are often enhanced with filters to introduce artificial colors. Additionally, scientists may artificially color images to better understand the interaction of various gases in space and the formation of galaxies and nebulae.
This is the appearance of stars when observed through a telescope
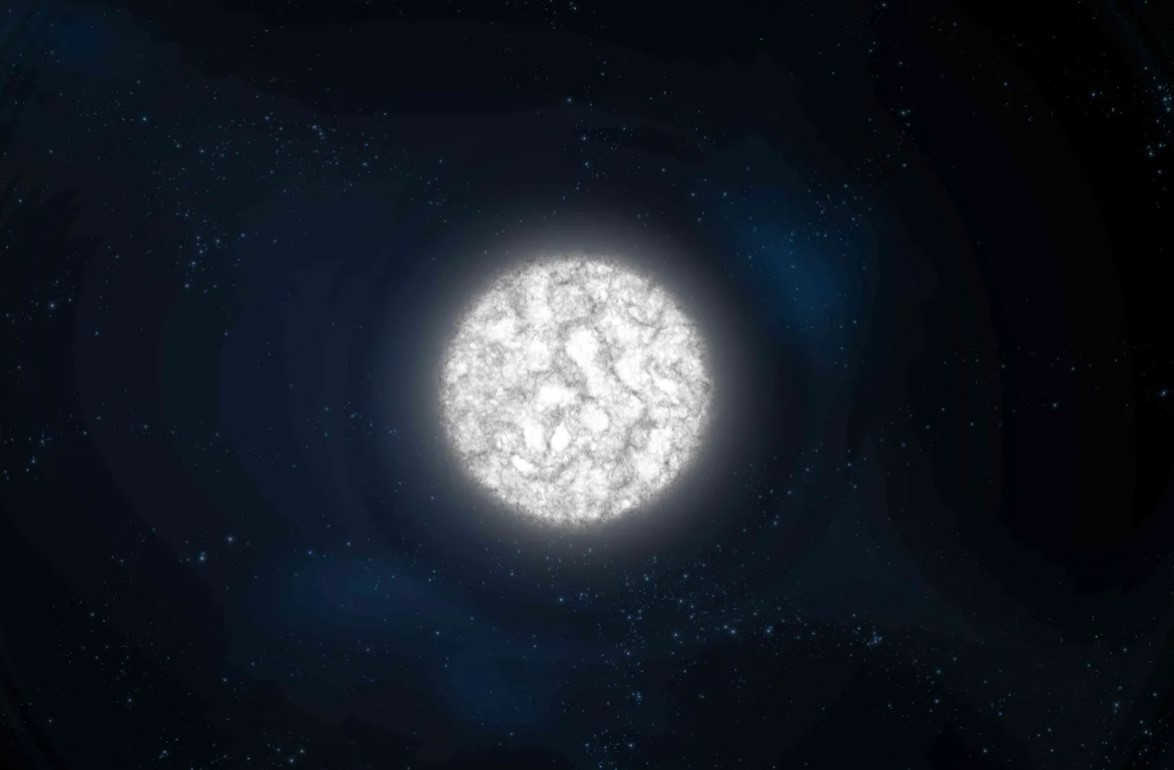
Stars and the Sun
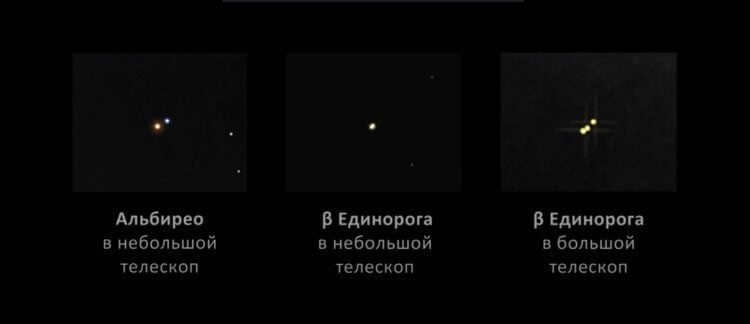
Observing stars may not be particularly fascinating since they generally appear the same as they do to the naked eye. However, one interesting aspect is that what may seem like a single star to the naked eye can actually be a cluster of several stars in close proximity. These “multiple” stars can be observed through any telescope.
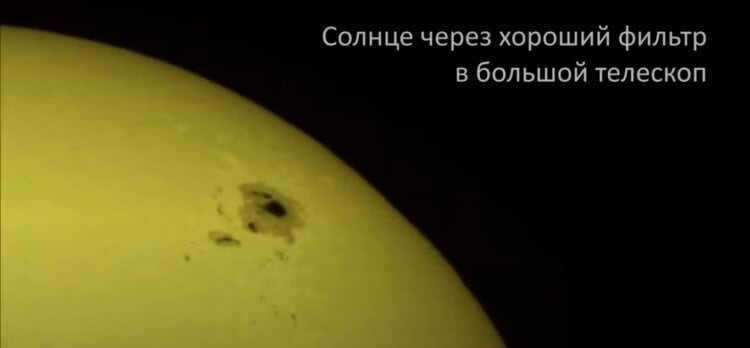
This is how you can observe the Sun using a high-quality filter in a top-of-the-line telescope
When it comes to observing the Sun, you can gaze at it through a telescope only twice in your lifetime – once with your left eye and once with your right eye. And there is indeed a punchline within this joke. Without specialized equipment, it is not possible to directly view our star. However, you have the option to purchase a special filter, which functions similarly to sunglasses. Even with a budget-friendly telescope, by employing this filter, you can catch a glimpse of sunspots on the Sun. In a more expensive telescope, the level of detail will naturally be greater.
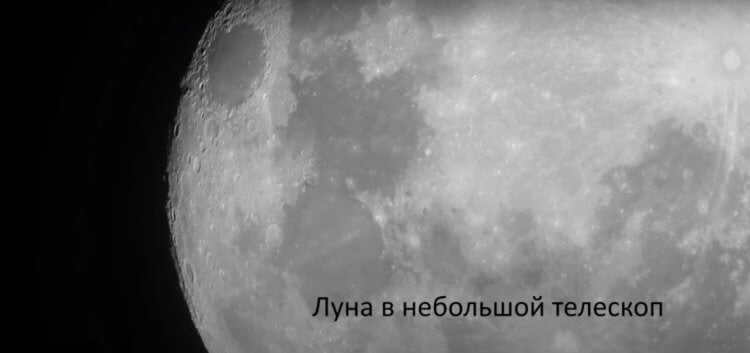
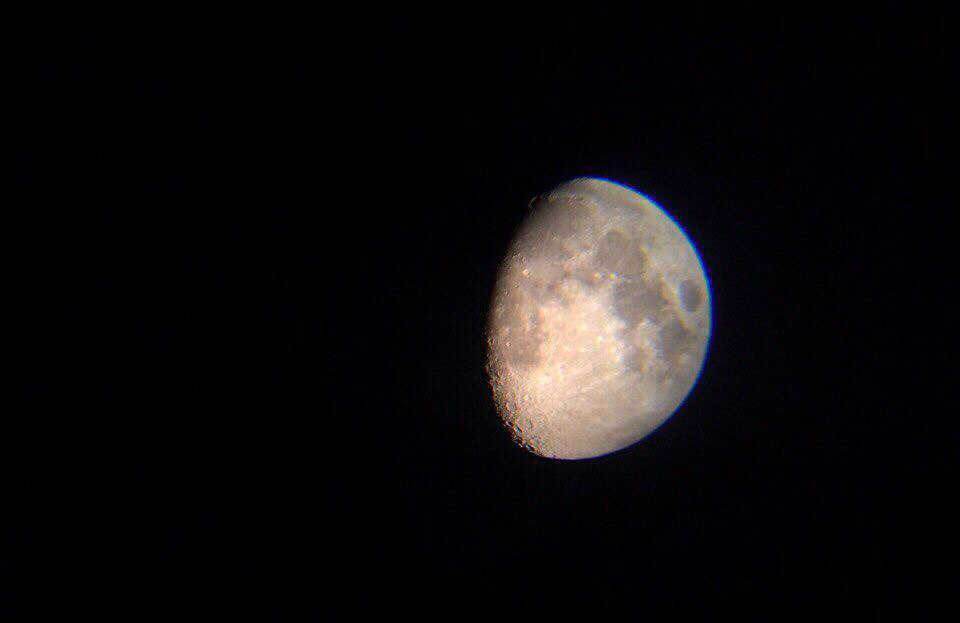
Here is the appearance of the Moon through an affordable telescope.
Observing the Moon
As one may expect, the Moon can be observed through a telescope with great clarity. It is worth mentioning that even with a basic telescope or binoculars, one can observe the prominent features of our celestial neighbor.
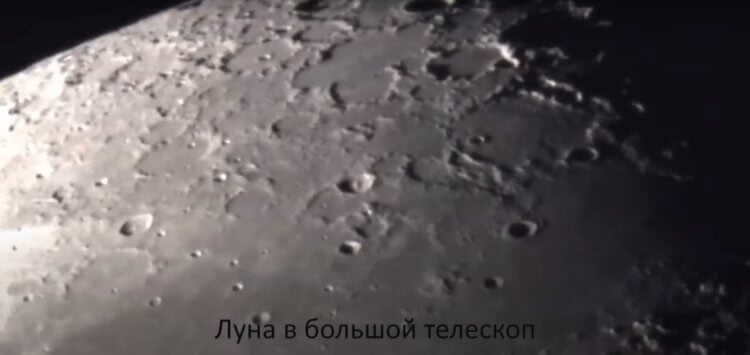
An extravagant telescope offers the opportunity to examine the Moon with greater precision
Through a telescope, one can observe even the relatively minor craters and various irregularities on the celestial body. An upscale telescope, in particular, can reveal a multitude of intricate details. However, it is futile to attempt to discern the American flag or the lunar rover, as the telescope’s capabilities are insufficient for such endeavors.
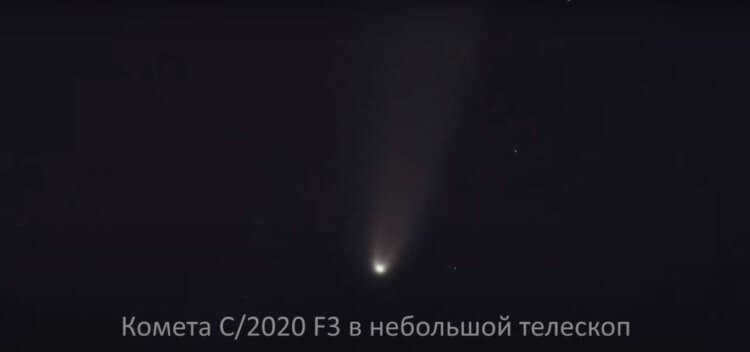
An affordable telescope can reveal a comet.
Comets, supernovae, and man-made Earth satellites
On occasion, when comets approach the Sun closely, they become visible through any telescope. Typically, they appear as a hazy shell with a small luminous dot inside. However, there are times when comets approach Earth, providing an opportunity to observe them with greater clarity. Additionally, it is possible to observe Earth’s satellites, including the International Space Station (ISS), through a telescope.

With a high-quality telescope, it is possible to observe even specific components of the International Space Station (ISS).
If you are more dedicated to space observation, you may occasionally witness extraordinary events such as supernova explosions and stars being eclipsed by asteroids. Additionally, you can study variable stars that undergo fluctuations in their brightness over time.
Admittedly, observing celestial objects through a telescope may not provide the vivid and detailed spectacle that many people envision. However, this does not diminish its allure and excitement.
Modern telescopes are extraordinary tools that enable us to observe not only the closest galaxies but also peer into the ancient history of the universe. However, the mechanism behind this capability is both straightforward and intricate.
The phenomenon of light traveling in a straight line is a well-known fact. However, the actual path it takes from one point to another is in the form of a wave, with shorter wavelengths corresponding to higher energy levels. Photons, which are minuscule packets of energy, have been traversing the cosmos ever since their inception during the Big Bang. These photons always move through the cosmic vacuum at a speed of 299,792,458 meters per second – the speed of light – which exceeds that of anything else.
Fortunately, telescopes provide us with the ability to observe phenomena that would otherwise remain concealed. In order to detect the presence of gas clouds located between stars and galaxies, we utilize detectors that are capable of capturing infrared waves. Detecting superhot stars necessitates the usage of instruments capable of perceiving short ultraviolet wavelengths. Furthermore, to observe gas clouds situated between galaxies, we require X-ray detectors.
For over 60 years, we have employed telescopes specifically designed to uncover the hidden aspects of the universe. As the Earth’s atmosphere absorbs the majority of light wavelengths, many of our telescopes must be stationed in orbit or in space in order to study the cosmos effectively. Now, we shall delve into the intricacies of these instruments and the invaluable insights they have provided us with.
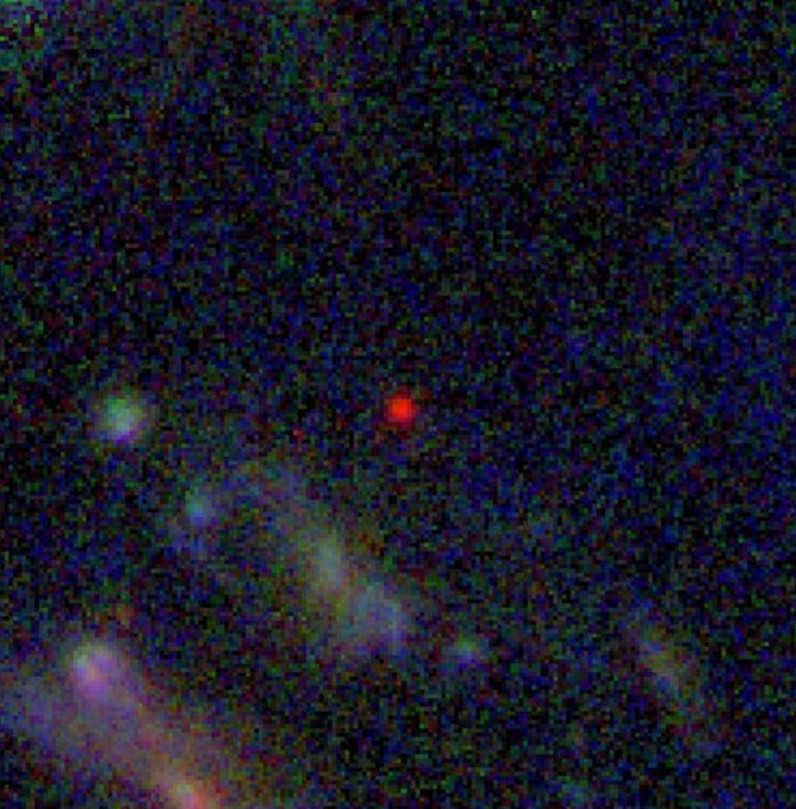
The oldest galaxy ever found, known as GLASS-z13, appears as a small red dot in this color image captured by the NIRCam. This remarkable galaxy came into existence approximately 300 million years after the cosmic event known as the Big Bang.
Exploring the Infrared Spectrum
We may not be able to visually perceive infrared waves, but we can detect them as heat. Sophisticated instruments like the James Webb Space Telescope have the capability to detect this heat energy in the vast expanses of the Universe. However, infrared radiation also serves practical purposes in our everyday lives. A prime example is the use of infrared signals in remote control devices, which operate by emitting signals with a wavelength of approximately 940 nanometers to control our televisions or stereos. Additionally, incubators utilize infrared waves to provide warmth for hatching chicks or heating pet reptiles. It’s important to note that as warm-blooded creatures, humans also emit infrared waves. Night vision goggles, for instance, convert infrared energy into false-color optical energy that can be perceived by our eyes, enabling a person using these goggles to “see” us. Similarly, infrared telescopes grant us the ability to observe outer space in a comparable manner.
In the 1960s and 1970s, astronomers initiated their initial examinations of the celestial sphere by employing infrared telescopes. Webb, which was launched in 2021, utilizes the infrared spectrum to investigate the most remote areas of the cosmos. Located in the frigid expanse of space, orbiting around the Sun, Webb boasts three infrared sensors that possess the capability to peer farther into the past than any other telescope that has been developed thus far.
The Near Infrared Camera (NIRCam), which is the primary imaging device, is responsible for observing the Universe. It operates with detectors that are specifically designed to capture wavelengths ranging from 0.6 to 5 microns. These detectors are ideally suited for studying light emitted by the earliest stars and galaxies in the Universe. On the other hand, the Webb Infrared Instrument (MIRI) is capable of detecting wavelengths between 5 and 28 microns. This instrument is particularly useful for detecting the red-shifted light emitted by galaxies that are located at great distances. One of the advantages of using infrared radiation is that it can easily penetrate the gas and dust clouds that exist in deep space, allowing us to see objects that are located behind them. These are just a few of the many reasons why the infrared spectrum plays a crucial role in our research of space. In fact, even satellites in Earth orbit, such as NASA’s Wide Field Infrared Survey Telescope (WFIRST), rely on longer infrared wavelengths to observe deep space.

The polarized light image of the M87 supermassive black hole was captured in 2021, providing a more enhanced version compared to the original image taken in 2019.
Exploring the Universe through Radio Waves
If our vision was limited to perceiving the night sky solely through radio waves, instead of the typical celestial bodies such as stars and planets, we would be greeted with an array of supernovae, pulsars, quasars, and regions filled with gaseous formations where stars are being born.
Instruments such as the Arecibo Observatory in Puerto Rico have the ability to perceive electromagnetic waves of extraordinary length that are beyond the reach of our human eyes. Radio waves, which can extend as long as a soccer field or even surpass the diameter of our planet, are detectable by these advanced tools. Unfortunately, the largest dish at the Arecibo Observatory suffered a collapse in 2020 due to structural issues. However, other sizable telescopes continue to operate, dedicated to the observation of radio waves emanating from outer space. One notable aspect of these large radio telescopes is their utilization of multiple smaller saucers, which collaborate to generate remarkably detailed images.
Ground-based radio telescopes have the advantage over optical astronomy in that they are not affected by weather conditions such as clouds and rain. This allows them to study the composition, structure, and motion of planets and stars regardless of the weather. However, due to the long wavelength of radio waves, radio telescope dishes need to be much larger than optical telescopes in order to produce a comparable image. For example, NASA’s Parkes Observatory dish is 64 meters wide, but its image quality is similar to that of a small optical telescope that can be purchased at a nearby store.
In 2019, the Event Horizon telescope project involved the coordination of observations from eight different radio telescopes around the world. This collaboration resulted in the creation of a remarkable image of the black hole located at the center of the M87 galaxy.
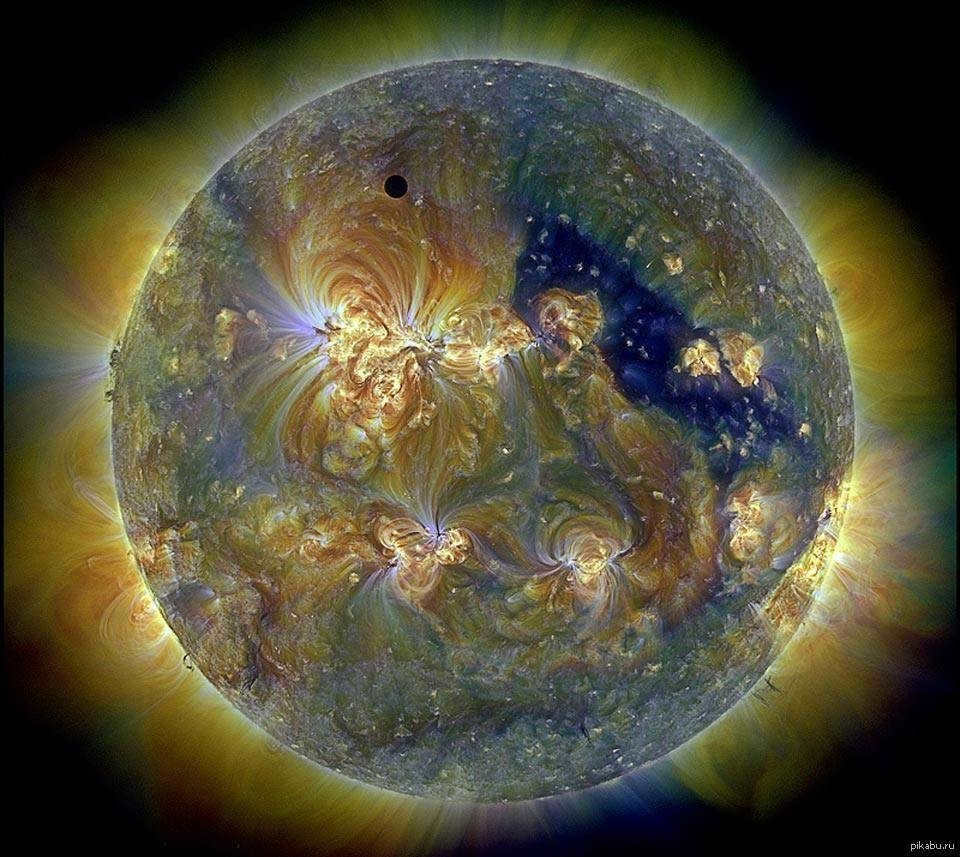
The Sun emits ultraviolet radiation. Cooler temperatures are associated with red light (around 60,000 degrees Celsius), while hotter temperatures are associated with blue and green light (over a million degrees Celsius).
Ultraviolet radiation
You likely already know about ultraviolet (UV) radiation. The Sun is the main source of these higher frequency and shorter wavelength waves that are beyond the visible range of the human eye, with wavelengths ranging from 100 to 400 nanometers. The Hubble Space Telescope is our primary tool for observing ultraviolet radiation in space, allowing us to study phenomena such as the formation of young stars in the spiral galaxy NGC 3627, Jupiter’s auroras, and the vaporization of a large cloud of hydrogen from an exoplanet in response to intense radiation from its star.
Our Sun and other celestial bodies emit a complete range of ultraviolet (UV) light, which provides astronomers with valuable information about their relative temperature. This UV radiation is divided into different subdivisions, including near-UV, mid-UV, far-UV, and extreme-UV. By utilizing visible-light matching with artificial colors, we are able to visually perceive the variations in temperature within a star’s gas.
To accomplish this, Hubble’s Wide Field Camera 3 (WFC3) utilizes filters to break down ultraviolet light into specific colors. Skilled visual developers then assign primary colors to the data and reconstruct it into an image that can be easily interpreted by our eyes. With the aid of image processing software, both professional astronomers and amateur enthusiasts can transform UV data into visually stunning and informative images.
The Chandra Space X-ray Observatory captures an image of Messier galaxy 33 and the star-forming region NGC 604 through its lens.
Observing X-rays
Closer to our own planet, the auroras at the polar regions also emit X-rays. And here on Earth, this type of light with a short wavelength and high frequency can easily penetrate the soft tissues of our bodies, but it cannot pass through our bones. As a result, it produces X-ray-like images of our skeletons and teeth.
The Hubble telescope has captured an awe-inspiring image of the Kiel Nebula, showcasing columns of gas, dust, and newly formed stars. This photograph depicts the visible spectrum of color, providing a remarkable glimpse into the cosmos.
Perception of Light
Astronomers rely on visible light to gather valuable data about stars, including their temperature, distance, mass, and chemical composition. Since 1990, the Hubble telescope, positioned approximately 569 kilometers above Earth, has played a crucial role in providing images of the cosmos using visible light.
When it comes to temperature, hotter objects emit energy at shorter light wavelengths. As a result, even young stars with temperatures as low as 12,000 degrees Celsius, like the Rigel star, appear blue to us. By observing the color of a star, astronomers can also estimate its mass. Since mass is directly related to temperature, astronomers know that hot blue stars are at least three times heavier than the Sun. For instance, the Eta Kiel star, a remarkably hot and brilliantly glowing blue variable star, has a mass 150 times greater than our Sun and emits 1,000,000 times more energy.

For Bori and Gleb, there are two icons, two idols. The absolute best. They are Pushkin and Gagarin. Pushkin, because the preschool teacher would often talk about him, and Gagarin, because space is their favorite topic.
I also adored Gagarin as a child, thanks to a book I had called “A Word About My Son” (1983, Molodaya Gvardiya), written by the mother of the first astronaut. I could spend hours poring over the archival family photos of the Gagarins in that book.
And my sons have watched all the Gagarin videos on YouTube, read the entire planets section in the “Encyclopedia of the Preschooler”. We even adorned the nursery ceiling with themed stickers.
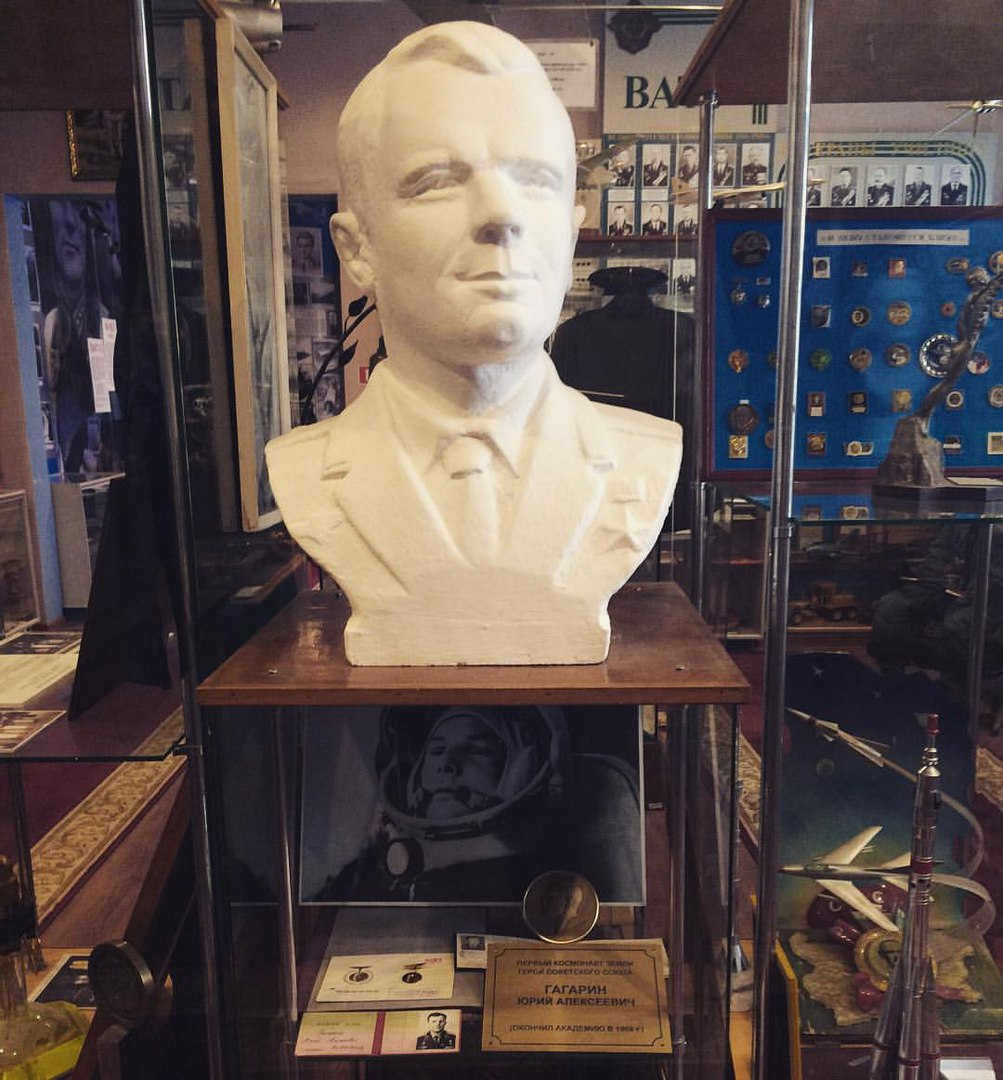
During my visit to the Air Force Academy museum, I captured images of the Gagarin exhibits specifically for the young visitors.
On the occasion of their birthday, Borja and Gleb were gifted a telescope. In this article, I will provide a concise evaluation of the telescope model that Zhenya and I selected, discuss the intricacies of telescope adjustment, and showcase our observations of the Moon. Let’s proceed!
Available Gear
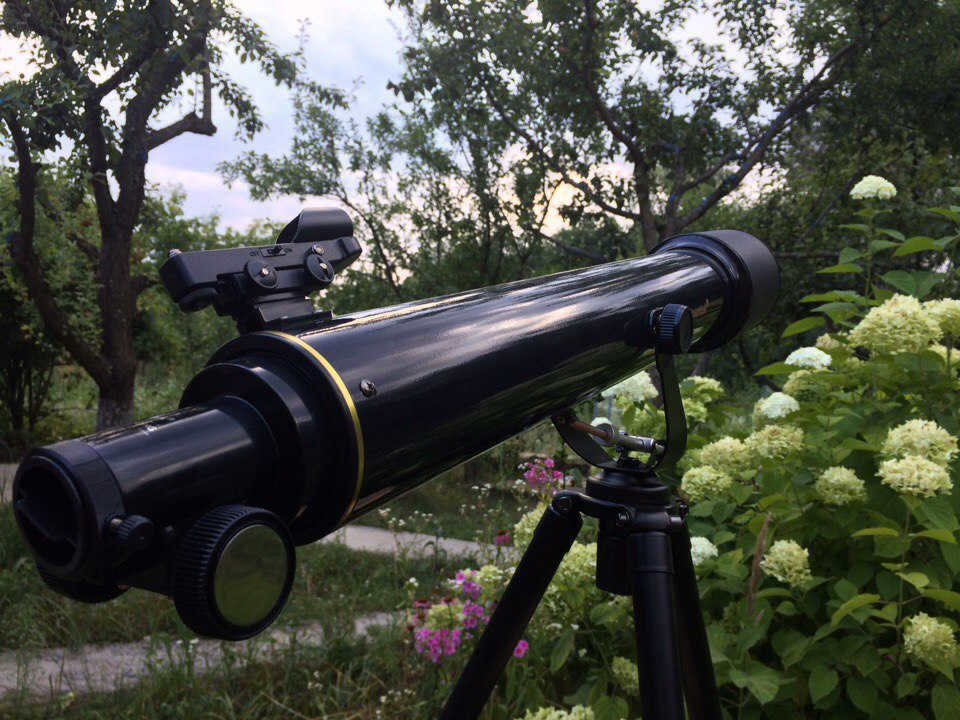
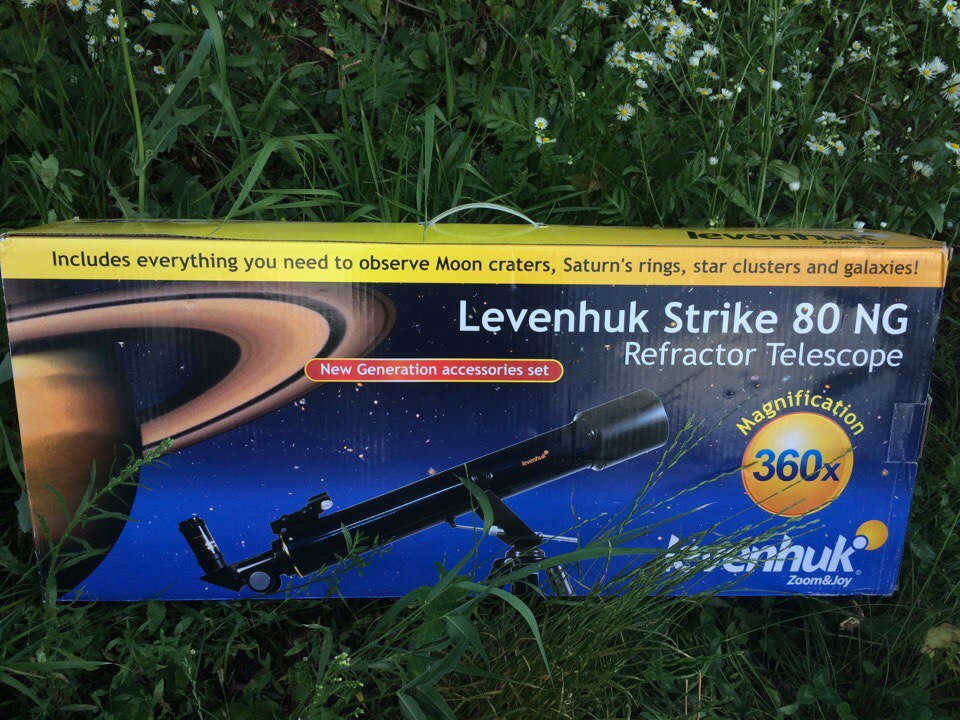
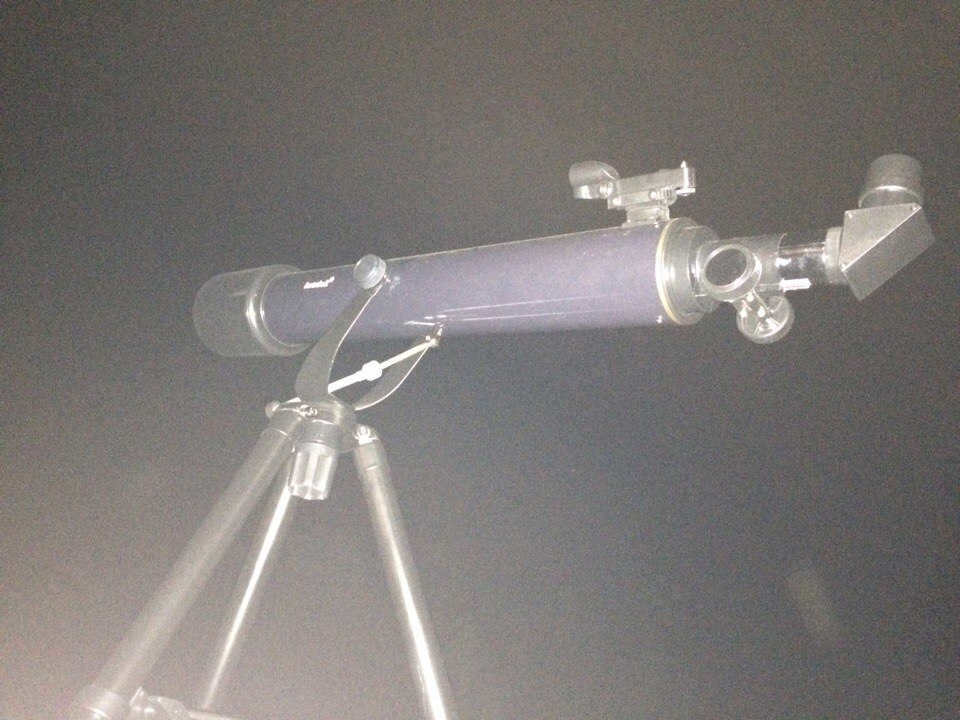
Levenhuk Strike 80 NG is packaged in a vividly colored box that is on the heavier side (weighing 7 kg with the packaging) and features a convenient plastic handle.
Constantly taking out and packing the telescope can be inconvenient, especially since the box opens from the side. If you frequently use the telescope, it would be more practical to invest in a case.
This particular model is specifically designed for children, teenagers, and beginners in stargazing. In fact, neither Zhenya nor I had any prior experience with telescopes. When we first opened the box, we were unsure of how to approach it. However, the kit includes everything you need to quickly get started.
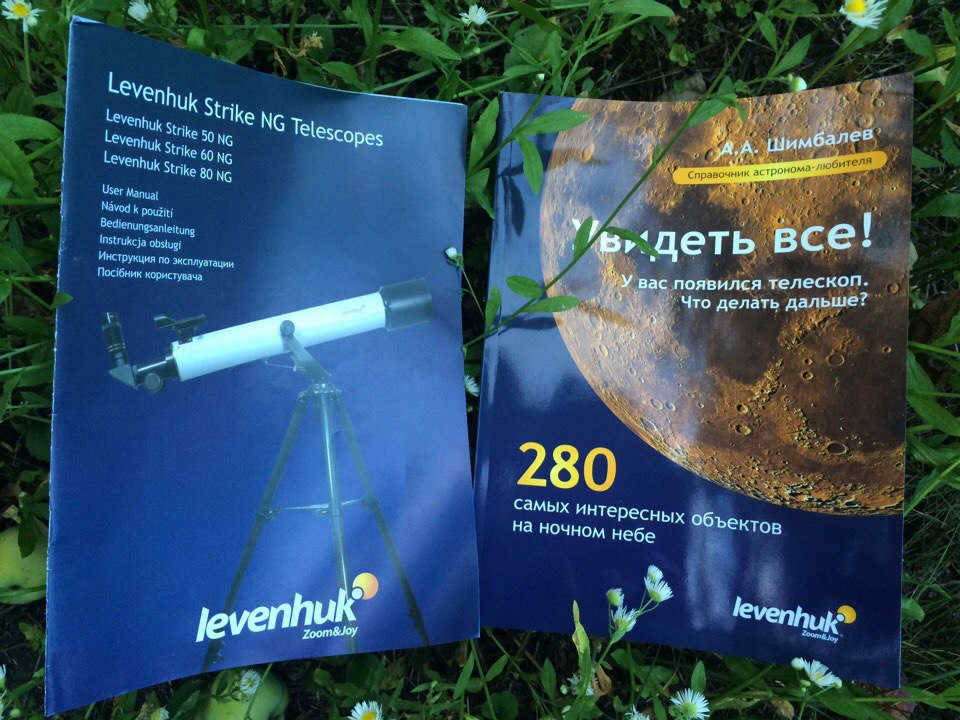
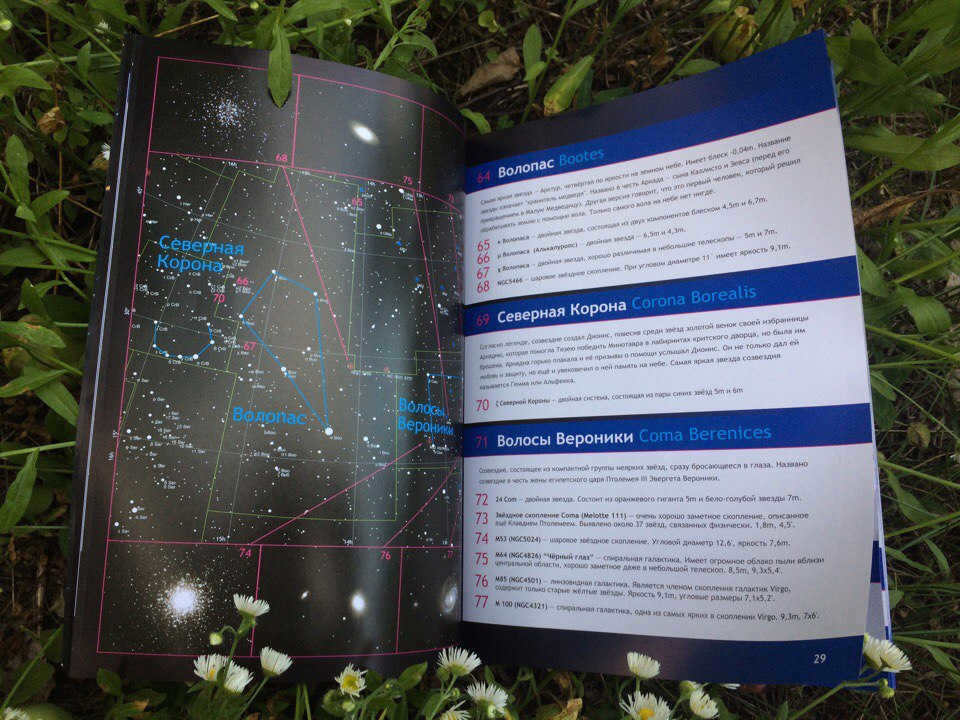
Inside the box, you will find a comprehensive manual that provides detailed information on the names of the components, as well as instructions on how to assemble and maintain the telescope. Additionally, there is an intriguing book titled “See Everything!”, which we have yet to delve into. Furthermore, the box contains three captivating A1 posters showcasing the “Moon”, “Sun and other stars”, and the “Solar system”.
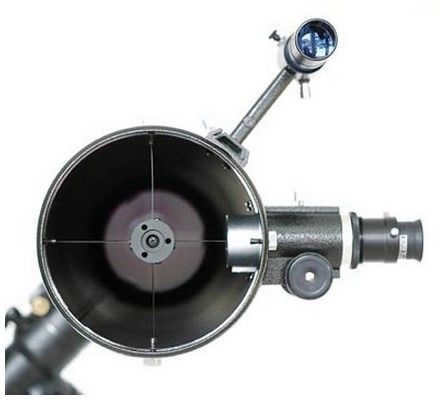
Of course, the box includes the essential tube and a sturdy steel tripod. To facilitate organization, a triangular shelf for accessories is conveniently attached between the tripod legs.
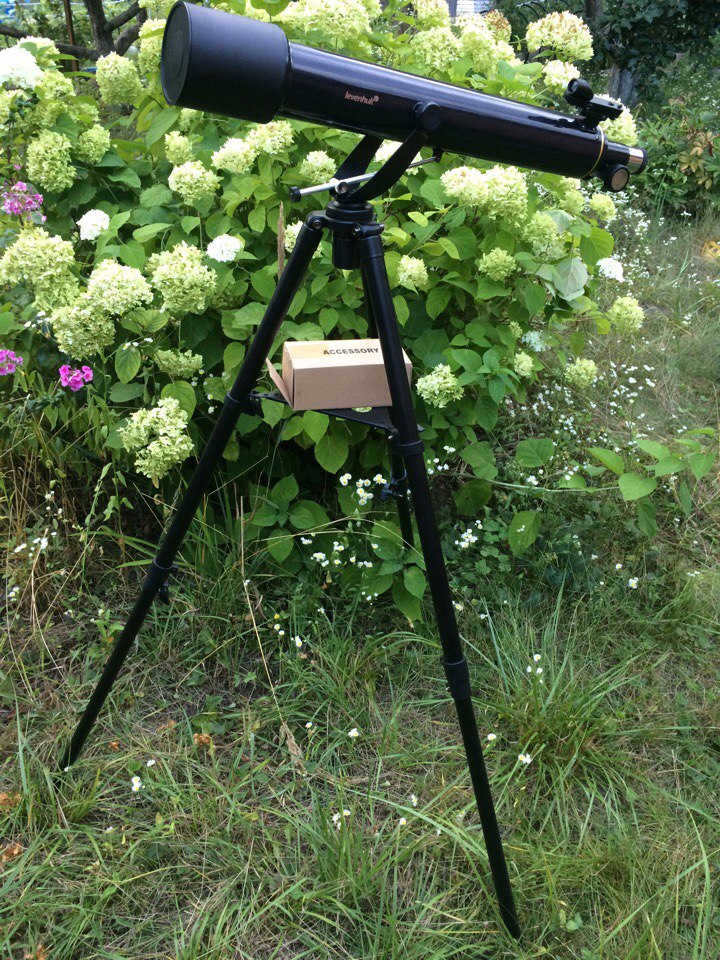
The set also includes a locator, a diagonal mirror, two eyepieces for varying magnifications, a Barlow lens (which provides an additional three times magnification), a compass, and a portable star map.

We discovered a disk containing the Stellarium computer program within the container. Stellarium is a remarkable virtual planetarium that allows users to input their current location, and the program will display the celestial objects visible in the sky at that precise moment. Alternatively, users can select any location on the planet and observe the corresponding celestial view.
Quality and construction
The telescope is backed by a lifetime warranty, which is not surprising given its durable and sturdy construction. The tripod and the telescope are made from thick, high-quality metal, ensuring their longevity and stability. The assembly process may require adult assistance, as it is not suitable for preschoolers.
The tripod is connected to the telescope from underneath. Once it is pointed towards the desired object, the tube is further secured in multiple locations. All the hinges are well-crafted. There are no creaking sounds and no sense of fragility, which is often found in Chinese products (although it appears that the telescope is manufactured there). The print quality in the books is also excellent.
Preparing the telescope
Right after receiving the gift, we assembled the telescope on the balcony of our apartment. We decided to aim it at the nearby high-rise building, specifically at the brick inscription indicating the name of the construction company. It was fascinating to observe every detail of the brickwork.
We needed to calibrate the telescope during the daytime. To do this, we had to align the telescope tube with a ground object approximately 300 meters away, and then locate the same object using the finder. The goal was to match the view in the finder with what we saw through the telescope’s eyepiece.
When setting up the finder, Zhenya and I had a comical mishap. After inserting the batteries, we attached the finder to the telescope and pressed the “ON” button.
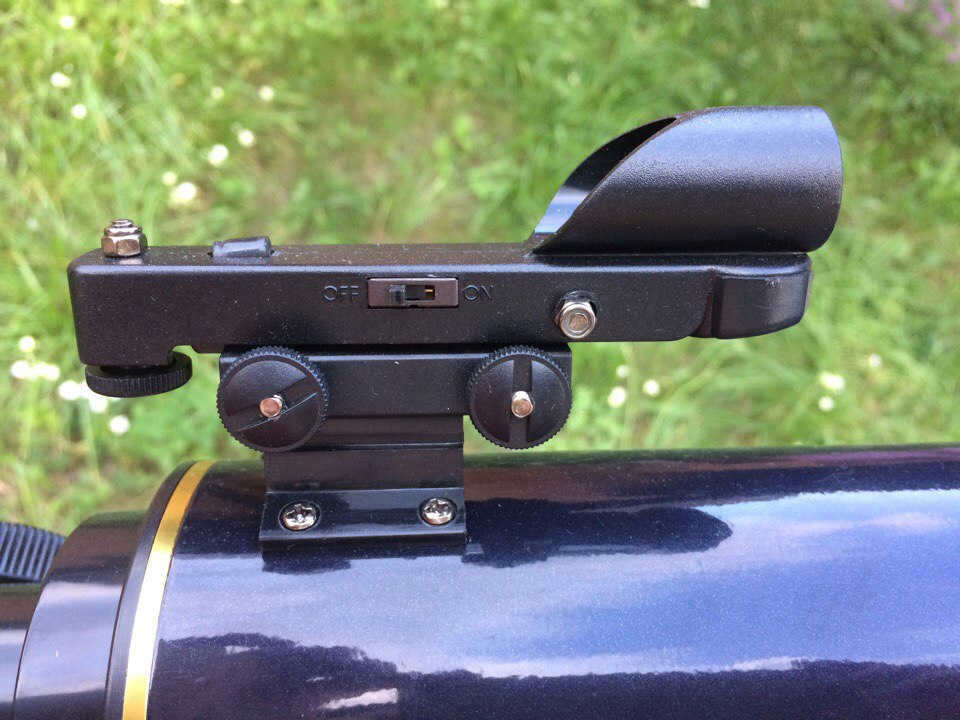
However, we didn’t observe any red dot as indicated in the instructions. No matter how many times we looked, it was nowhere to be found! Boris and Gleb were getting impatient, constantly asking when it would appear.
We searched the internet for answers, but couldn’t find any. Other people either had different finders (a cross instead of a red dot) or were having no issues at all. We started to suspect that our finder was defective. Then, I had an idea to detach the finder and reattach it.
Our hunch was correct – we had mistakenly attached the finder the wrong way around. The red dot was actually “looking” at us, instead of us looking at it. The amusing thing is that the finder was perfectly secured on the tube, both in the correct orientation and in reverse. Hopefully, my post will help someone understand why their red dot has gone missing.
During our time at the cabin, we quickly aligned the image in the telescope’s finder with the image in the main tube. To test its functionality, we used the top of a power pole as our target.
Astrophysical Objects: Stars and the Moon
The Levenhuk Strike 80 NG telescope provides a magnification of 360x. On the first night of our summer stargazing session, we were unable to spot the Moon in the night sky, so we directed our attention towards the stars instead. When observed through the telescope, the stars appeared as bright, white spheres, which left Borya and Gleb feeling somewhat disappointed.
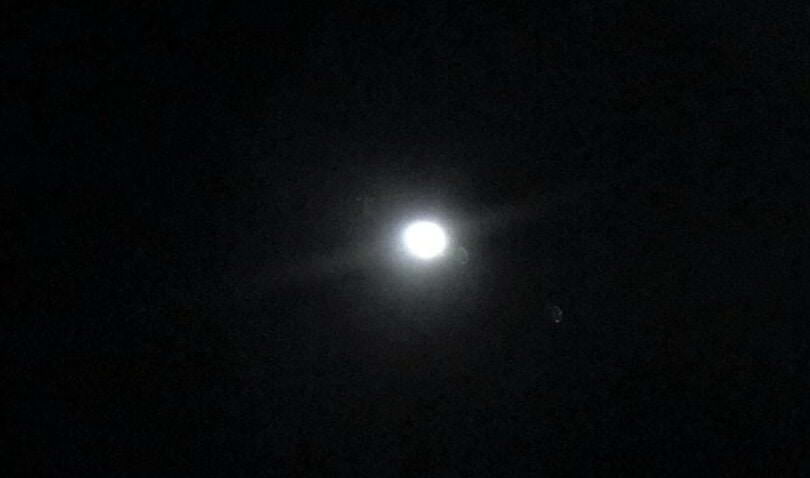
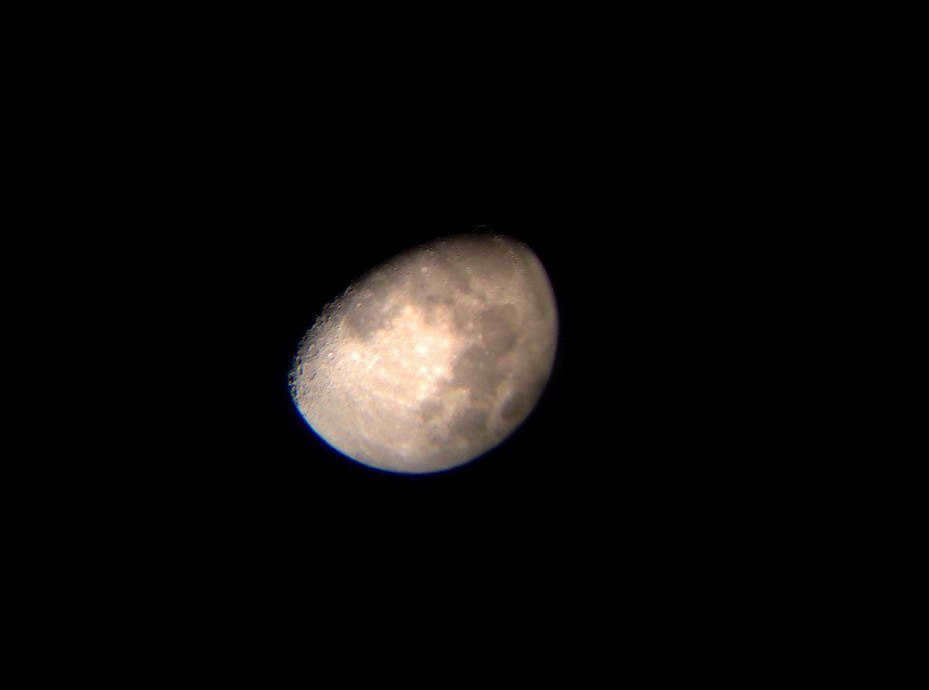
However, we were only able to observe the Moon through the telescope on the night of August 3, 2017. We could see craters in the area where the light transitions into shadow 🌓. It was a truly beautiful sight!
Borja and Gleb wondered why there was no flag on the Moon. In their encyclopedia, the Moon was depicted with the U.S. flag, so that’s how they had imagined it. They started making up stories about seeing little men up there.
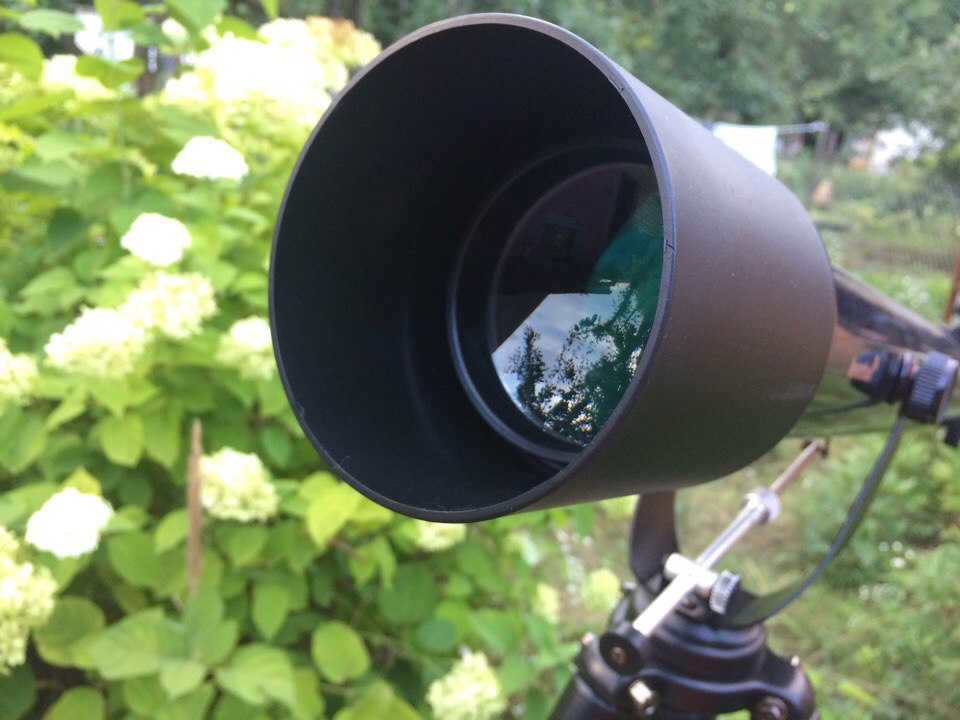
The Levenhuk Strike 80 NG telescope has the option to connect an SLR camera and capture images of what it shows. However, we haven’t purchased the necessary accessory (T-adapter) yet. So, I improvised by using an iPhone camera and holding it up to the eyepiece.
It is true that I experienced a slight decrease in sharpness and a significant loss in saturation. When looking through the viewfinder, the moon appeared as a vibrant yellow hue. However, when I captured the image using my smartphone camera, the resulting photo differed:
Considerations. Should I invest in a telescope?
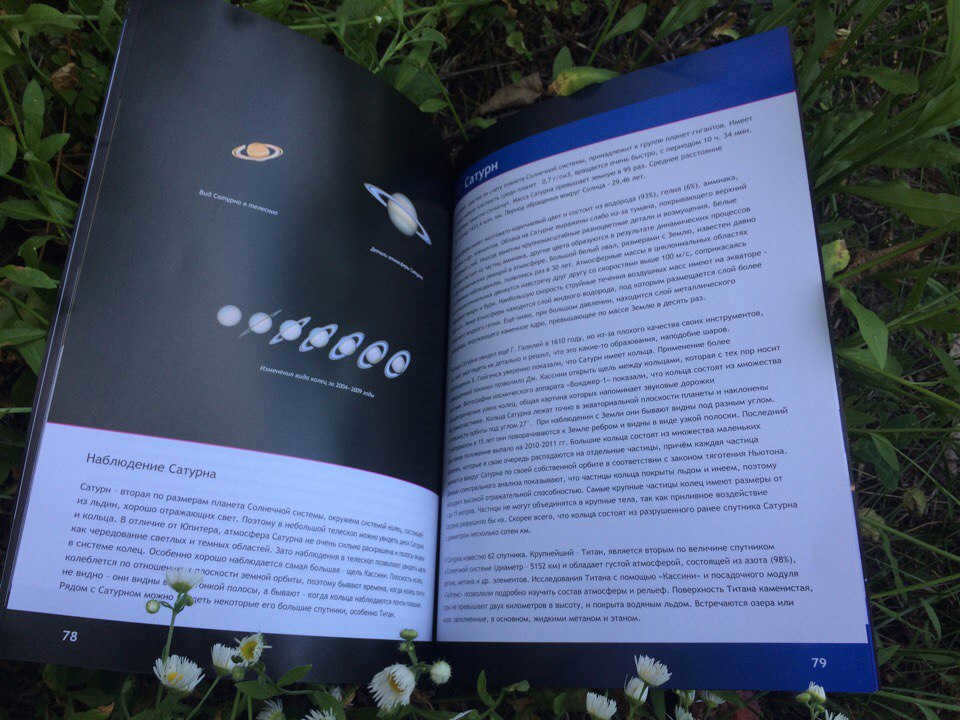
At present moment, my offspring and I are keen on observing the captivating rings of Saturn, as well as exploring the vastness of the celestial sphere. It is my intention to procure a telescope case (approximately 2-3 thousand rubles) and potentially an attachment to affix a camera.
Generally speaking, I highly recommend the telescope as an educational present for children aged 6-7 and above. It is also fascinating for adults as it can become a family hobby that ignites a passion for astronomy. While it’s one thing to read about craters and stars in books or online, it’s a completely different experience to actually observe them in real-time above you. This realization evokes a sense of awe and wonder.
The telescope is definitely a worthwhile investment (in 2017, it costs around 13-15 thousand rubles). With proper care, this device can serve multiple generations. However, it’s important to allocate a designated storage space for it.
Since I was a child, I have always been captivated by the beauty of the night sky. One of my fondest memories is when my father and I would venture outside at night to gaze at the stars and engage in conversation. Those moments are truly cherished. Additionally, during my younger years, I possessed a fascinating book titled “Who, When, Why?” (1961, “Children’s Literature”), which included a captivating section dedicated to planets.
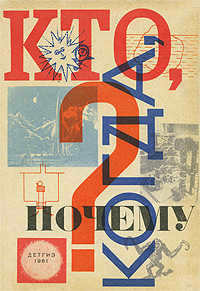
The memories of that book’s illustrations still linger in my mind, even though they were in black and white. The artist portrayed the Universe in a whimsical manner, featuring a bearded deity constructing the world with the assistance of celestial beings. I ponder if this book has endured the test of time. I must inquire my father, as I yearn to peruse its pages. However, for some inexplicable reason, the school’s astronomy curriculum failed to captivate my interest.
Dear friends, kindly share your thoughts in the comments. Do you find pleasure in gazing at the night sky? Have you ever peered through a telescope? If so, what captivating sights did you behold? Or perchance, have you been fortunate enough to witness a rare celestial phenomenon? Do share!
We had an amazing experience observing the Moon’s craters with the Levenhuk Strike 80 NG Telescope! Read our review and see the stunning pictures! (9 comments)
As a child, I had a similar book about Yuri Gagarin, and I believe it is still on a shelf in my parent’s house. Thank you for sharing this article. Although we don’t have many books about space yet, my son already knows more than me about it. It’s funny, but true! I feel like I am discovering many things for the first time. Thank you for this enlightening article!
It’s amazing how kids excel in certain subjects. Besides space, my children are fascinated with dinosaurs. They read books and watch popular science movies about them. They can even name different species, something I struggle with.
Exploring space with a telescope is a wonderful hobby for the whole family. It brings out the magic in being a kid. We can’t wait to share more incredible pictures with you!
Leave a comment Cancel your response
Hello there!

Currently in discussion

VK