There is a debate among astronomers about whether a refractor or a reflector is the superior telescope. This question has been a topic of discussion for as long as both of these systems have existed. Each type of telescope has its own supporters who can list numerous advantages of “their” design, as well as drawbacks of the opposing design.
Refractor vs Reflector: Which Telescope is Superior?
Throughout history, there has been a prevailing belief that the “true” telescope is the refractor, the traditional lens-based design. But why is this the case when, in many aspects, the refractor is just as capable as, and sometimes even surpasses, the reflector? Perhaps it is because the refractor predates the reflector, or maybe because it closely resembles the telescopes of old that were once renowned and widely used. It could also be due to the fact that manufacturers have historically focused on producing refractors, while reflectors were often crafted by artisans, making them somewhat of an anomaly in the telescope community.
Times have changed though, and now both refractors and reflectors of exceptional quality are readily available for purchase. This begs the question – which type of telescope reigns supreme?
It should be noted that a lot depends on the specific observation plans. Personal preferences can also play a significant role. However, let’s approach the question more seriously and consider which is better suited for a refractor and which is better suited for a reflector.
Advantages of a Refractor
A refractor, by design, is a lenticular system, which brings both advantages and disadvantages. Some of the advantages include:
- The refractor tube is closed on both ends – the lens and the eyepiece. This means that no dust, moisture, or other debris can enter, resulting in minimal maintenance for the tube. Additionally, a closed tube eliminates air currents that can distort the image.
- The refractor design is more durable, and the centering of the lens and eyepiece does not deteriorate over time. This makes it convenient for travel.
- The refractor lens is a lens that is always ready for use. Simply take out the telescope, set it up, and you’re good to go – it only takes a few minutes.
- The refractor lens does not require any maintenance over time, except for cleaning. The glass retains its properties over time, so even after several years, the refractor will provide the same quality image as a new one.
- Unlike other telescopes, the refractor lens does not have any additional components in the light path that can cause diffraction distortions and reduce image brightness.
- The refractor lens is extremely user-friendly, making it a perfect choice for beginners. There are even models designed for curious children.
These are the main advantages of refractors, often highlighted by supporters of this telescope design. However, there are also some downsides to consider.
Drawbacks of the refractor telescope
The refractor telescope has certain disadvantages that can significantly impact the selection process.
- Due to the refraction of light, chromatic aberration occurs, resulting in a colored border around observed objects. To address this issue, complex and more expensive multi-lens designs are utilized.
- Even the slightest imperfections in the glass or inconsistencies in its structure can lead to a noticeable decrease in image quality.
- When light passes through the lens, the violet and ultraviolet portions of the spectrum are absorbed by the glass, especially if the lens is larger and thicker.
- In a refractor telescope, light loss occurs not only during its passage through multiple lenses but also due to reflection on their surfaces.
- An 80-90 mm refractor is already a significant instrument, and larger diameters necessitate a fixed location.
Here are some of the primary drawbacks of refractor telescopes.
Benefits of a refractor
Reflectors have garnered the affection of numerous amateur astronomers for a reason. And there are reasons for that:
- The refractor completely lacks the primary drawback of the refractor – chromatic aberration, resulting in a clear and sharp image without any color artifacts.
- Defects in the mirror glass are inconsequential – light is reflected, not refracted. Mirrors can even be made of metal.
- There is no absorption of the ultraviolet and violet portion of the spectrum in the reflector.
- A reflector can have an extremely large relative aperture – 1:3, which is simply unachievable for a refractor.
- A reflector can be compact even with a fairly large mirror diameter.
- Compared to a refractor with similar characteristics, a reflector is much more affordable.
- It is possible to make a powerful reflector on your own!
Nevertheless, reflectors also come with their disadvantages, and there are quite a few of them as well.
The main drawbacks of reflectors are as follows:
- Reflectors require more careful handling and periodic alignment.
- The reflective coating on the mirror fades over time and needs to be renewed.
- The mirror is susceptible to temperature deformations that distort the image.
- The open tube design of the Newton reflector and similar systems does not protect the optics from dust, and it can create thermal air currents that can significantly damage the image.
- Due to the presence of a secondary mirror in the light path, some of the light is lost, although this is not significant with a sufficiently large main mirror diameter.
- Reflectors are more fragile and delicate devices, making it difficult and undesirable to take them on trips.
The first two disadvantages can be considered the most significant.
So which telescope is superior?
When it comes to deciding between a refractor or a reflector telescope, the answer is not straightforward. It depends on various factors. For instance, if you are a beginner looking to explore the wonders of the night sky, observe popular celestial objects, and have little to no experience with telescopes, a refractor would be the better choice. This type of telescope is user-friendly, low-maintenance, and provides a multitude of fascinating views.
The same can be said for curious children. A refractor telescope can serve as an excellent and undemanding tool for them.
Experienced stargazers are aware that a refractor with the same lens diameter will offer a greater viewing experience.
The refractor is also beneficial for frequent travelers. For instance, numerous seasoned amateur astronomers possess a refractor in their collection as a portable instrument for observing comets, eclipses, and other phenomena during their journeys. It is also advantageous for urban dwellers who have the opportunity to periodically venture outside the city, where the night sky is significantly more abundant in celestial wonders.
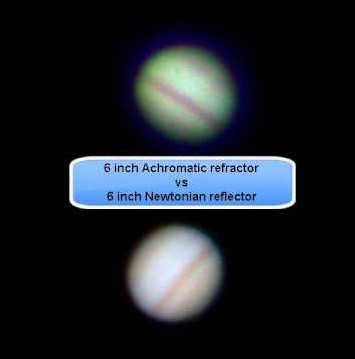
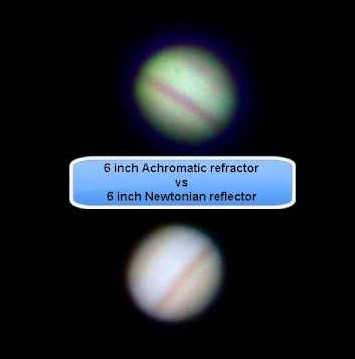
Photograph of Jupiter taken with a refractor telescope (above) and a reflector telescope (below)
For amateur astronomers who already have experience with handling telescopes of various designs, a reflector telescope is a recommended choice. Typically, experienced amateur astronomers who own a refractor telescope also eventually acquire a reflector telescope for more powerful observations and astrophotography. A reflector telescope produces exceptionally clear images, especially of faintly luminous objects. For instance, a reflector telescope with a 150-mm aperture is compact enough to be used on a balcony, whereas a refractor telescope of similar power requires a separate room and a complex, heavy mount.
Also, a lot depends on the intended objects for observation. If there is no specific purpose, you have the freedom to choose any design, considering the pros and cons. However, if your interest lies in faintly luminous objects such as nebulae, galaxies, stars, or planetary details, then it is advisable to focus on a reflector. A reflector collects significantly more light compared to a similar refractor, making it much more suitable for observing faint objects and producing brighter and better photographs.
For beginners and those who frequently travel, a refractor is the preferred choice. A refractor is better suited for detailed observations and astrophotography due to its greater power and luminosity.
What factors should you consider when selecting a refractor telescope? If you are pondering over this inquiry, it is likely that you possess prior knowledge regarding the three main types of telescopes: reflectors (mirrors), refractors (lenses), and catadioptrics (mirror-lens). A refractor telescope is a type of optical instrument wherein the objective lens is composed of multiple lenses (two, three, or even five!). At present, refractor telescopes are the most widely utilized optical devices in the production of amateur-level telescopes and telescopes.
In the category of telescopes, the refractor telescope stands out.
There are several advantages of the refractor telescope:
- The lenticular lens is always ready to use and maintains its optical properties over time. Unlike reflective systems that can develop clouding on the reflecting layer. Although, it should be noted that modern mirrors are coated with a reliable protective coating and can function effectively for many years.
- The adjustment of a refractor telescope is rarely needed, especially for most amateur models. They typically do not require any adjustment throughout their entire lifespan.
- A refractor telescope does not have any additional surfaces between the objective and eyepiece, meaning there is no central shielding or stretching that can result in light loss (although this is relative).
- Furthermore, the absence of intermediate parts prevents additional diffraction distortions in the telescope.
- The tube of this type of telescope is typically tightly sealed, preventing dust and, most importantly, air currents from affecting the image quality.
- In other words, the main advantage of a refractor telescope is its ease of use, making it an excellent choice for beginners or for those who simply want to observe the Moon without any additional adjustments. You can simply take it out, set it up, and start observing almost immediately. Refractors are also highly portable and can be easily transported.
Drawbacks of a refractor (or its distinctive features):
- Less accurate color rendering (due to residual chromatic aberration) and potential loss of fine contrast details on planets. This issue can be resolved by using special types of glass or designing the lens with three or more lenses – these are known as apochromats, ED-refractors, etc. However, the price of such telescopes significantly increases! Alternatively, in the case of a classical achromat, the focal length of the lens can be increased. The industry produces a wide range of classical duplets with ratios ranging from f/5 to f/11, which are the most commonly purchased. In any case, chromatism will be noticeable in these models, and even telescopes with f/10 noticeably distort the color of objects.
- The necessity of utilizing a hood to protect against dew (condensation) on the primary lens, which also increases the overall size of the tube. Additionally, the hood effectively addresses the issue of unwanted illumination.
- Although a refractor lacks central shielding, there is light loss. The lenses themselves absorb light, and the larger the lens diameter, the greater the absorption. Light is also lost due to reflections from the lenses. However, the situation is improved by the utilization of specialized glass and luminescent coatings. Almost all mass-produced refractor telescopes today feature multi-layered luminescent optical elements. On the other hand, budget models might lack optimal internal blackening and an unblackened focuser, among other features.
- The cost of a refractor telescope is higher when compared to a Newton reflector with a smaller aperture. It is important to note that an 80-90mm refractor can have the same price as a 114-130mm refractor.
Therefore, when considering a refractor telescope, how do you make a choice and is it worth considering for someone interested in astronomy?
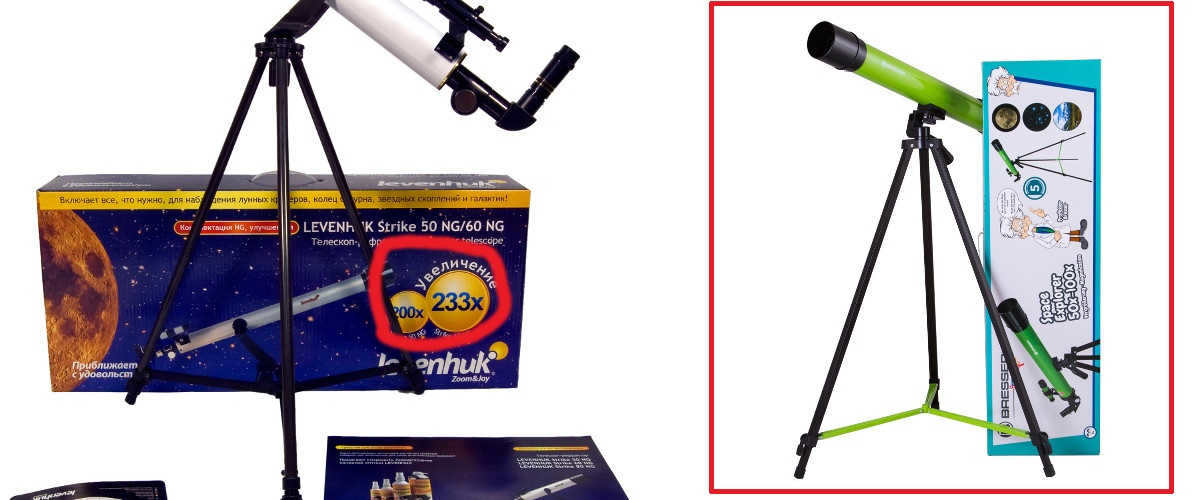
- Avoid, if possible, selecting models with plastic (acrylic) lenses packaged in bright and colorful packaging. These optical devices for children, despite often having a higher price tag, can discourage interest in observing or simply result in wasted money. Typically, such devices end up becoming yet another toy in the room, rarely used for their intended purpose. The price range for such devices is between 2,000 and 6,000 rubles. However, within this price range, there are good models available, such as the Meade Infinity 50 mm with fully glass optics, which costs just over 4,000 rubles. Take caution when making your selection.
- Opt for a telescope that comes with a stable mount. This factor holds more significance than the telescope’s equipment. Eyepieces can always be purchased separately if the telescope has a standard mounting diameter, but the mount itself cannot be changed. The mount determines the extent to which the image will be affected by vibrations and shakes during observations. On unstable mounts, even the slightest touch to the eyepiece can cause the image to wobble.
Telescopes that have questionable performance.
Once more, a brief history and clear benefits for beginners
Lens telescopes are an excellent choice for novice amateur astronomers, particularly children. The refractor design ensures that the telescope has a closed tube, which is advantageous because it prevents excessive accumulation of dust and dirt, unlike Newton telescopes. Additionally, lens telescopes have a rapid thermostabilization process, allowing users to quickly begin observing after taking it outside. In contrast, mirror-lens instruments can take hours to stabilize. Another major advantage of lens telescopes is their user-friendly nature, as they are easy to operate and require minimal maintenance. This makes them especially suitable for beginners and children. Lastly, lens telescopes provide a direct, albeit mirrored, image, and can also be equipped with a separate wraparound prism for a completely straight classical image, similar to a traditional telescope.
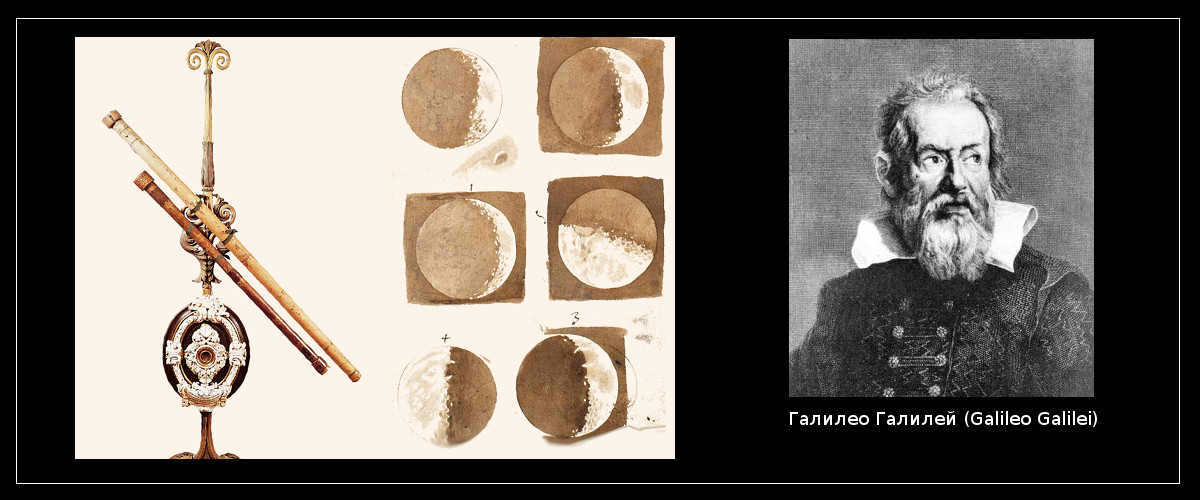
Galileo Galilei, an Italian astronomer and physicist, used lenticular telescopes in the 17th century. His telescopes had lens diameters ranging from 37 to 58 mm. However, he had to significantly diaphragm these lenses to improve the quality of the images. This was necessary because the lenses at that time were made of a single lens with strong aberrations. Despite this limitation, Galileo Galilei made impressive discoveries using his refractors. In comparison to the modern lenticular telescopes available today, those first telescopes used by Galileo Galilei are no match in terms of picture quality.
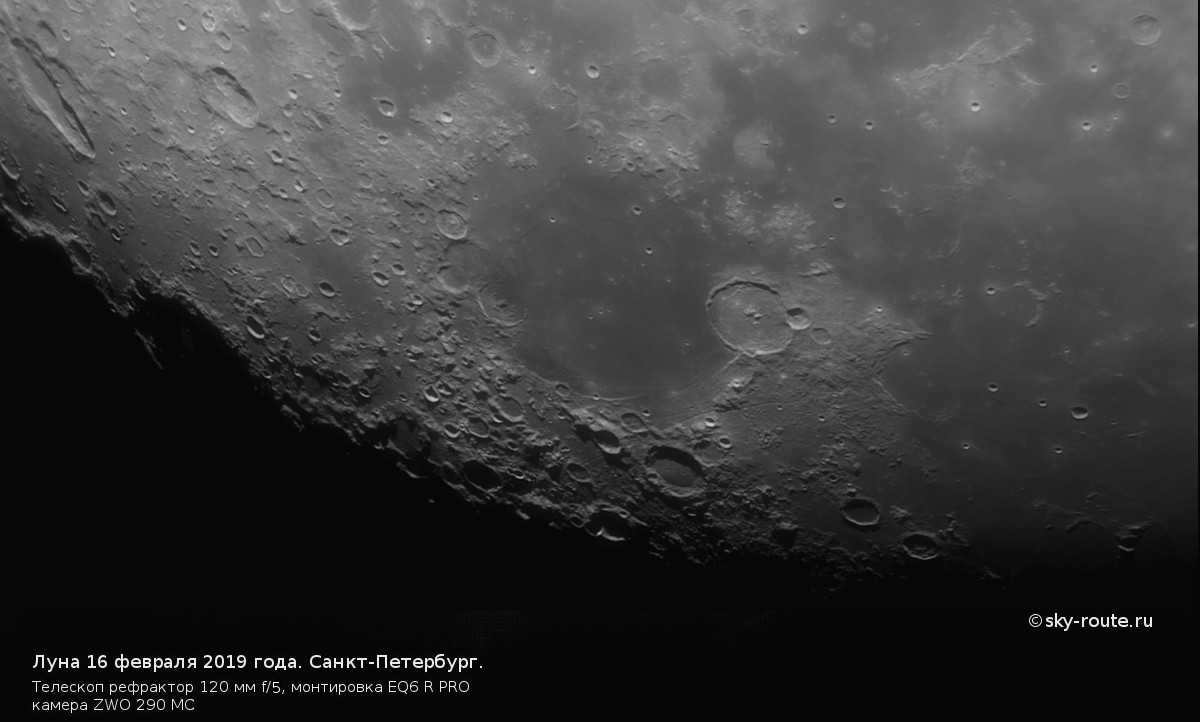
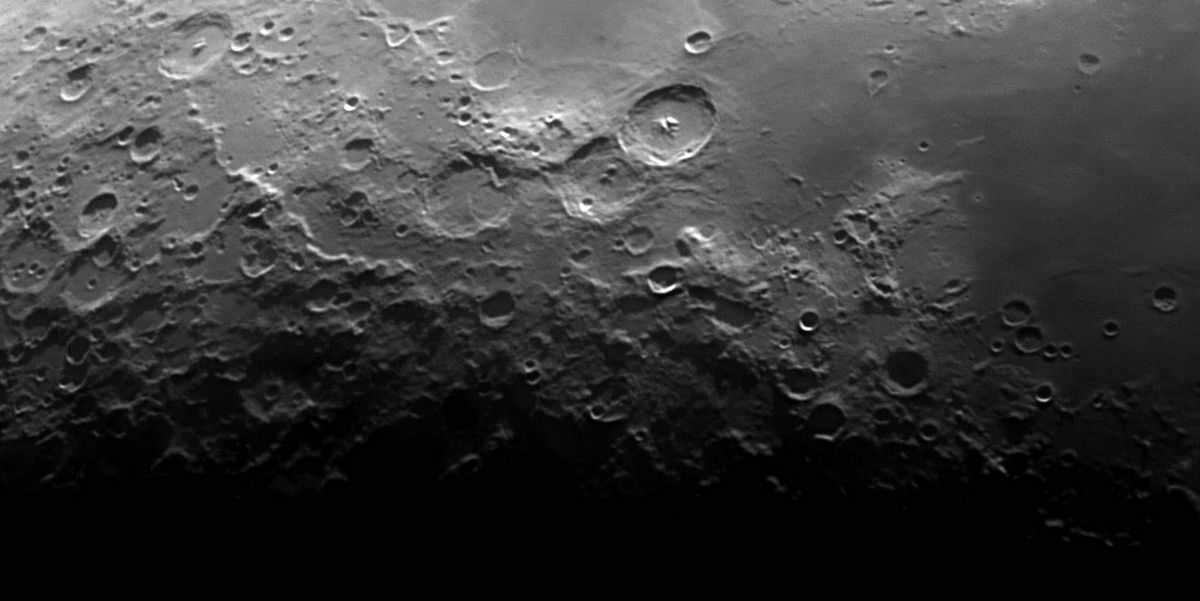
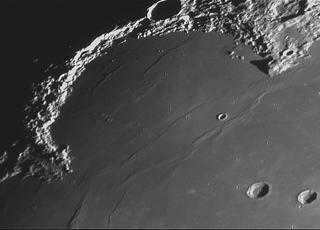
The Sea of Humidity and the Gassendi crater can be observed using a refractor telescope equipped with a 120 mm achromatic lens. This telescope has a focal length of 600 mm (f/5).
In addition, there is no need to adjust the lens or align it with the optical axis, which is a rare procedure, usually seen in professional models. For beginners in amateur astronomy, most entry-level refractor telescopes offer decent image quality, despite some residual chromatic aberration. While this aberration may be present, it does not render the telescope unusable or of poor quality. You may not even notice it, such as a slight bluish tint on the edge of the Moon’s disk, for example.
What is the description of refractor telescopes?
Traditional refractor telescopes with two lenses
A refractor telescope is typically a two-lens refractor (also known as a classical scheme) that is constructed using two types of glass – flinglass and kronglass. This design is commonly found in entry-level and mid-range telescopes. However, it is important to note that these telescopes may exhibit residual chromatic aberration in both visual and photographic observations. To minimize this aberration, it is recommended to use a larger focal length, although this will result in a larger tube size. The majority of mass-produced refractor telescopes have a relative aperture of 1:10, which is expressed as the lens diameter to focal length ratio (D/f), or as the aperture value – f/10. For example, if the lens diameter is 90 mm and the focal length is 900 mm, the resulting relative aperture is 1:10 or f/10. Despite the potential chromatic aberration, such a telescope is still suitable for most amateur observations and serves as an excellent first optical instrument.
Refractors with wide apertures and achromatic lenses. Manufacturers produce refractor telescopes with fast light transmission, such as f/5 or f/6, with lens diameters ranging from 70 mm to 120 mm. These telescopes have been a subject of controversy due to their noticeable chromatic aberration. However, they also offer unique advantages that can outweigh the disadvantages when it comes to selecting a telescope. So, if you’re still unsure about which refractor telescope to choose, it might be worth considering short-focus telescopes as well. Who knows, it might be exactly what you need?
We acknowledge that some of you may have consulted “telescope blacklists” on other websites during your search for information. However, there is a possibility that despite all that, you might still choose to purchase such a device.
- Light-aperture refractors are excellent for visual observation of star fields, bright Deep-Sky, especially if the aperture is between 100-120 mm.
- They offer a wide field of view, which is beneficial for observing extended objects and exploring the sky.
- These telescopes are compact and perfect for travel, balcony use, and urban settings.
- Their closed tube and compact design ensure stability and minimize the impact of air currents.
- They can be quickly set up and are easy to transport and carry.
- These telescopes are also great for earth observations.
Other notable features include:
- However, it’s important to note that these telescopes may still distort colors, especially at higher magnifications.
- Consider carefully if you truly require a telescope of this price range!
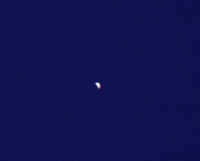
Take a look at this demonstration, showcasing our 120 mm refractor with a focal length of 600 mm:
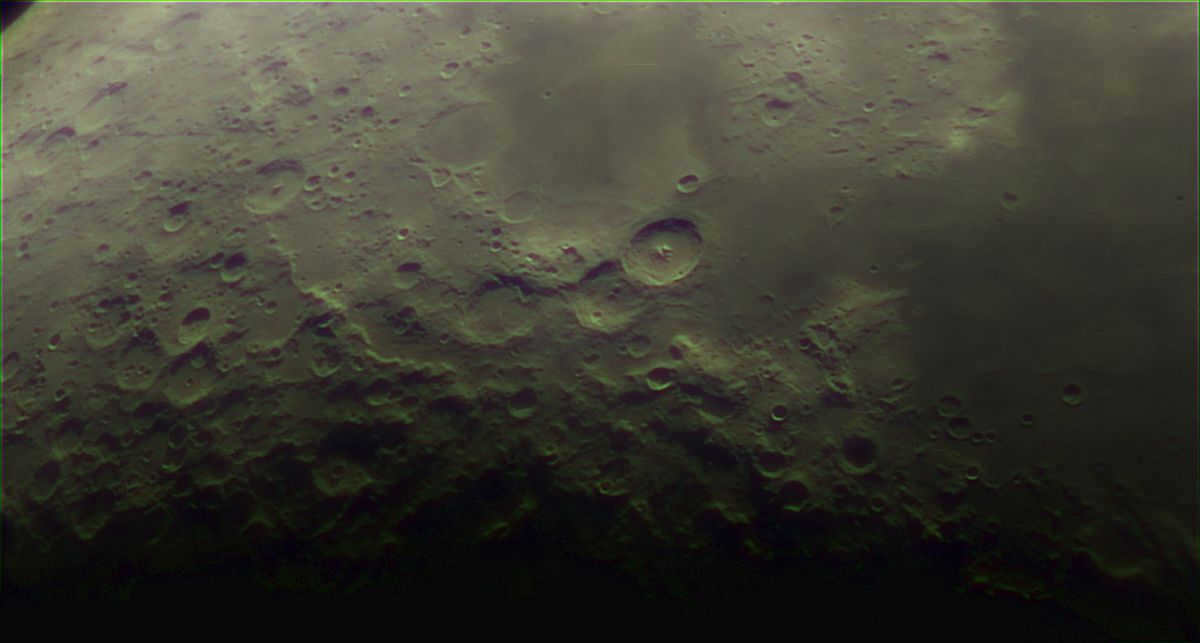

The picture provides a clear view of the moon’s color, which is not actually present. This phenomenon is caused by chromatic aberration affecting the quality of the image.
After applying basic adjustments in a photo editing software, here is the modified picture of the Moon. This photo was captured from a balcony in an urban setting.
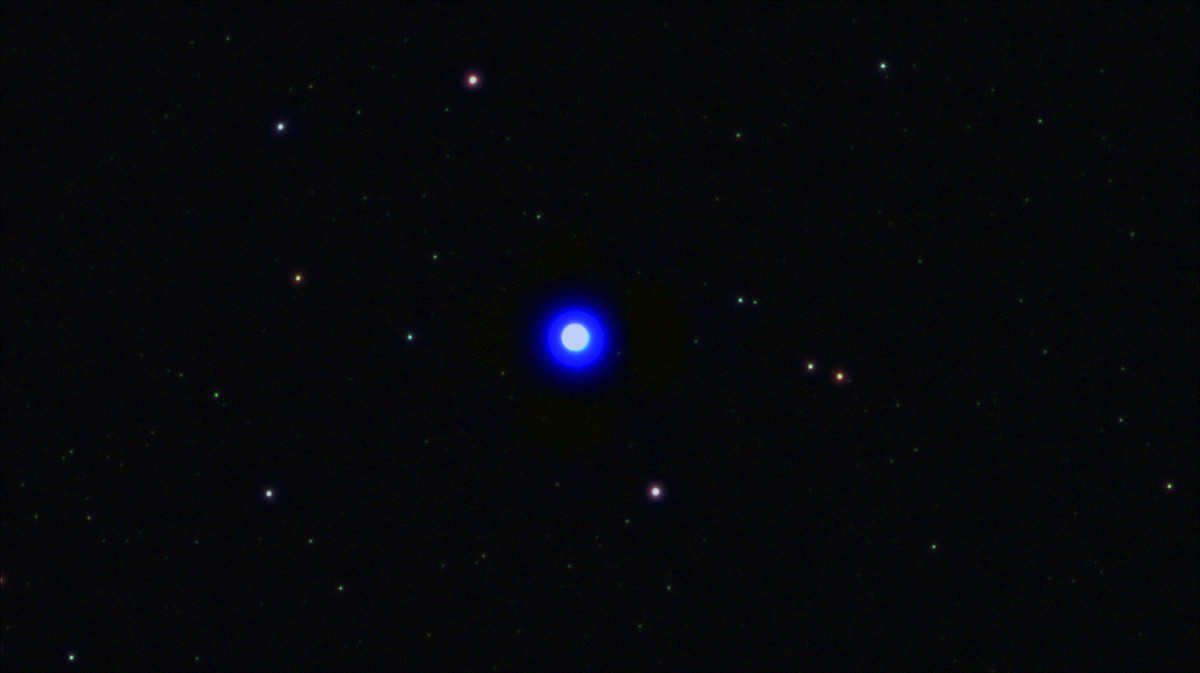
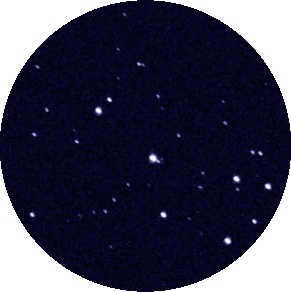
Here is another example, showcasing a portion of the starry sky through the same 120 mm refractor. The central bright star is surrounded by a vivid blue halo, while the fainter stars exhibit a greenish hue. These pseudo-colors highlight the celestial objects, with the central star, Betelgeuse, traditionally appearing as a bright red-orange.
When it comes to refractor telescopes, our team has conducted extensive research to help you save time. Based on their quality and usability, we have curated a list of the finest refractor telescopes available. With such a vast array of options on the market, we have narrowed down the selection to the top telescopes that align with your needs and budget.
Guidelines for Selecting a Refractor Telescope
When it comes to selecting the perfect refractor telescope for your specific requirements, there are two key factors to consider: aperture and focal ratio.
The aperture plays a crucial role in determining the distance and sharpness of the image, whereas the focal ratio dictates the extent of the universe that will be visible through your telescope.
Aperture
Aperture plays a crucial role in the performance of telescopes as it determines the diameter of the main lens or mirror.
- When it comes to observing distant objects, the aperture size becomes increasingly important. The larger the object’s distance, the larger the aperture required for optimal observation. For clear and detailed views of deep space objects, a minimum aperture of approximately 140mm is recommended.
- Nevertheless, objects can still be observed with good quality using apertures ranging from 80mm to 120mm, with 120mm generally being regarded as the ideal choice for most amateur astronomers.
- It is worth noting that a higher aperture size translates to an improved viewing experience.
Focal Ratio
The focal ratio is calculated by dividing the focal length, which is the distance that light travels from the front of the telescope to the back, by the diameter of the front lens or mirror, known as the objective (represented as F / D, where F is the focal length and D is the aperture).
- The focal ratio also influences the physical length of the telescope. Generally, if you wish to observe individual objects like planets or stars, a longer focal ratio of f / 10 or higher is required.
- On the other hand, if you want to observe larger objects such as star clusters or galaxies, a lower focal ratio for a wider field of view is needed, usually f / 7 or less.
Magnification
Magnification refers to the extent to which the visible image is enlarged compared to what is seen with the unaided eye. The magnification values can range from 10x to 300x depending on the telescope.
- To determine the magnification, you need to divide the focal length of the telescope by the focal length of the eyepiece.
- For instance, if your telescope has a focal length of 1000mm and you are using a 25mm eyepiece, the magnification would be 1000mm ÷ 25 = 40.
Another simple way to calculate the magnification, especially for those who are not technically inclined, is to multiply the aperture size of the telescope in inches by 50. For example, a 6-inch telescope can achieve a magnification of 300x, while an 8-inch refractor telescope can achieve a magnification of 400x.
For those who are just starting out, an excellent quality telescope will provide a magnification range of 20x to 60x, which is perfect for obtaining clear and precise images. The greater the magnification, the more intricate details you will be able to observe. However, be cautious as excessively high magnification can cause image distortion.
It is worth noting that many of the telescopes we have evaluated are equipped with two different eyepieces. For instance, you may find a 10mm and a 20mm eyepiece included. This allows you to select varying magnifications for viewing objects with the same telescope. To view the entire Moon, a magnification of approximately 50x would be suitable. However, if you desire to observe the specific details of craters, you will need to increase the magnification to around 150x.
A comprehensive overview of refractor telescopes
In order to provide you with the most accurate and up-to-date information, we reached out to astronomers who are experts in the field. Our team contacted the manufacturers of each telescope and inquired about the unique features and specifications of their respective models. Using this valuable insight, we have carefully selected our top 5 refractor telescopes and compiled a detailed review that aims to simplify your purchasing process.
This refractor telescope is highly regarded in the market due to its inclusion of ED SCHOTT glass. This special glass allows for ultra-high resolution and a wider aperture, resulting in a brighter and superior image quality. This gives it an advantage over the typical optical lenses found in many other telescopes available for purchase.
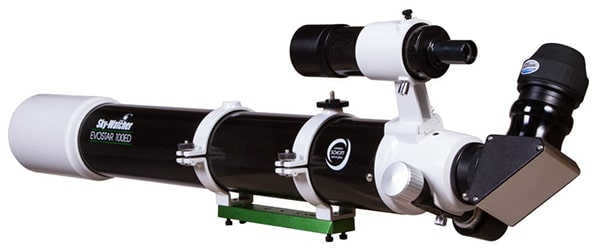
Specifications:
- Aperture: 100mm
- Focal length: 900 mm
- Focal ratio: f / 9
- Weight: 11.9 kg
- Focuser: two-speed Crayford type
- Warranty: 2 years
- Additional features: ED Schott glass, 8 × 50 RA viewfinder, two 1.25-inch diameter eyepieces for 180 and 45x magnification
The refractor telescope is accompanied by a durable aluminum carrying case, ensuring safe transportation between locations. This instrument is of considerable size and requires separate purchase of a traditional stand.
Designed for optimal visual and photographic performance, this unique instrument excels in observing bright planetary objects.
With the ED SCHOTT, the image is incredibly clear, making it ten times superior to an achromatic refractor.
An achromatic refractor tends to have a pink tint on bright objects due to its bias towards blue.
For those interested in deep space exploration, the Orion AstroView 120ST is the ultimate choice.
Featuring a wide field of view, the Orion AstroView 120ST offers unparalleled clarity and resolution when observing deep space objects.
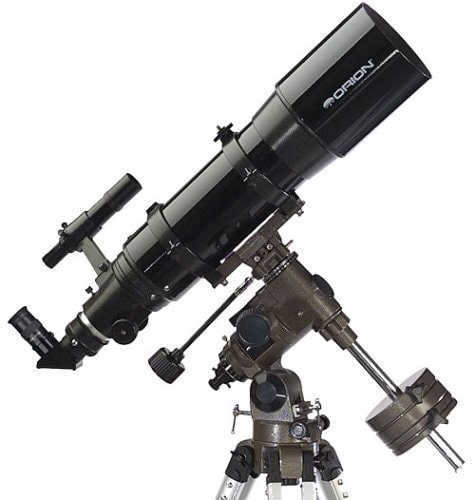
The telescope has an aperture of 120 mm, a focal length of 600 mm, and a focal ratio of f/5. It weighs 16.5 kg and is equipped with a 2 inch rack and pinion focuser. The telescope comes with a 1 year warranty and has additional features including two Sirius Plossl 1.25″ eyepieces with 24x and 60x magnification, a 6 × 30 finder, Starry Night astronomy software, and an adjustable tripod.
The AstroView is equipped with a pair of 1.25-inch Sirius Plossl eyepieces, which deliver sharp images and offer the flexibility to capture broader views or focus more precisely on specific celestial objects. One of the standout features of this product is its AstroView EQ mount, which features three sturdy legs and a slow motion control for smooth scanning of the night sky. The included polar axis scope ensures quick and accurate polar alignment.
For comfortable observing, the AstroView includes a 1.25-inch 90-degree mirrored star diagonal, which provides a convenient viewing angle and produces bright images.
Despite being a compact telescope with a wide field of view, the AstroView still offers impressive magnification for observing the Moon and planets.
You’ve read an article about things to observe in the sky, observed them yourself, shared them with your friends, and developed an interest in the subject. The next logical step is to purchase a telescope and explore the same wonders with a well-equipped eye. However, this task is not as straightforward as it may appear, as the selection process depends on various factors. Therefore, a blog post discussing different optical designs of telescopes and mounts would be beneficial.
Essential Disincentives and Considerations for Observation
To avoid regretting the money spent, it is important to begin with a slightly demotivating introduction.
The Human Element
- Budget. The cost of additional accessories can be equal to or even exceed the cost of the telescope itself. Keep this in mind when setting budget constraints for the model’s price.
- Observation Location. Where do you plan to observe? In the city from your balcony, at your country house, out of town, in the countryside, in the middle of nowhere, or even abroad?
- Storage and Transportation. Where and how do you plan to store the telescope? How will you transport it to the observation location from the previous point? How often will you need to transport it, and how will you pack it? What mode of transportation will you use?
- What are the specific objects you desire to observe?
- What is your preferred observing method? Will you visually observe or engage in astrophotography? Will you observe alone or with family/friends/other enthusiasts?
- Reach out to acquaintances to inquire if anyone possesses a telescope.
- Check if there are any astronomy clubs in your area (on social media or astronomy forums).
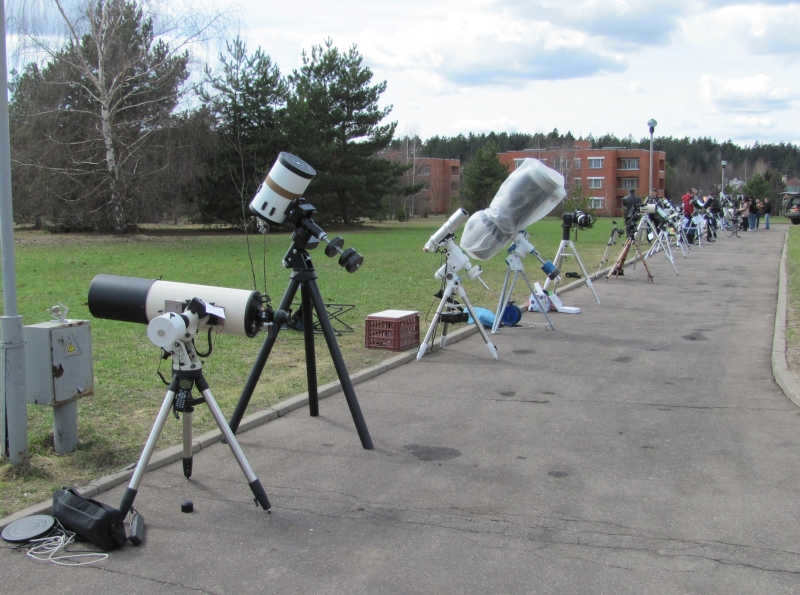
- Attend a sidewalk astronomy event, which are organized by planetariums and telescope retailers.
Man has been surpassed by technology
Furthermore, it’s important not to get too excited when looking at pictures of nebulae taken by the Hubble telescope, as you won’t be able to see them with the naked eye. Unfortunately, our eyes are not capable of capturing photons like a film or camera sensor, and our ability to see colors in low light conditions is limited. Consequently, what you see in person, in most cases (although there are exceptions!), will appear less impressive than what you see in internet photos. Therefore, I have compiled a brief list featuring illustrations of what various objects will actually look like through a telescope. The list is arranged according to the level of difficulty in observing each object and the subjective beauty they possess.
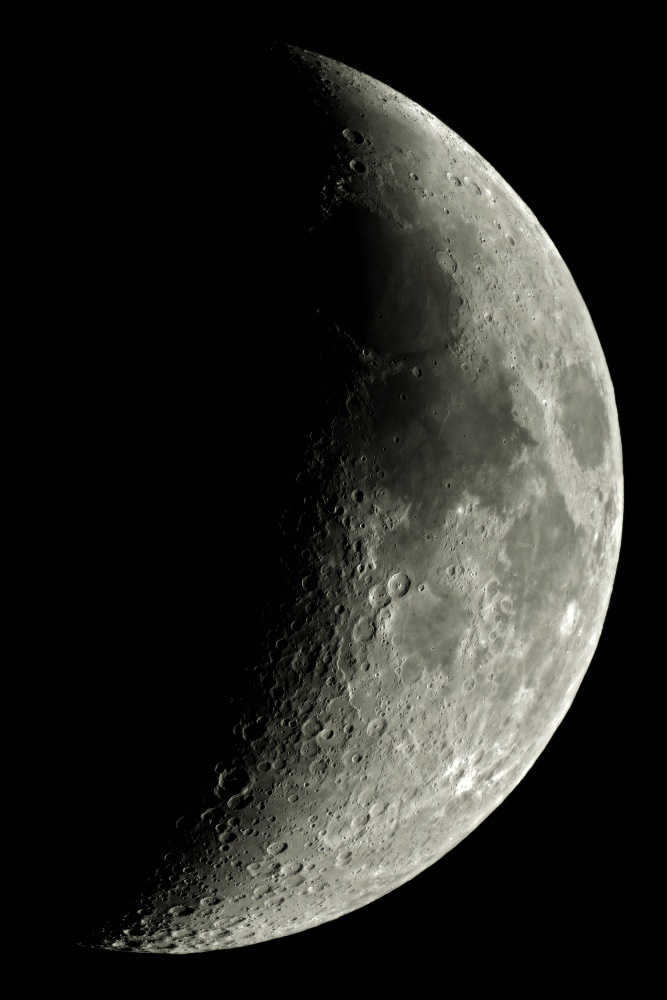
The Moon is an object that is visually stunning, especially when observed through a telescope. Its brightness, clarity, size, and beauty are enhanced when viewed with the naked eye. The optimal time to observe the Moon is during the first and last quarter, when approximately half of its surface is visible. During this phase, the boundary between light and shadow, known as the terminator line, reveals the intricate relief of the Moon’s surface, including craters of varying depths and vast seas. The Moon is a captivating celestial body that never fails to amaze, as it undergoes changes on a daily basis. It is a constant source of fascination and never ceases to captivate. I had the pleasure of capturing a photo of the Moon during a session with the Tver Astroclub, and I made slight edits to ensure it accurately portrays its mesmerizing appearance.
When utilizing increased magnification, one is able to observe distinct and captivating features of the scenery, such as the breathtaking Rainbow Bay:
Planets
Planets are the second most easily observable objects. They follow a predictable schedule, making the viewing experience anything but boring. However, unfortunately, they are not as visible through amateur telescopes compared to astrophotos or images taken from observatories, the Hubble telescope, or interplanetary vehicles.
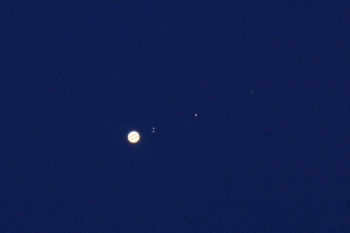
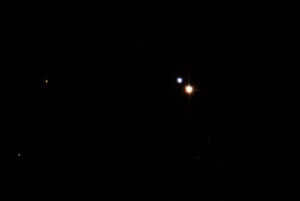
Jupiter is a massive, luminous, and stunning planet. When observed through a telescope, it reveals two bands on its surface and the four Galilean satellites, which were the first celestial objects spotted using Galileo’s inaugural telescope. These satellites, namely Io, Europa, Ganymede, and Callisto, orbit around the planet’s disk, creating luminous dots that occasionally align in captivating patterns such as triangles or broken lines. When viewed through the telescope’s eyepiece, the scene appears as follows:
Upon careful observation, one can discern the presence of two stripes on the planet’s surface. I have added them to this photograph, as the human eye possesses a superior dynamic range compared to a simple amateur astrophoto.
Saturn is known for its exceptional beauty, with its most distinctive feature being its magnificent rings. When observed through a telescope, it may appear as if it has been artfully drawn, but its sight is undeniably stunning. However, in a small amateur telescope, the Cassini division, a prominent gap in Saturn’s rings, may not always be visible. In my two years of observing Saturn, I have only seen it once, and even then, I cannot be completely certain.
Venus. An extremely radiant star in the morning or evening sky when observed through a telescope appears uniformly white, however, it possesses a distinctive characteristic – it exhibits visible phases.
Mars. Mars is currently situated in the state of frustration. When observed through a small amateur telescope, one can only ascertain that it appears red:
Mercury and Uranus are located far out in the realm of disappointment. If one is genuinely interested, it is possible to locate them, though there is not much to observe.
Multiples of stars
When looking through a telescope, one can observe the various colors of stars. The sight of a double star with multiple colors is truly breathtaking. Among the most brilliant examples are Albireo in the constellation of Cygnus, also known as the Swan, and the star system known as Carl’s Heart in Canes Venatici, or the Hound Dogs.
For enhanced color perception, you may want to slightly adjust the focus of the telescope when observing Albireo.
Dispersed clusters
Dispersed clusters are the second category of celestial objects that are more awe-inspiring in person than in photographs. The first time I observed Hi/Ash Perseus through a telescope, a friend of mine likened it to the finale of “A Space Odyssey” – “My God, it’s full of stars!”
The Pleiades. The naked eye may not be able to perceive the blue nebulae captured in high-quality astrophotos, but the blue tint of the stars will still be noticeable. The Pleiades are so expansive that they can only be fully encompassed in low magnification eyepieces.
Hee/Ash Perseus
Two stunning clusters spread out next to each other, creating a mesmerizing sight:

No, it’s still preferable to witness in real life
Globular clusters
Things are more melancholic in this realm. When viewed through a novice’s telescope, globular clusters manifest as nebulous blots, however, if one is fortunate enough with the atmospheric conditions, they can still discern that these clusters are comprised of thousands or even millions of individual stars.
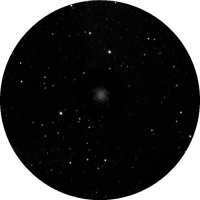
The immense Hercules cluster.
Galaxies
It’s a rather gloomy situation over here. Due to the characteristics of the human eye, galaxies appear primarily in black and white, secondly, they are barely discernible, and thirdly, one must venture far beyond urban areas to catch a glimpse of them.
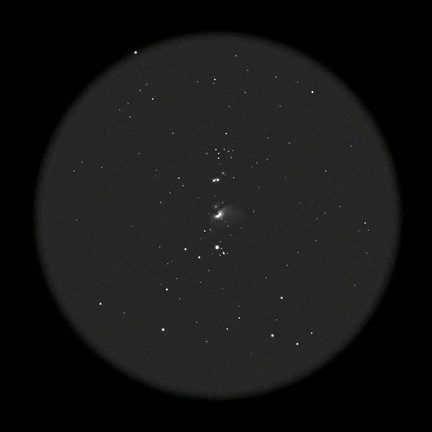

The Orion Nebula
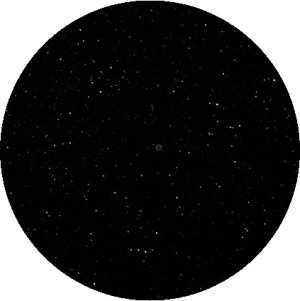
M57. The Ring Nebula in Lyra.
And do not claim that there is nothing visible here.
The star
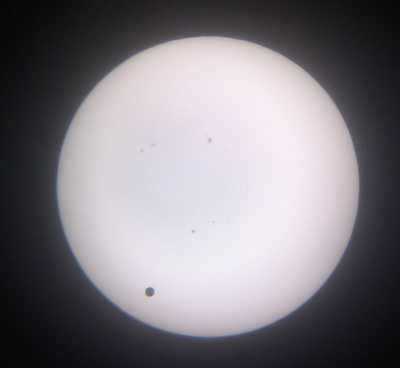
By purchasing a specialized filter, it is possible to observe the Sun. In a regular filter, one can observe sunspots and the granulation, which resembles a reticulated surface.
During the transit of Venus across the Sun’s disk in 2012, sunspots were visible at the top.
CAUTION: Without a specialized filter, it is extremely dangerous to aim a telescope at the Sun. Doing so can cause the mounted eyepieces to melt or even explode, and can permanently blind the eye when attempting to look through the eyepiece. The use of smoked glass, aluminum foil, or any other substitutes in place of a specialized solar filter is strictly prohibited!
Alternative
If you’re fortunate and skillful, you may catch a glimpse of aircraft soaring overhead, the International Space Station (its distinct four rows of solar panels are easily identifiable), Chinese lanterns, and more.
Additionally, it’s worth noting the inclusion of the “Eyepieces” plugin in Stellarium. By inputting the specifications of your telescope and eyepiece, Stellarium will display the apparent size of the object when viewed through the eyepiece.
Issues
In order to have a meaningful discussion about telescopes, it is crucial to comprehend the essence of telescopes and the pros and cons associated with them.
Glossary
Aperture – The size of the main mirror in a telescope. Put simply, a larger aperture means a better view. The maximum practical magnification for a telescope is twice the aperture size. In reality, telescopes are rarely used at magnifications higher than 150-200, so there’s no need to chase after extreme magnification. Additionally, the atmosphere is usually not stable enough to fully take advantage of telescopes with apertures larger than 300mm.
Focal length – The distance at which a telescope creates an image of an object that is infinitely far away. Knowing the focal length is important for calculating the magnification of eyepieces: magnification is equal to the focal length of the telescope divided by the focal length of the eyepiece. For example, a telescope with a focal length of 900mm and a 10mm eyepiece will have a magnification of 900/10=90x. It’s worth noting that telescopes with shorter focal lengths require eyepieces with shorter focal lengths in order to achieve high magnifications. For instance, a telescope with a 114mm aperture and a focal length of 500mm would require a 2.5mm eyepiece for its maximum magnification. However, such eyepieces tend to be expensive and uncomfortable for observing.
Relative aperture – The ratio of the aperture to the focal length. This is an important parameter for astrophotography and can be roughly compared to the aperture of a camera. For visual observations, it’s worth noting that telescopes with a relative aperture smaller than 1/6 may produce distortion at the edge of the eyepiece’s field of view.
Thermal stabilization – A telescope that has a different temperature than its surroundings can cause additional image distortion. The shorter the thermal stabilization time, the better. Unfortunately, some telescopes have a relatively long thermal stabilization time, and this time tends to increase with the size of the telescope.
Alignment – The process of aligning the optical axes of the telescope’s components. Depending on the design, this alignment may be done at the factory and last for the entire lifetime of the telescope, or it may need to be regularly adjusted by the user.
The Refractor, also known as the lenticular telescope, is the oldest type of telescope and is still widely used today. There are two types of modern refractors – achromats and apochromats. Achromats correct most image distortions, but still have some issues with chromatic aberration, resulting in colored edges in the observed objects. Apochromats, on the other hand, correct chromatic aberration as well but are more expensive.
Advantages:
- Requires minimal maintenance as the factory alignment is preserved for years and the tube is closed off from dust and moisture.
- Thermal stabilization is very fast.
- The aperture works fully with no elements blocking part of it in the tube, resulting in greater image contrast.
Disadvantages:
- Achromats are prone to chromatic aberration, while apochromats are more expensive.
- Creating large lenses for telescopes is both challenging and costly, which is why apertures larger than 150mm are rarely found.
- Having a long tube can be seen as a disadvantage.
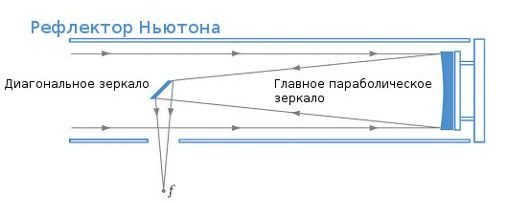
Reflector, also known as a mirror telescope, was developed by Newton as a solution to the issues faced by refracting telescopes at that time. Despite the existence of other mirror designs, the Newtonian design remains highly popular today.
Advantages:
- No aberrations, resulting in excellent image quality.
- Relatively inexpensive per millimeter of aperture – as the aperture size increases, reflectors become even more cost-effective compared to other designs.
- Short thermal stabilization time, although this increases with the size of the telescope.
Disadvantages:
- The secondary mirror and its holders “consume” some of the aperture. The supports cause characteristic “rays” to appear around stars in astrophotographs.
- Unseal the tube. As time passes, dust accumulates on the mirror.
- Alignment required. The reflector may become misaligned during transportation and will require realignment. Luckily, with practice, this can be done in a matter of minutes.

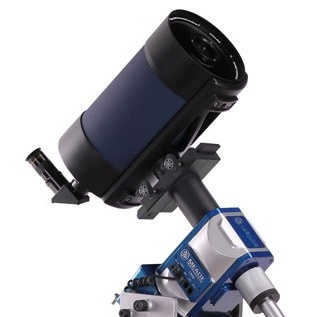
Catadioptric telescopes, also known as mirror-lens telescopes, were introduced in the 20th century. In addition to the well-known names of Galileo and Newton, the telescope designs of the Russian astronomer Maksutov, who invented one of the popular mirror-lens telescope designs – the Maksutov-Kassegren scheme, have also become immortalized.
Advantages:
- Compact size, making them the shortest telescopes.
- Enclosed tube design protects the mirror from dust.
- No aberrations in the image.
Disadvantages:
- Less contrast in the image due to center shielding area, as the aperture does not fully function.
- The most expensive per millimeter of aperture.
- Long thermal stabilization time.
Mounts
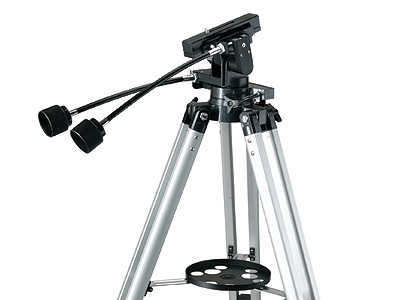
The mount serves as the connector between the telescope and the tripod. It determines the level of comfort during observation, the weight to be carried, and the stability of the telescope while observing.
Mounts can be categorized into two types: alt-azimuthal and equatorial.
The alt-azimuthal mount is equipped with two axes: azimuth and elevation, which explains its name. It doesn’t take into account the fact that the Earth’s axis of rotation is tilted in relation to the horizon.
Advantages:
- Simple, lightweight, and able to bear a load.
- No additional preparation is required for observations.
Disadvantages:
- The object being observed must be tracked along two axes.
- The object slowly rotates in the field of view, making astrophotography more challenging.
- A brief mention should be made of the Dobson alt-azimuthal mount, which will be discussed further.
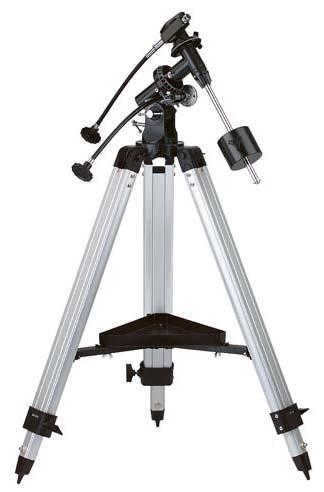

Equatorial mounts, also known as German mounts, have an additional axis that allows them to be aligned parallel to the Earth’s rotation axis.
Advantages:
- It is easy to manually track celestial objects, and even budget mounts often have provisions for attaching a simple motor to make tracking even easier.
- No issues with accessing objects at the zenith.
- The field of view remains fixed, making it ideal for astrophotography.
Disadvantages:
- Equatorial mounts are more complex and heavier, often requiring a heavy counterweight.
- Additional setup and calibration is necessary before and after observing sessions.
The mount can also be motorized or computerized.
- An equatorial mount, in its simplest form, is equipped with an analog or digital motor to track the object, with manual pointing.
- A more advanced variation includes a drive on both axes of the mount, enabling you to point the telescope at the object using a remote control (if connected to a laptop with the appropriate software) and automatically track it.
- The most sophisticated option is a computerized mount with its own database of objects, capable of autonomously pointing at and tracking objects. The most advanced mounts can also be equipped with GPS/GLONASS and a compass for fully automated observation setup.
Automation greatly simplifies life, but it’s important to keep in mind that it comes at an additional cost, which, if on a limited budget, could be allocated towards a more powerful telescope.
Preventive Measures
What mistakes can be made when selecting a telescope?
Purchasing a telescope from a hypermarket. Nowadays, there are numerous specialized stores with branches in major cities and nationwide delivery. It is not advisable to take the risk of buying a telescope from an unfamiliar manufacturer with uncertain quality.
Being too frugal. Refractors with an aperture of no more than 60 mm, reflectors of no more than 76 mm, and catadioptrics of no more than 80 mm are generally not considered serious instruments. Typically, they come with very flimsy mounts. If one is tight on budget, it would be better to save up for a decent instrument or consider using binoculars instead.
Newtonian telescopes with correctors. There are models of Newtonian reflectors equipped with a corrector in the focuser mechanism. While they are shorter than regular Newtonians, they introduce distortion.
Short-focus refractor-achromats. Similar to the previous case, image quality is compromised in exchange for size reduction. These telescopes tend to exhibit stronger chromatic aberrations.
If you have a clear understanding of what you want and what your limitations are, making a decision should not be too challenging. There are several common situations that can be considered.
Observing the city from a balcony
When it comes to observing from a balcony, the size of the telescope is a crucial factor. Hence, if you have a tight budget, it is more preferable to opt for refractors on an azimuth mount. This is because a refractor will have most of its tube sticking out, and an azimuth mount is easier to handle. On the other hand, if you have a generous budget, you might consider investing in a motorized mount with a catadioptric telescope. Regardless, it is not necessary to prioritize aperture excessively; a size of 100-150 mm is sufficient for urban settings. However, it’s worth noting that this advice is just a suggestion. Personally, I have had great success using a reflector telescope on an equatorial mount from my balcony. In my case, I wanted a larger aperture without chromatic aberration while working with a limited budget, and I had plans to purchase a drive for the mount.
Observing in rural areas
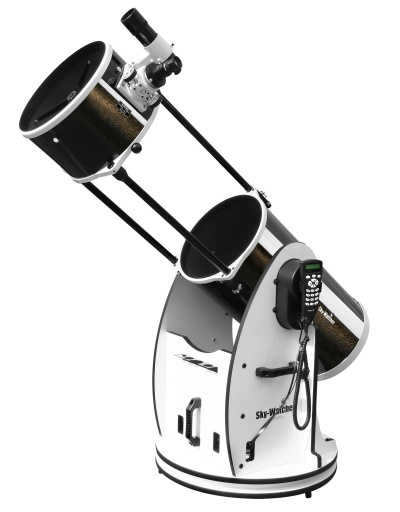
If space and transportation are not an issue, then considering a larger aperture telescope may be a good option, especially if you have the budget for it. One option for a larger aperture telescope at a reasonable price is a Newton reflector. However, keep in mind that a larger aperture telescope requires a more expensive, heavy, and complex classical mount. To address this, the Dobsonian mount was developed, which eliminates the need for a tripod and instead uses a “stool”-like mount.
It’s worth noting that some telescopes have a foldable tube, which increases their mobility. There are also non-folding models available that are cheaper.
This design allows for the production of telescopes with apertures of 400mm and above. These telescopes can be as tall as a person.
There was also a mention on Habra about the option of renting telescope time, which may be of interest to some people as an alternative. There is a website that broadcasts fascinating astronomical events, showcasing data from telescopes along with English commentary.
Astrophoto is a vast topic on its own with specific requirements, but I didn’t delve into it, so I only provided the most basic information.
I highly recommend checking out the largest Russian Astroforum, where you can find a section dedicated to telescope recommendations.
For the images in this article, I used photos from arm_ann, as well as the excellent resources RealSky and “Two Sagittarius”.
KDPW – Astrofest 2014.
P.S. I left out information about eyepieces and other accessories to keep the article from becoming too lengthy. If there is interest, I can continue with a follow-up article discussing eyepieces and my personal recommendations.
An optical telescope is designed for observing celestial objects that are far away. When translated from Greek to Russian, the word means “observing far away”.
Novice astronomers who are just starting out are often curious about how telescopes work and what types of optical instruments are available. When a beginner visits an optical store, they often ask the salesperson, “How much does this telescope magnify?” It may be surprising to some, but the question itself is incorrect.
Is it all about magnification?
There are individuals who believe that the greater the magnification of a telescope, the more impressive it is. Some argue that it brings distant objects closer to us. However, both of these viewpoints are incorrect. The primary purpose of this optical device is to gather electromagnetic radiation waves, including the visible light spectrum. It’s worth noting that electromagnetic radiation encompasses other types of waves such as radio, infrared, ultraviolet, X-ray, and more. Modern telescopes have the capability to capture all of these wavelengths.
Therefore, the fundamental function of a telescope is not the level of magnification it provides, but rather its ability to gather light. The more light the lens or mirror can gather, the sharper the desired image will be.
To achieve a high-quality image, the optical system of a telescope focuses light rays to a single point, known as the focus. If the light is not properly focused, the resulting image will be blurry.
What is the structure of telescopes?
Telescopes come in various designs, including:
- Refractors: These telescopes use only lenses and work by refracting light rays.
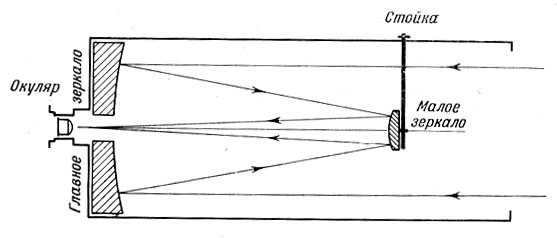
- Reflectors: These telescopes are made entirely of mirrors. The main mirror serves as the primary lens, and there is also a secondary mirror.
- Catadioptrics or mixed type: These telescopes combine both lenses and mirrors in their design.
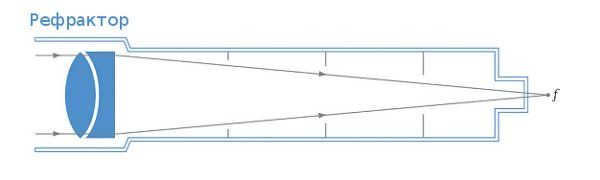
Understanding the mechanics of refractor telescopes
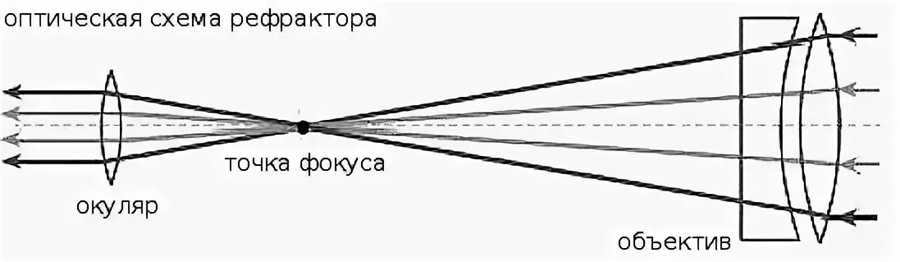

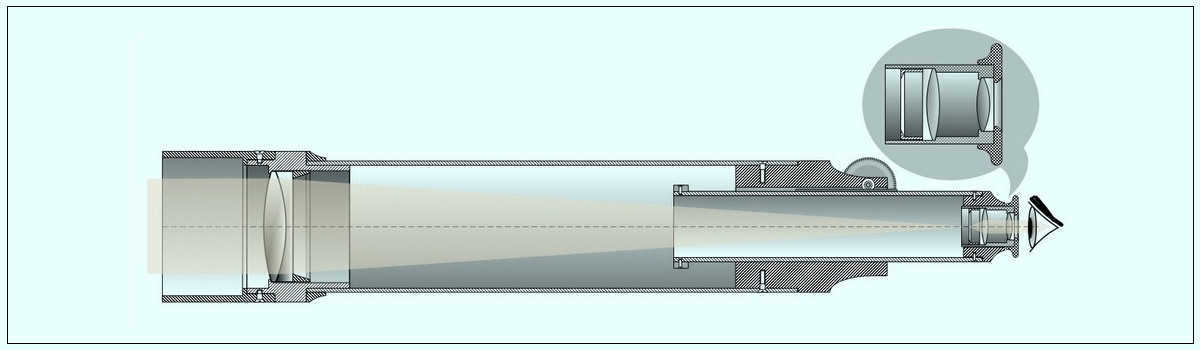
The optical configuration of a refractor telescope consists of a double-convex lens. Its primary function is to gather light rays and focus them onto a single point. By using an eyepiece, we are able to achieve magnification of the original image. In modern telescope designs, complex optical systems are employed. Relying solely on a single large lens, which is convex on both sides, would result in significant errors in the final image.
Firstly, the light rays are unable to converge precisely onto a single point. This phenomenon, known as spherical aberration, prevents us from obtaining a uniformly sharp image. When using the focusing mechanism, we can achieve sharpness in the center of the image, but the edges will appear blurry – and vice versa.
Optical experts have developed techniques to combat various types of aberrations. To achieve this, they design refractor optical systems made up of different lenses. This allows for effective correction of images, although it does require significant effort.
How refractors work
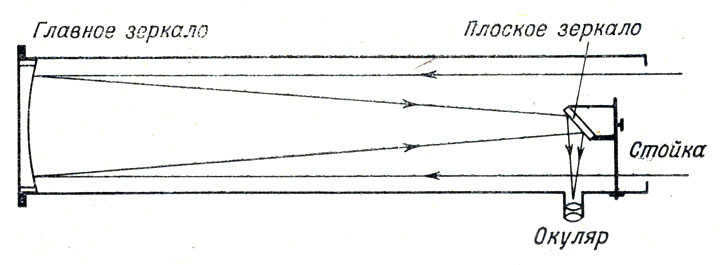
The presence of reflector telescopes in the field of astronomy is not a coincidence, as they completely eliminate chromatic aberration found in “SLRs”, and any spherical distortions can be corrected by shaping the primary mirror into a parabola. This type of mirror is known as a parabolic mirror. Additionally, the secondary mirror, which is an integral part of the telescope’s design, is responsible for redirecting the light rays reflected by the primary mirror and orienting the image correctly.
The primary mirror, which possesses the parabolic shape, possesses a unique capability to precisely converge all the light rays onto a single focal point.
Telescopes with Mirror Lenses